Connect Stripe
Save your Stripe secret key in the admin, add the webhook that delivers what people buy and make a test payment. There are no products or prices to create in Stripe.
Updated 9 Oct 2026 · written for Launch Lab 2.9.0
On this page
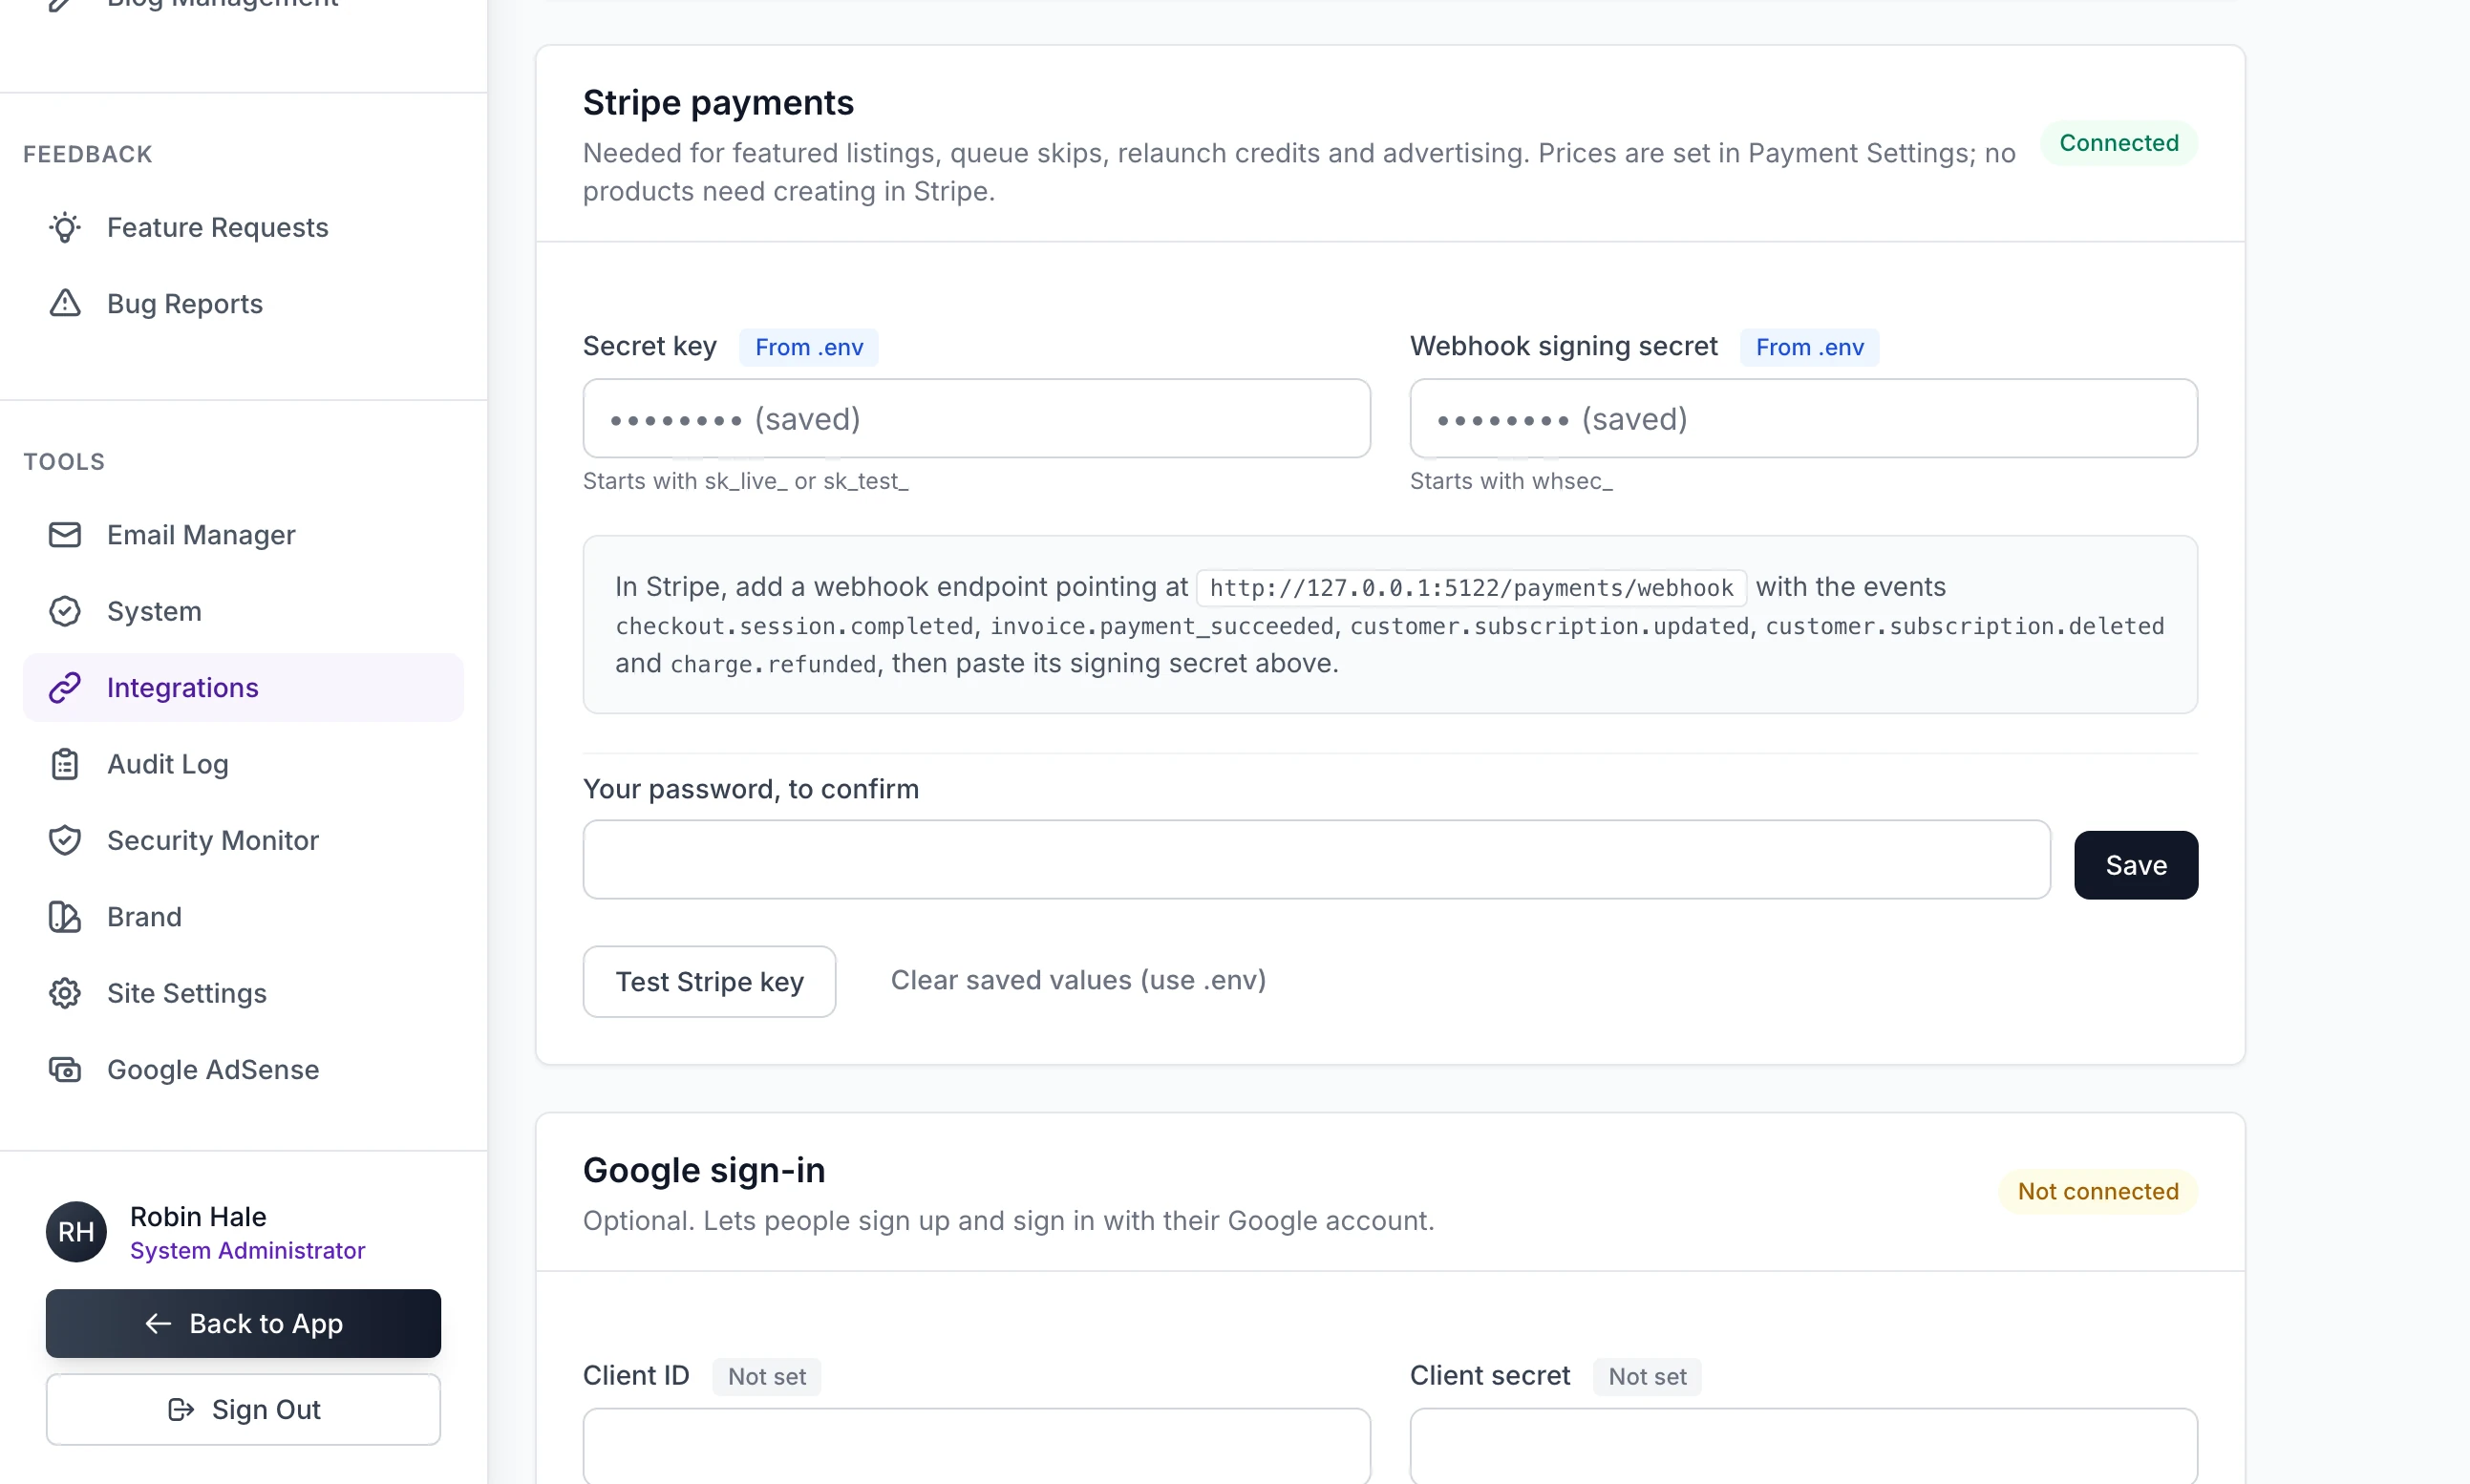
Open Integrations under Tools in the admin sidebar and scroll to the Stripe payments card. Everything Launch Lab sells is paid for through your own Stripe account: featured listings, do-follow links, paid places, relaunch credits and advertising on a weekly site, with fast-track review and bumps on a rolling one. This card is where the site and the account are joined. You do it once.
Launch Lab sends the name and the price of each purchase to Stripe at the moment of checkout. There are no products, prices or price IDs to create in Stripe and nothing to copy back. You type your prices in Payment Settings, and the amount on that page is the amount charged: see What you sell and your prices. If you have used Local Lab, the sister kit, this is the opposite of what you did there.
There is also one key, not two. Launch Lab has no use for Stripe's publishable key, because payment happens on Stripe's page and not on yours.
Your site uses its own words for a listing and for the person who launches it. This guide says "listing" and "maker".
Save your secret key#
Step 1: Copy the secret key from Stripe
Sign in to Stripe and open dashboard.stripe.com/apikeys. Copy the Secret key. It starts with
sk_test_in a sandbox, Stripe's name for a test account, and withsk_live_in a live account.Begin in a sandbox, where no money moves. Test and live covers the change to real payments.
Step 2: Paste it in
On the Stripe payments card, paste the key into Secret key. Leave Webhook signing secret empty for now.
Step 3: Type your password
At the foot of the card, type the password you sign in with into Your password, to confirm. If you joined with Google and never set a password, the box reads Type your email address to confirm. Without it nothing is saved and you see "Enter your account password to save credentials."
Step 4: Click Save
You see "Stripe payments settings saved." The badge at the top of the card changes from Not connected to Connected, and the badge beside Secret key reads Saved here. The box itself is empty again and shows "•••••••• (saved)": a saved secret is never sent back to your browser.
Step 5: Click Test Stripe key
The site asks Stripe which account the key belongs to. You see, for example, "Stripe key works: connected to Soloweek in test mode." The name is your Stripe account's name, and the mode is read from the start of the key.
A secret box you leave empty keeps the value already saved, so you can come back and add the webhook secret without typing the key again.
Test Stripe key has three other answers:
| Message | What it means |
|---|---|
| "Save a Stripe secret key first." | There is no key, here or in .env. |
| "Stripe rejected the key. Check it was copied in full and is the secret key, not the publishable one." | Stripe does not know the key. |
| "Stripe could not be reached with that key. Check the server log for the reason." | Something else went wrong, such as no connection to Stripe. The reason is in the server log. |
Only a full administrator can open this page. An admin account with read-only access is sent back to the dashboard with "Full System Administrator access required".
Where each key comes from#
Each box has a badge:
| Badge | It means |
|---|---|
| Saved here | Saved on this page. This is the one in use. |
| From .env | Not saved here, and found in your .env file as STRIPE_SECRET_KEY or STRIPE_WEBHOOK_SECRET. |
| Not set | Not in either place. |
A value saved on this page always wins over the same value in .env. A placeholder left over from an example file, such as sk_test_your-key or whsec_your-secret, counts as not set.
Saved values are stored encrypted, using the SECRET_KEY from your .env file. If you left SECRET_KEY empty, the site made one for itself in the file instance/secret_key. Change that key, or lose that file, and the saved values can no longer be read. The badges fall back to From .env or Not set and the card reads Not connected. Type the keys in again.
Clear saved values (use .env) removes both saved values at once, without asking for your password. You see "Saved Stripe payments settings removed. Values from the .env file are used if present."
What changes when Stripe is connected#
Until the card reads Connected, nothing can be bought:
Payment Settings carries the line "Nothing can be bought until Stripe is connected in Integrations."
The public Pricing page says the upgrades "are not on sale yet".
A maker's Billing page says "Paid upgrades are not on sale on Soloweek yet. Launching is free.", and the page where they choose a launch week offers free places only.
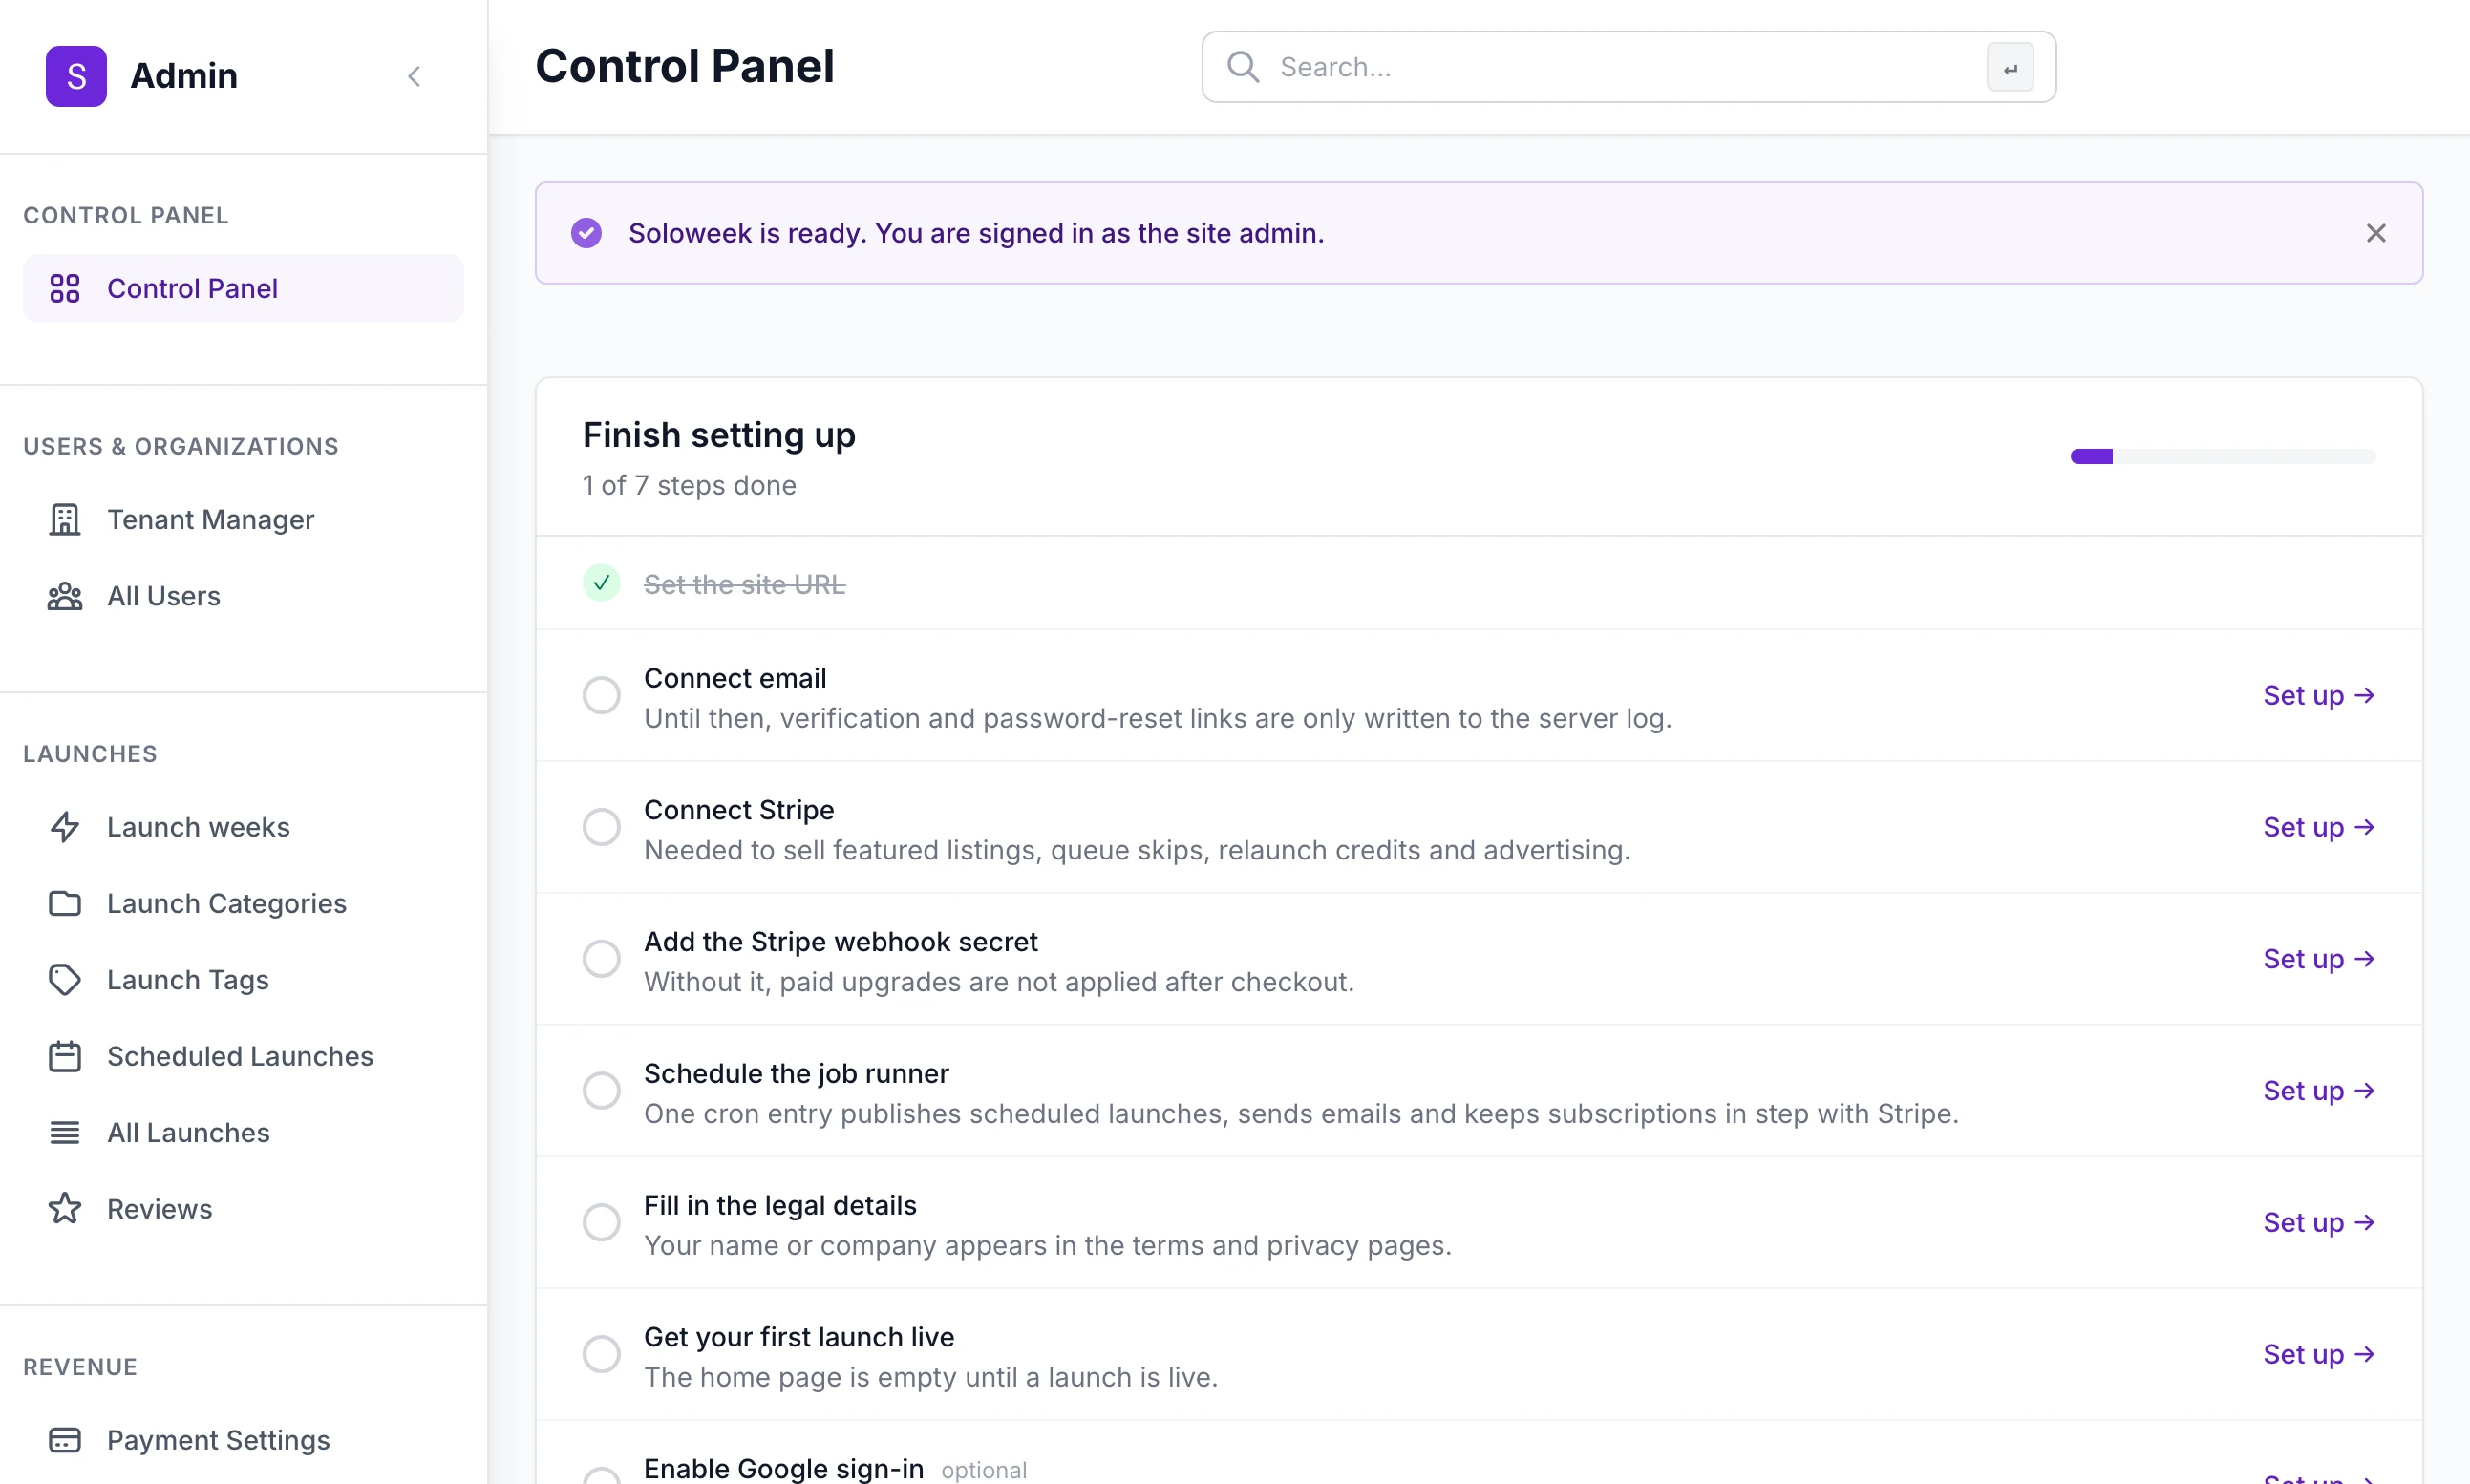
The Finish setting up list on the admin dashboard has two lines for Stripe, Connect Stripe and Add the Stripe webhook secret. Each ticks itself when the value is in place.
Add the webhook#
A webhook is a message Stripe sends your site when something happens on your account. Launch Lab depends on it more than most.
Stripe cannot reach a site on your own computer, so do this once the site is live on its domain: see Deploy to a server. To try a purchase before then, see Test it on your own computer.
Step 1: Start a new destination in Stripe
Open dashboard.stripe.com/webhooks. Stripe calls this page Event destinations. Click Add destination. The form has three parts: Select events, Choose destination type and Configure your destination.
Step 2: Choose the six events
Find and tick the six events in the table below. Any other event you send is accepted and ignored.
Step 3: Give it your site's address
Choose a webhook endpoint as the destination type and give it this address, with your own domain:
Endpoint URLhttps://your-domain.com/payments/webhookThe Stripe payments card prints the address for you, built from the site address in Site Settings.
Step 4: Save the signing secret
Stripe gives the endpoint a signing secret that starts with
whsec_. Paste it into Webhook signing secret, type your password and click Save. The badge beside the box reads Saved here.
What each event does#
| Event | What Launch Lab does |
|---|---|
checkout.session.completed | For a one-off purchase: marks the payment completed, gives the buyer what they paid for, emails them a receipt and emails you a notice. For an advert: records the subscription and puts the advert live. A repeat of the same message changes nothing. |
checkout.session.expired | An advertiser left Stripe's page without paying. Frees the advert place that was being held for them. Without this event the place frees itself 35 minutes after they went to pay. |
invoice.payment_succeeded | An advertising subscription was paid. Updates the dates it is paid up to. On a monthly renewal it also emails the advertiser a receipt. |
customer.subscription.updated | Follows the subscription's state in Stripe. If a payment has failed, the advert stops showing but keeps its place, and the advertiser is emailed. If the subscription has ended, the advert stops and the advertiser is told. |
customer.subscription.deleted | Marks the subscription cancelled. The advert stops showing and the advertiser is emailed. |
charge.refunded | When the whole payment has been refunded, marks it Refunded and emails the maker. A part refund changes nothing. It does not take back what was bought. |
What "gives the buyer what they paid for" means for each product is in What you sell and your prices.
How your site answers Stripe#
Stripe shows your site's answer beside each message it delivered.
| Answer | What it means |
|---|---|
200 | Received. Acted on, or ignored because it is not one of the six. |
503 "Stripe is not configured" | No webhook signing secret is saved. Nothing was read. |
400 "Invalid signature" | The saved secret belongs to a different destination, or to the command-line tool. |
500 "Could not apply this payment" or "Could not apply this event" | Something failed part-way. Nothing half-done is kept, and the answer tells Stripe to send the message again. |
Test it on your own computer#
On your own computer a test purchase does nothing until Stripe's messages are forwarded to it. Stripe's command-line tool does the forwarding.
Step 1: Install Stripe's tool and sign it in
Install Stripe's command-line tool, then sign it in to your sandbox:
Terminalstripe loginStep 2: Start forwarding
Leave this running in a second terminal. Change
5000if your copy runs on another port.Terminalstripe listen --events checkout.session.completed,checkout.session.expired,invoice.payment_succeeded,customer.subscription.updated,customer.subscription.deleted,charge.refunded --forward-to http://127.0.0.1:5000/payments/webhookStep 3: Save the secret it prints
The tool prints a signing secret that starts with
whsec_. Save it as the Webhook signing secret on the Stripe payments card.Step 4: Buy something
Sign in as a maker with a listing that is booked or live, open Billing and click Add under Featured listing. On Stripe's page, pay with the test card below.
Step 5: Watch the terminal
Each message is listed with your site's answer.
checkout.session.completedshould be followed by[200]. The payment is now under All Transactions in the admin. A live listing is featured, and a booked one is marked to be featured from launch day.
| Box | Type |
|---|---|
| Card number | 4242 4242 4242 4242 |
| Expiry | Any date in the future, for example 12 / 34 |
| Security code | Any three digits |
| Name and postcode | Anything |
The secret belongs to the tool. Replace it with the real destination's secret when the site goes live.
Test and live#
Launch Lab does not know a sandbox from a live account. It sends whichever secret key you saved, and Stripe decides. Three things follow:
Going live means replacing two values: the secret key and the signing secret of a new destination made in the live account. There are no prices to create again.
A voucher belongs to the Stripe account it was made in. One made against a sandbox does not exist in your live account: delete it and create it again. See Featured listings and vouchers.
A test payment is recorded under All Transactions and counted on the Sales page like a real one. Nothing marks it as a test and no screen removes it. Make your test purchases on the copy on your own computer, not on the live site.
What a maker sees#
A maker can buy in three places: on the page where they choose a launch week, from the Upgrades card on their listing's page and from Billing. The button reads Continue to payment or Add for and the price, and it takes them to Stripe.
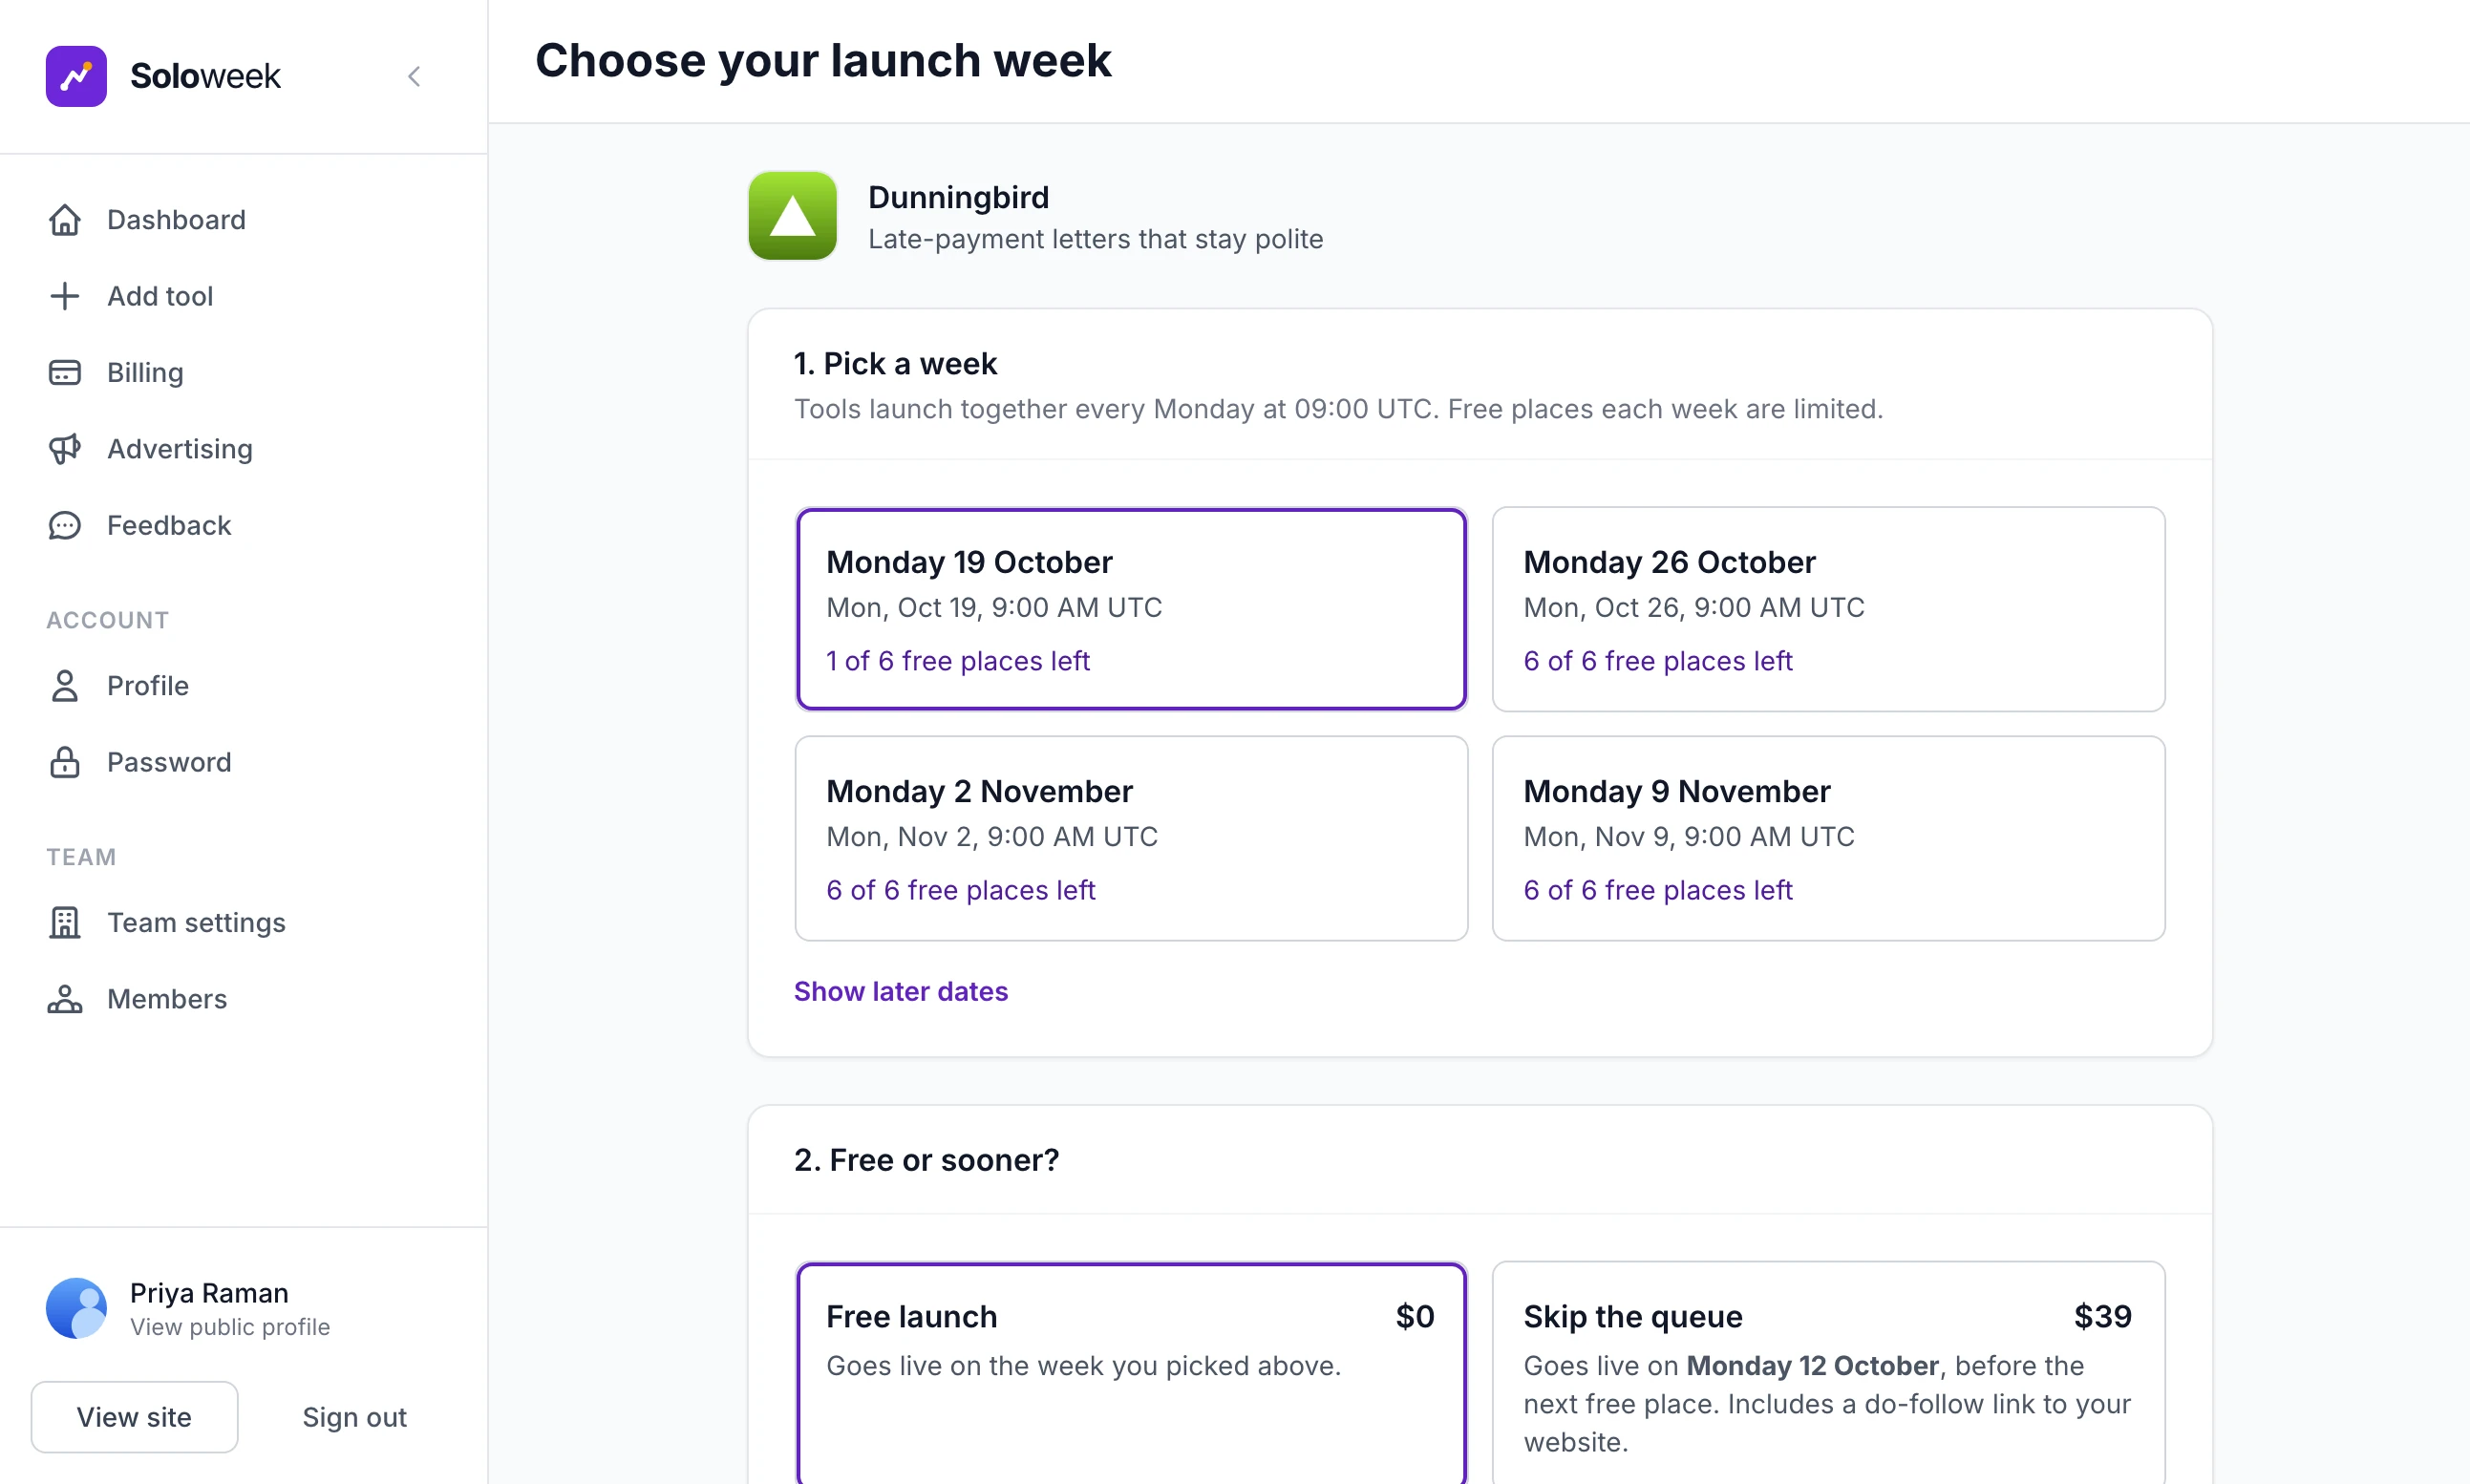
Stripe's page carries the name of your Stripe account, the product's name as Launch Lab sends it ("Featured listing", "Do-follow link", "Skip the queue", "Relaunch credits", "Fast-track review", "Bump" or "Advertising") and the price from Payment Settings in your currency. The maker's email address is filled in from their account. Two things bought together are two lines.
When they have paid they come back to your site under "Payment received. Thank you!", and a receipt headed "Thank you. Here is your receipt." is emailed to them. A maker whose listing is not live yet lands on a page headed You're booked. If Stripe's message has not arrived yet, that page is headed Confirming your payment and updates by itself when it does.
A maker who leaves Stripe's page without paying comes back to their listing with nothing changed. A launch date that was waiting on the payment is released by the daily job once it has waited 24 hours: see Backups and scheduled jobs.
Refunds#
Open All Transactions under Revenue, open the payment and click Refund payment. The whole amount goes back through Stripe, the payment is marked Refunded and you see "Payment refunded. What the customer bought (for example a featured listing) is not removed automatically." A full refund made in Stripe's own dashboard is marked the same way, by the charge.refunded event. Neither takes back what was bought: remove it yourself. In version 2.9.0 the maker is emailed about a refund only when it is made in Stripe's dashboard. The button in the admin sends no email. Sales, transactions and refunds has the steps.
One Stripe account for several sites#
Stripe sends every event on an account to every destination on it, so two sites sharing an account each receive the other's messages. One-off purchases are safe: each site matches a payment by Stripe's own reference for the checkout and ignores one it did not start.
A maker paid and nothing happened
Stripe's message did not arrive or was not accepted. Check that Webhook signing secret reads Saved here, then open the destination in Stripe and read your site's answer against the table above. If every answer is 500, the site is on a version before 2.9.0: update it. A message your site refused is sent again by Stripe, so a purchase can be applied late once the secret is right. If no destination existed when the maker paid, no message was ever sent: feature the listing by hand, or add the credits in Tenant Manager.
A maker sees "Payment processing error. Please try again."
Stripe refused to start the checkout. The secret key is wrong or has been withdrawn, or Stripe will not accept the amount in your currency. Click Test Stripe key, then check the price in Payment Settings.
A maker sees "Featured listing is not available on this site."
The product named is not on sale. Either it is switched off in Payment Settings, it belongs to the other way of launching or Stripe is not connected.
Do I need the publishable key?
No. There is no box for it, and .env has no line for it.
The card went back to Not connected by itself
The SECRET_KEY the values were encrypted with has changed, so they cannot be read. This happens when SECRET_KEY is edited in .env, or when a site that relied on instance/secret_key is moved without that file. Type the key and the signing secret in again.
Stuck on a step? Send a message.