What a maker sees
The whole of a maker's path, from signing up to relaunching, so that you can answer their questions without guessing what is on their screen.
Updated 9 Oct 2026 · written for Launch Lab 2.9.0
On this page
A maker never sees the admin. Everything they do is in their own area at /dashboard: add a listing, choose when it goes live, watch its numbers and buy extras.
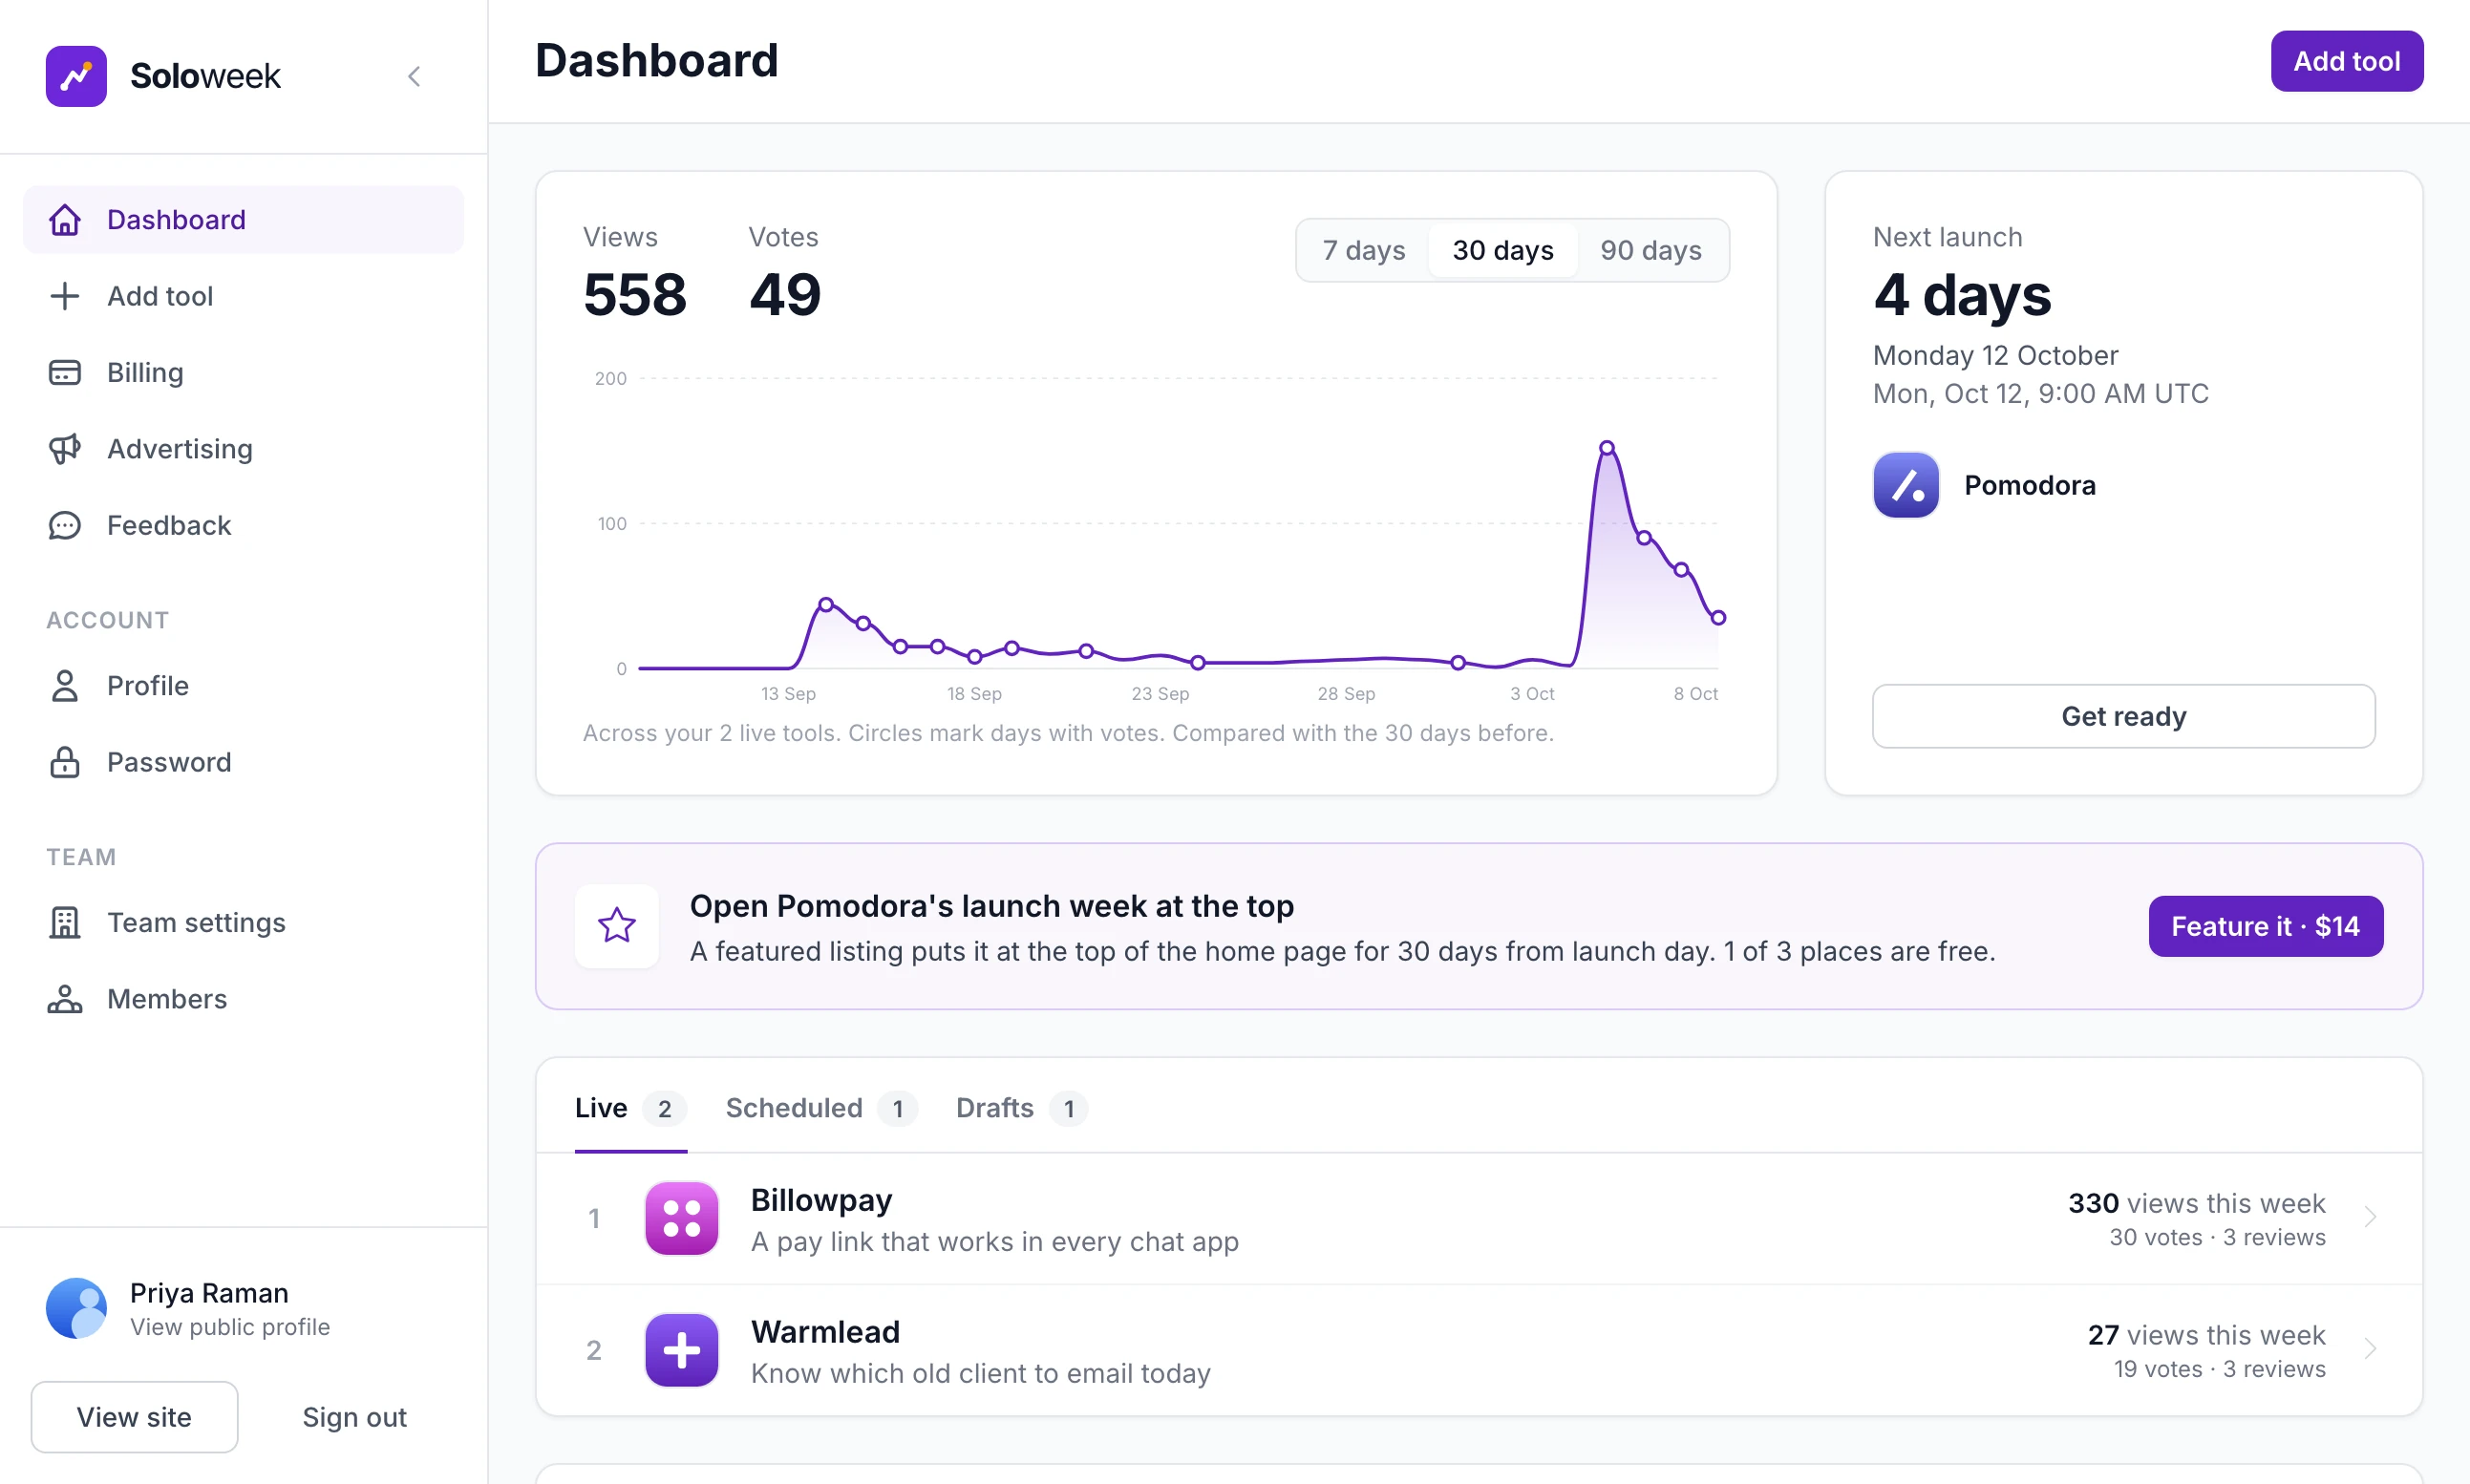
Your site has its own words for a listing and for the person who launches it. These guides say "listing" and "maker", and the pictures show a site that says "tool".
From sign-up to a booked launch#
Step 1: Create an account
Add your tool on the home page leads to Create your account: First name, Last name, Email, a Password of at least 10 characters and a tick box for the terms and privacy policy. With Google sign-in connected there is a Sign up with Google button as well.
Step 2: Basics
The listing editor has four steps, listed across the top. The first asks for the name, a Tagline, a Category, your site's tags if it has any (up to 5) and a Website. A panel headed How it will look shows the listing as it will appear in the list, changing as they type.
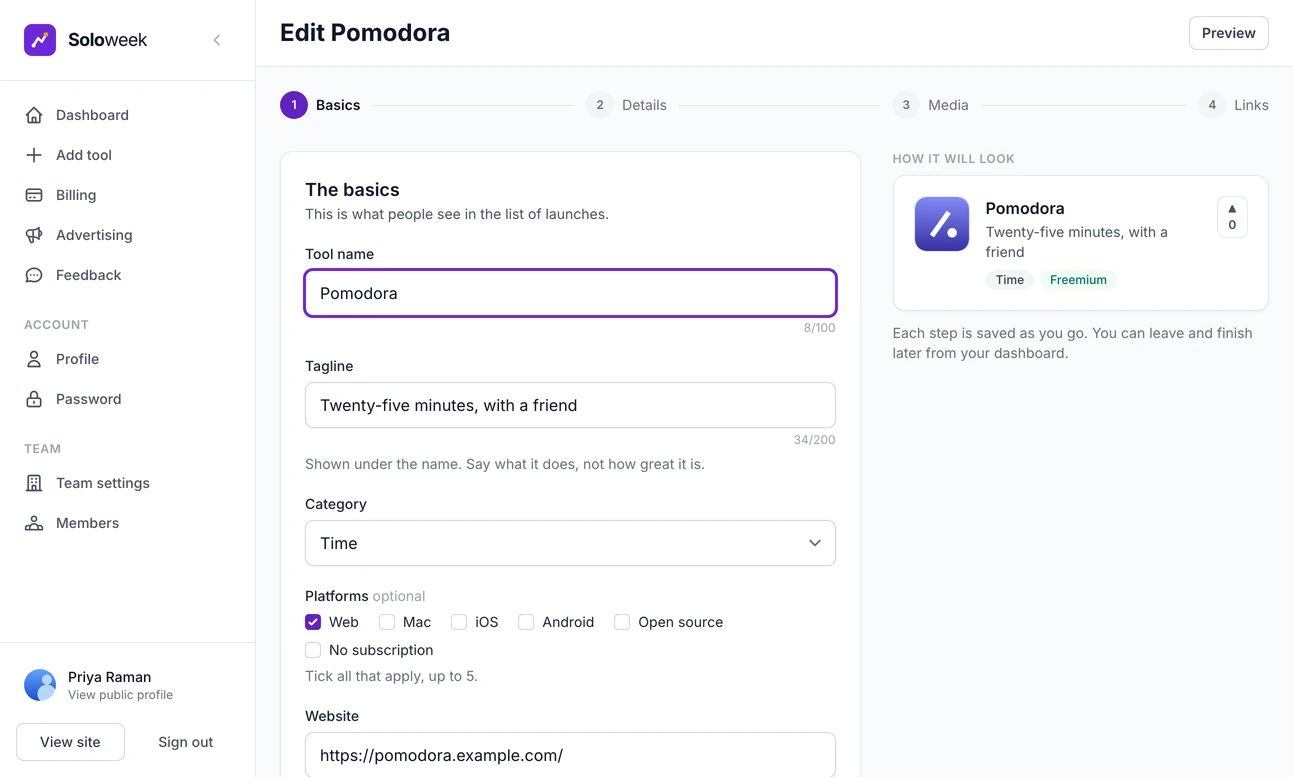
The listing editor has four steps, with a live preview beside each. Step 3: Details
A Description of at least 30 characters, a Pricing choice (Free, Freemium, Paid, Subscription or One-time) and up to 6 Key features. The last two are optional.
Step 4: Media
A Logo, up to 6 Images and a YouTube Video link, all optional. Without a logo the listing gets a coloured tile with its first letter.
Step 5: Links
Eight optional addresses: X (Twitter), LinkedIn, Instagram, Facebook, YouTube, TikTok, Discord and GitHub.
Step 6: Choose when it goes live
On a weekly site the last button reads Save and choose a launch date and opens the week picker. On a rolling site it opens Review and publish.
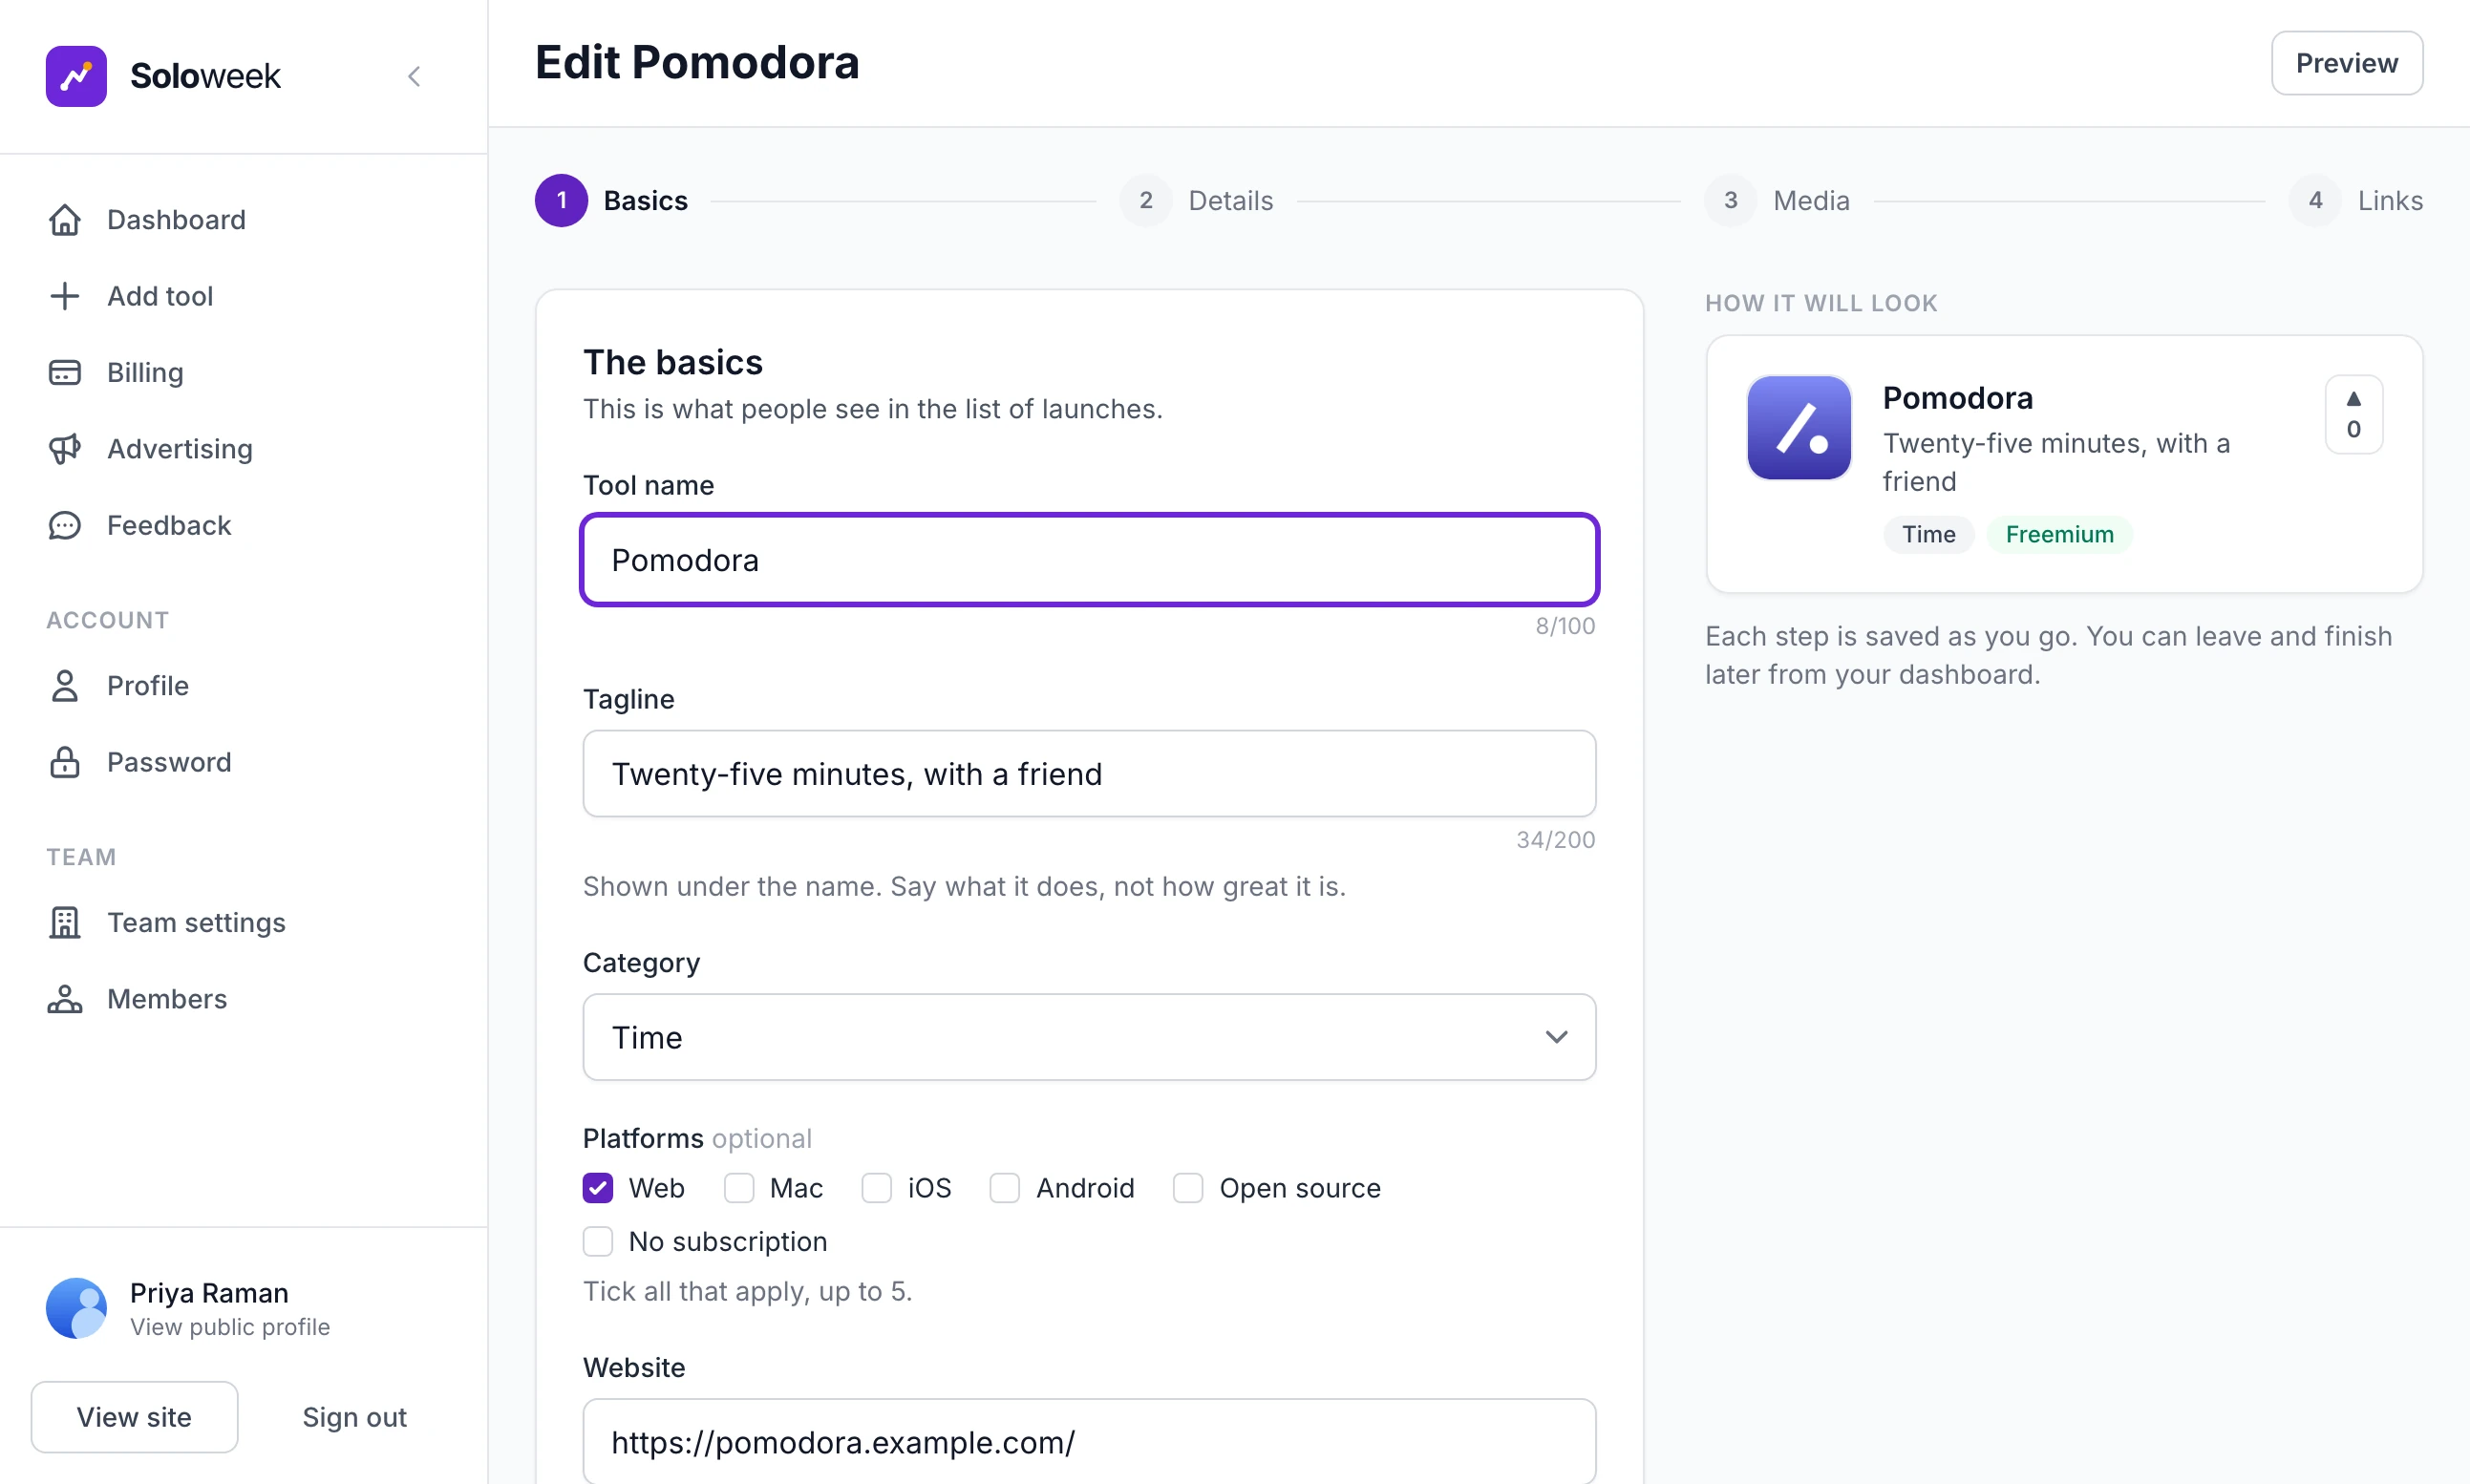
Each step is saved when the maker moves on, so a half-finished listing is kept as a draft. A live listing can be edited at any time and the changes show at once. Its web address follows its name only until it first goes live.
Signing up, with and without an email server#
What happens after Create account depends on whether an email server is connected under Integrations.
| Email server connected | No email server | |
|---|---|---|
| After the form | A Check your inbox page. The account cannot sign in yet | Signed in at once and taken to the editor |
| Message | "We sent a link to" and their address | "Welcome to Soloweek! Add your first tool to get started." |
| To finish | They click the link, which works for three days. It signs them in and opens the editor | Nothing |
Send the link again on the Check your inbox page sends a new one. Either way the new account starts with the relaunch credits set in Free credits for a new account on Payment Settings. With an email server connected you are emailed about each new sign-up. Email and the emails the site sends covers connecting a server.
Picking a week#
On a weekly site the maker lands on Choose your launch week.
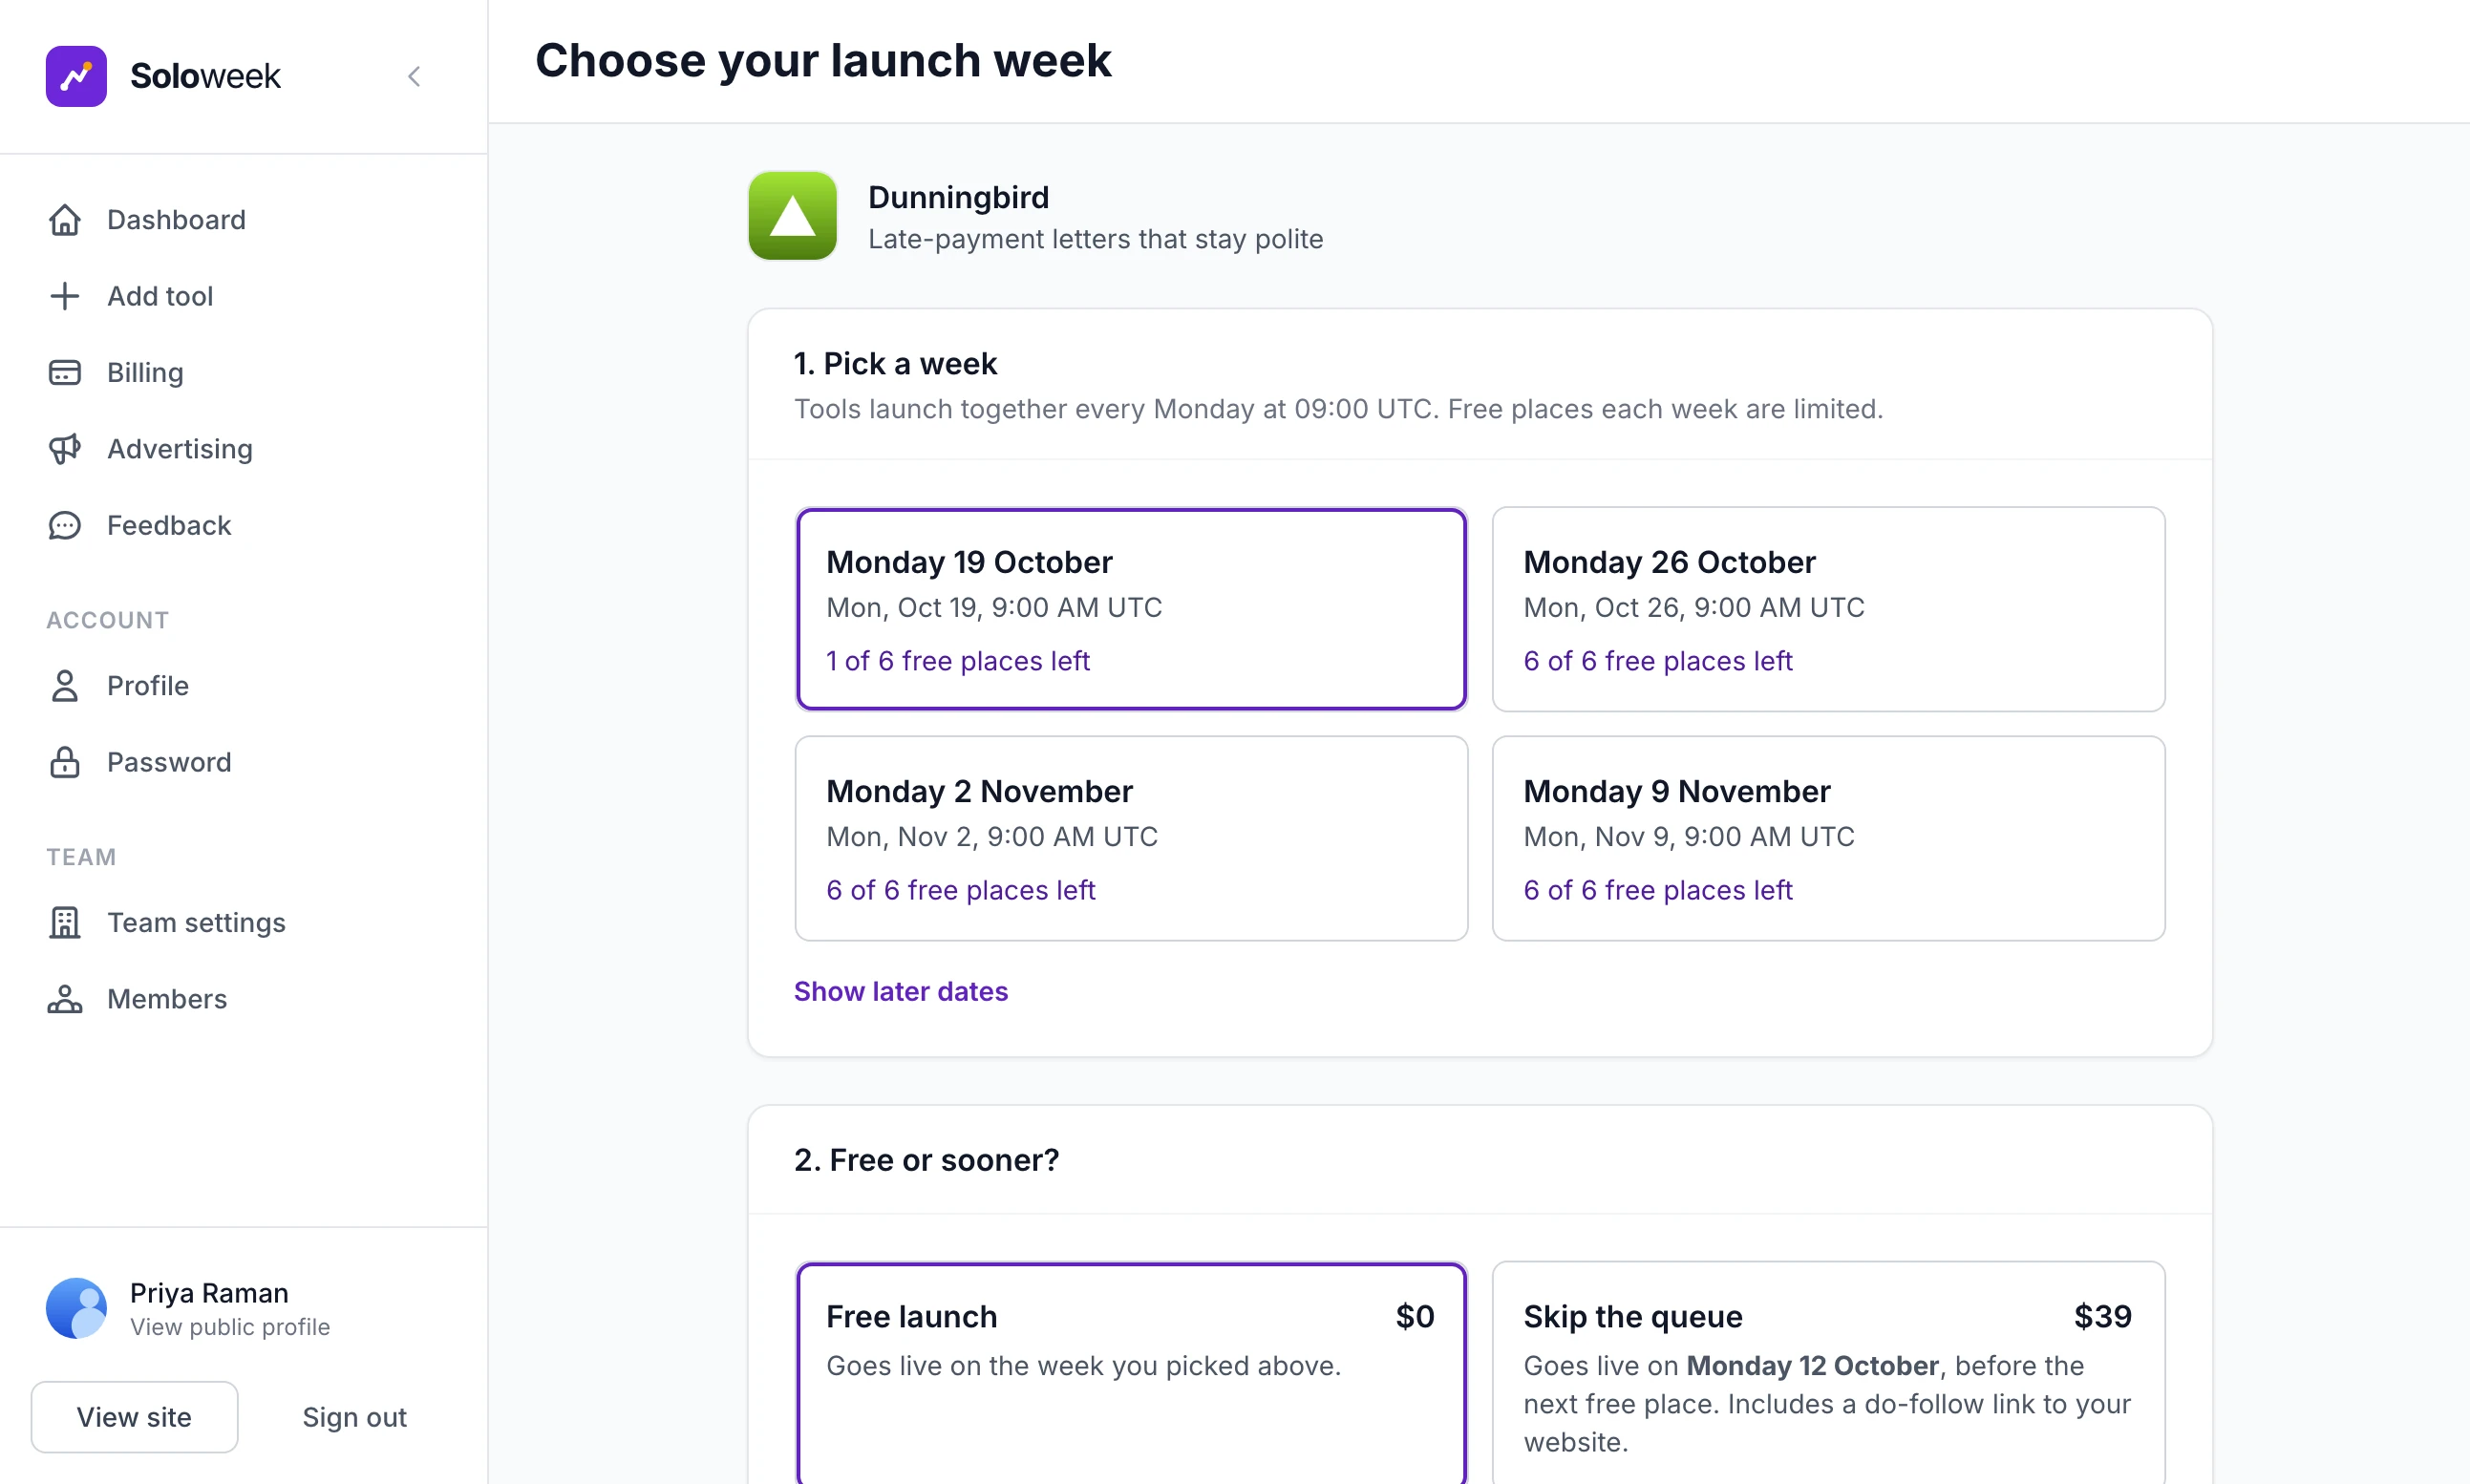
1. Pick a week lists the coming launch days, each with the time in the maker's own time zone and "4 of 6 free places left", Full or Already booked for this week. The first week with room is already chosen. Show later dates lists more.
2. Free or sooner? appears only when a paid place would get them live earlier than the first free one. It offers Free launch or Skip the queue with its price and date.
Extras offers a featured listing and a do-follow link, each with its price.
The button reads Schedule for free, or Continue to payment with the total once anything paid is chosen.
How launches work has the rules for places and payment.
The booked page#
A confirmed booking opens You're booked.
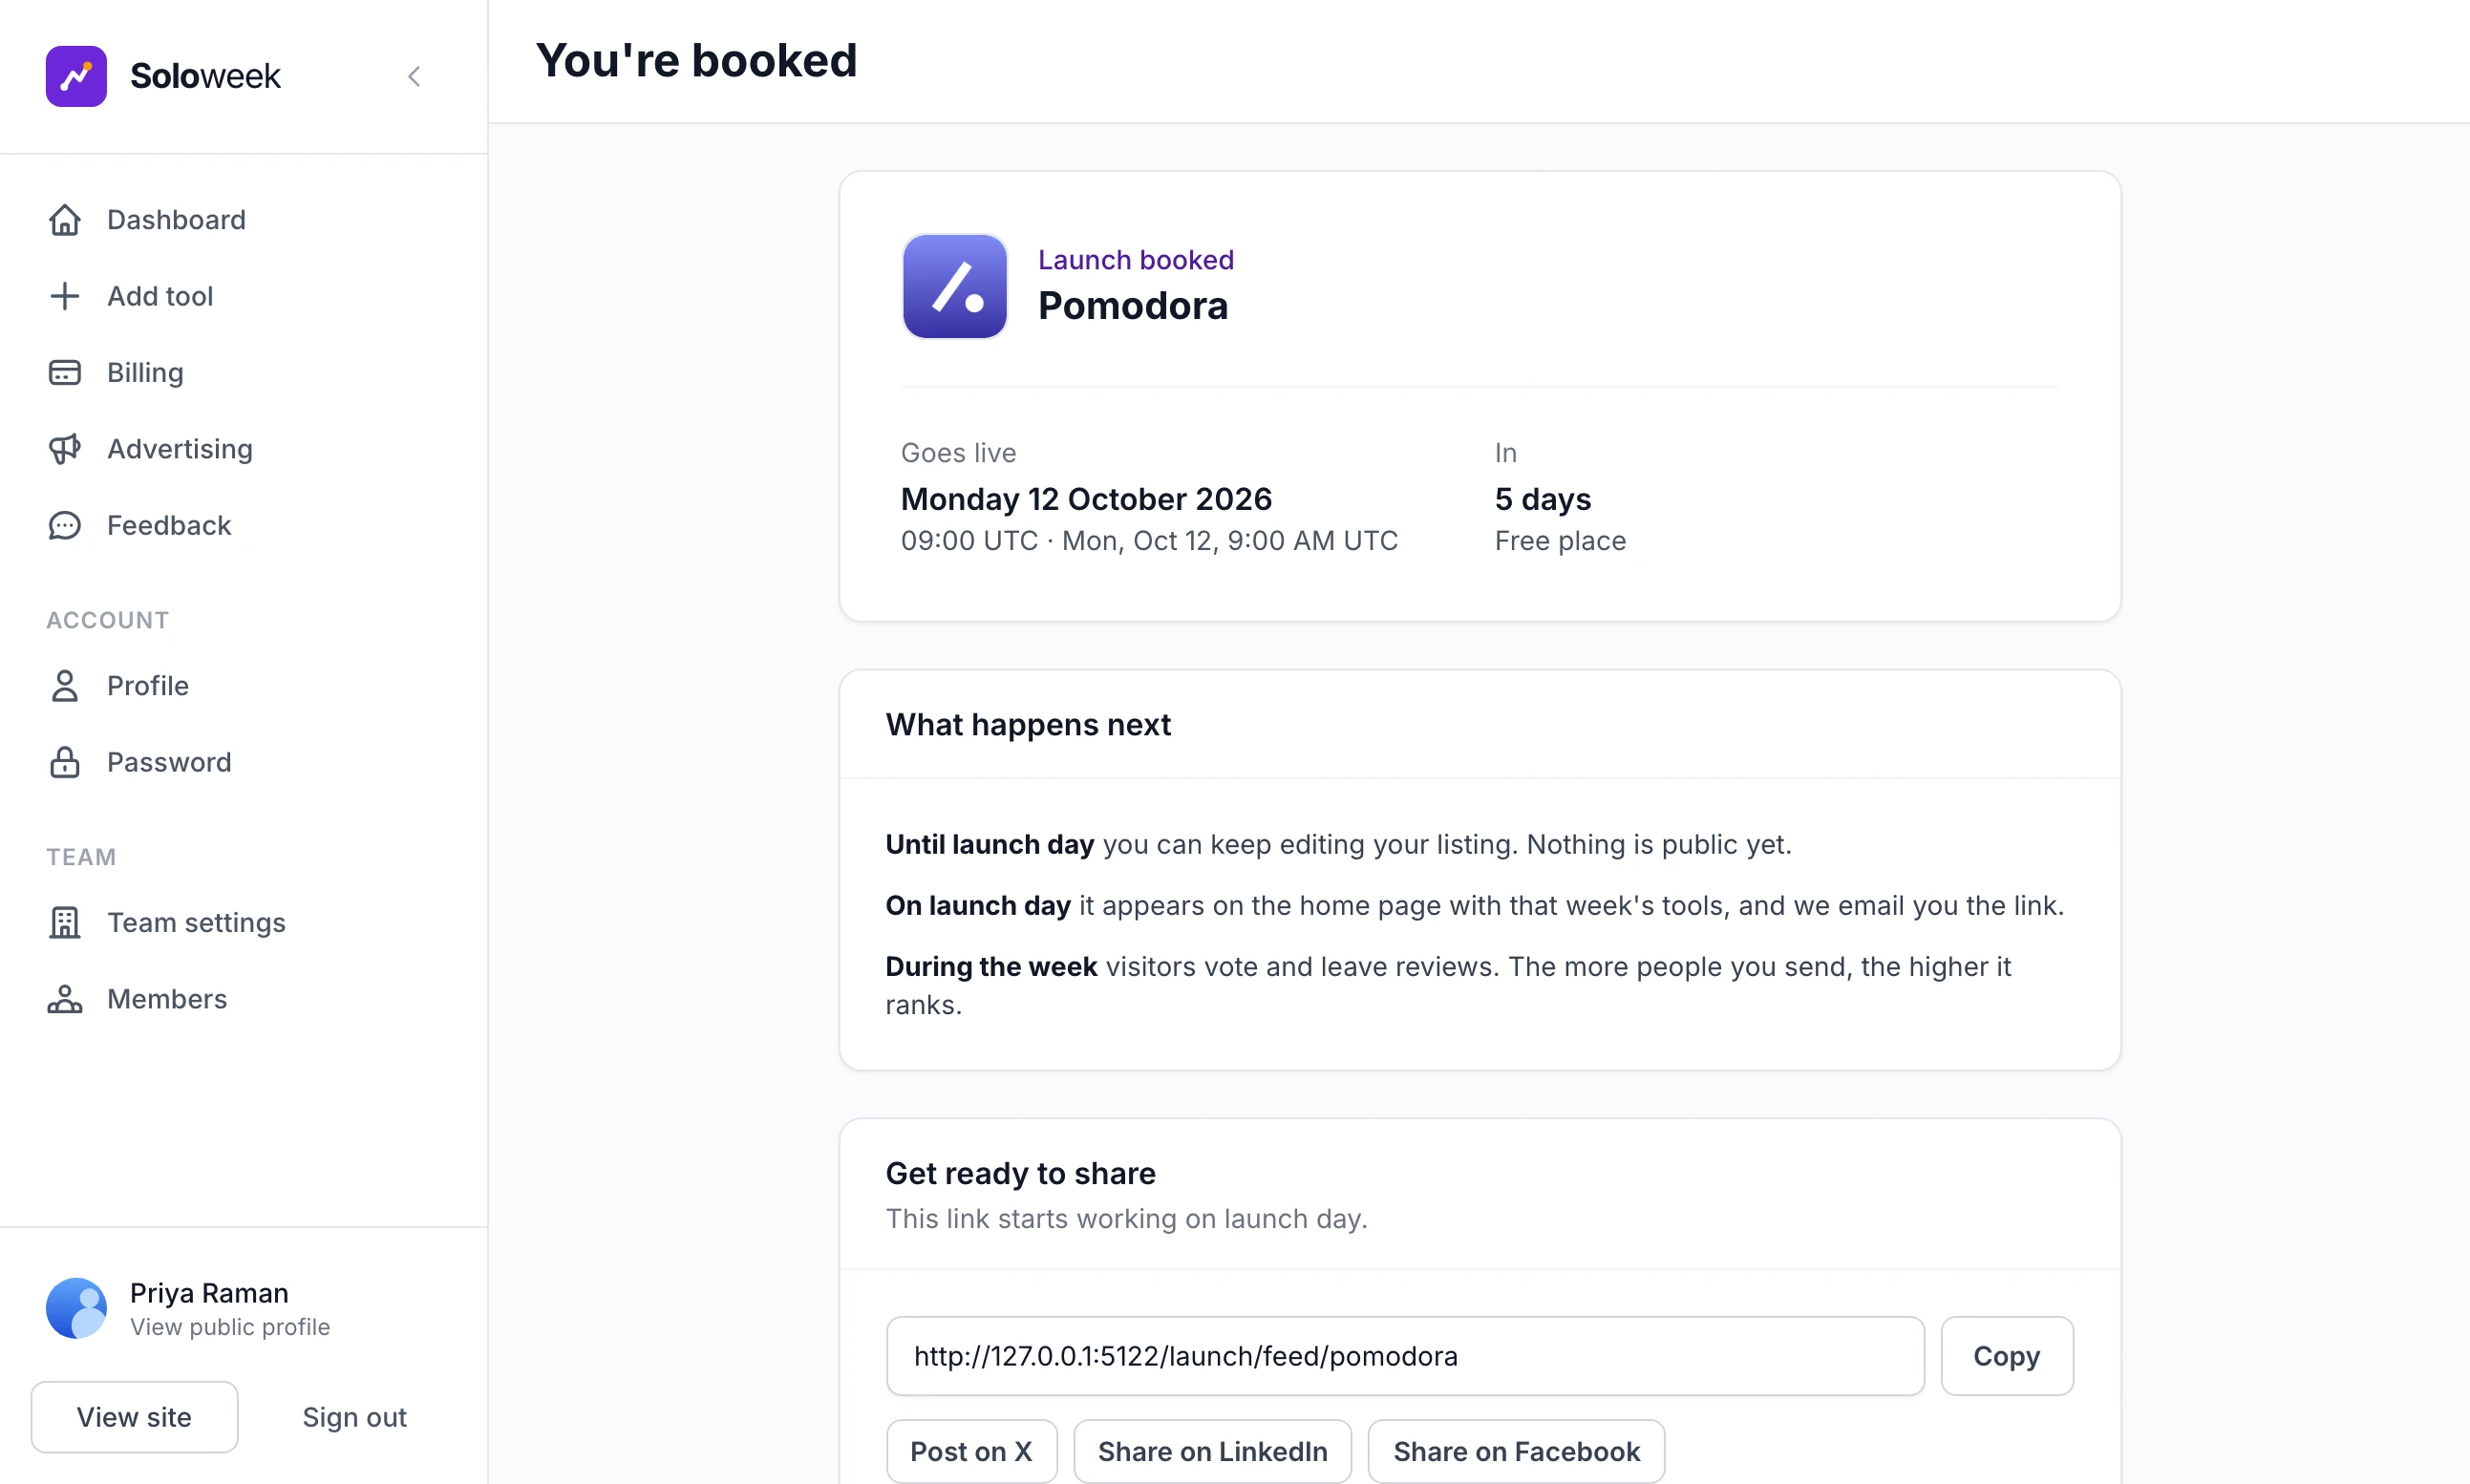
It shows the date and time the listing Goes live, the days to go and Free place or Paid place (queue skipped). What happens next says that nothing is public yet, that they are emailed the link on launch day, and that visitors then vote. Get ready to share holds the link the listing will have. A maker who paid sees Confirming your payment for a few seconds first.
A maker cannot move a booking to another week themselves. If one asks, cancel the booking and they pick again: see Running launches day to day.
Review and publish on a rolling site#
On a rolling site the editor ends on a page that shows the listing as it will appear, a Worth adding first list of what is missing, and any extras on sale. The button reads Publish now, and the listing is live at once. If you check listings first it reads Submit for review, and the maker is told how many are already waiting.
When you send a listing back, its maker sees This launch needs changes before it can go live with your note and an Edit and resubmit button. Saving any step of the editor returns it to your queue.
The dashboard#
A maker with no listings sees a three-line welcome and one button. After that the dashboard holds:
Views and Votes across their live listings, over 7, 30 or 90 days, as a chart.
Next launch, with the date, the time and a Get ready button.
One suggestion at most, such as "Finish Daymark's listing". Free improvements come before anything that costs money.
Every listing once, under a tab for where it stands: Needs changes, Live, In review, Scheduled or Drafts.
A week after a listing goes live, and with Feature requests and bug reports switched on, a line at the foot asks "How was launching on Soloweek?" with a Leave a review button. That is a review of your site, not of a listing.
Managing one listing#
Clicking a listing opens its own page, headed with its name and a status such as Scheduled or Live.
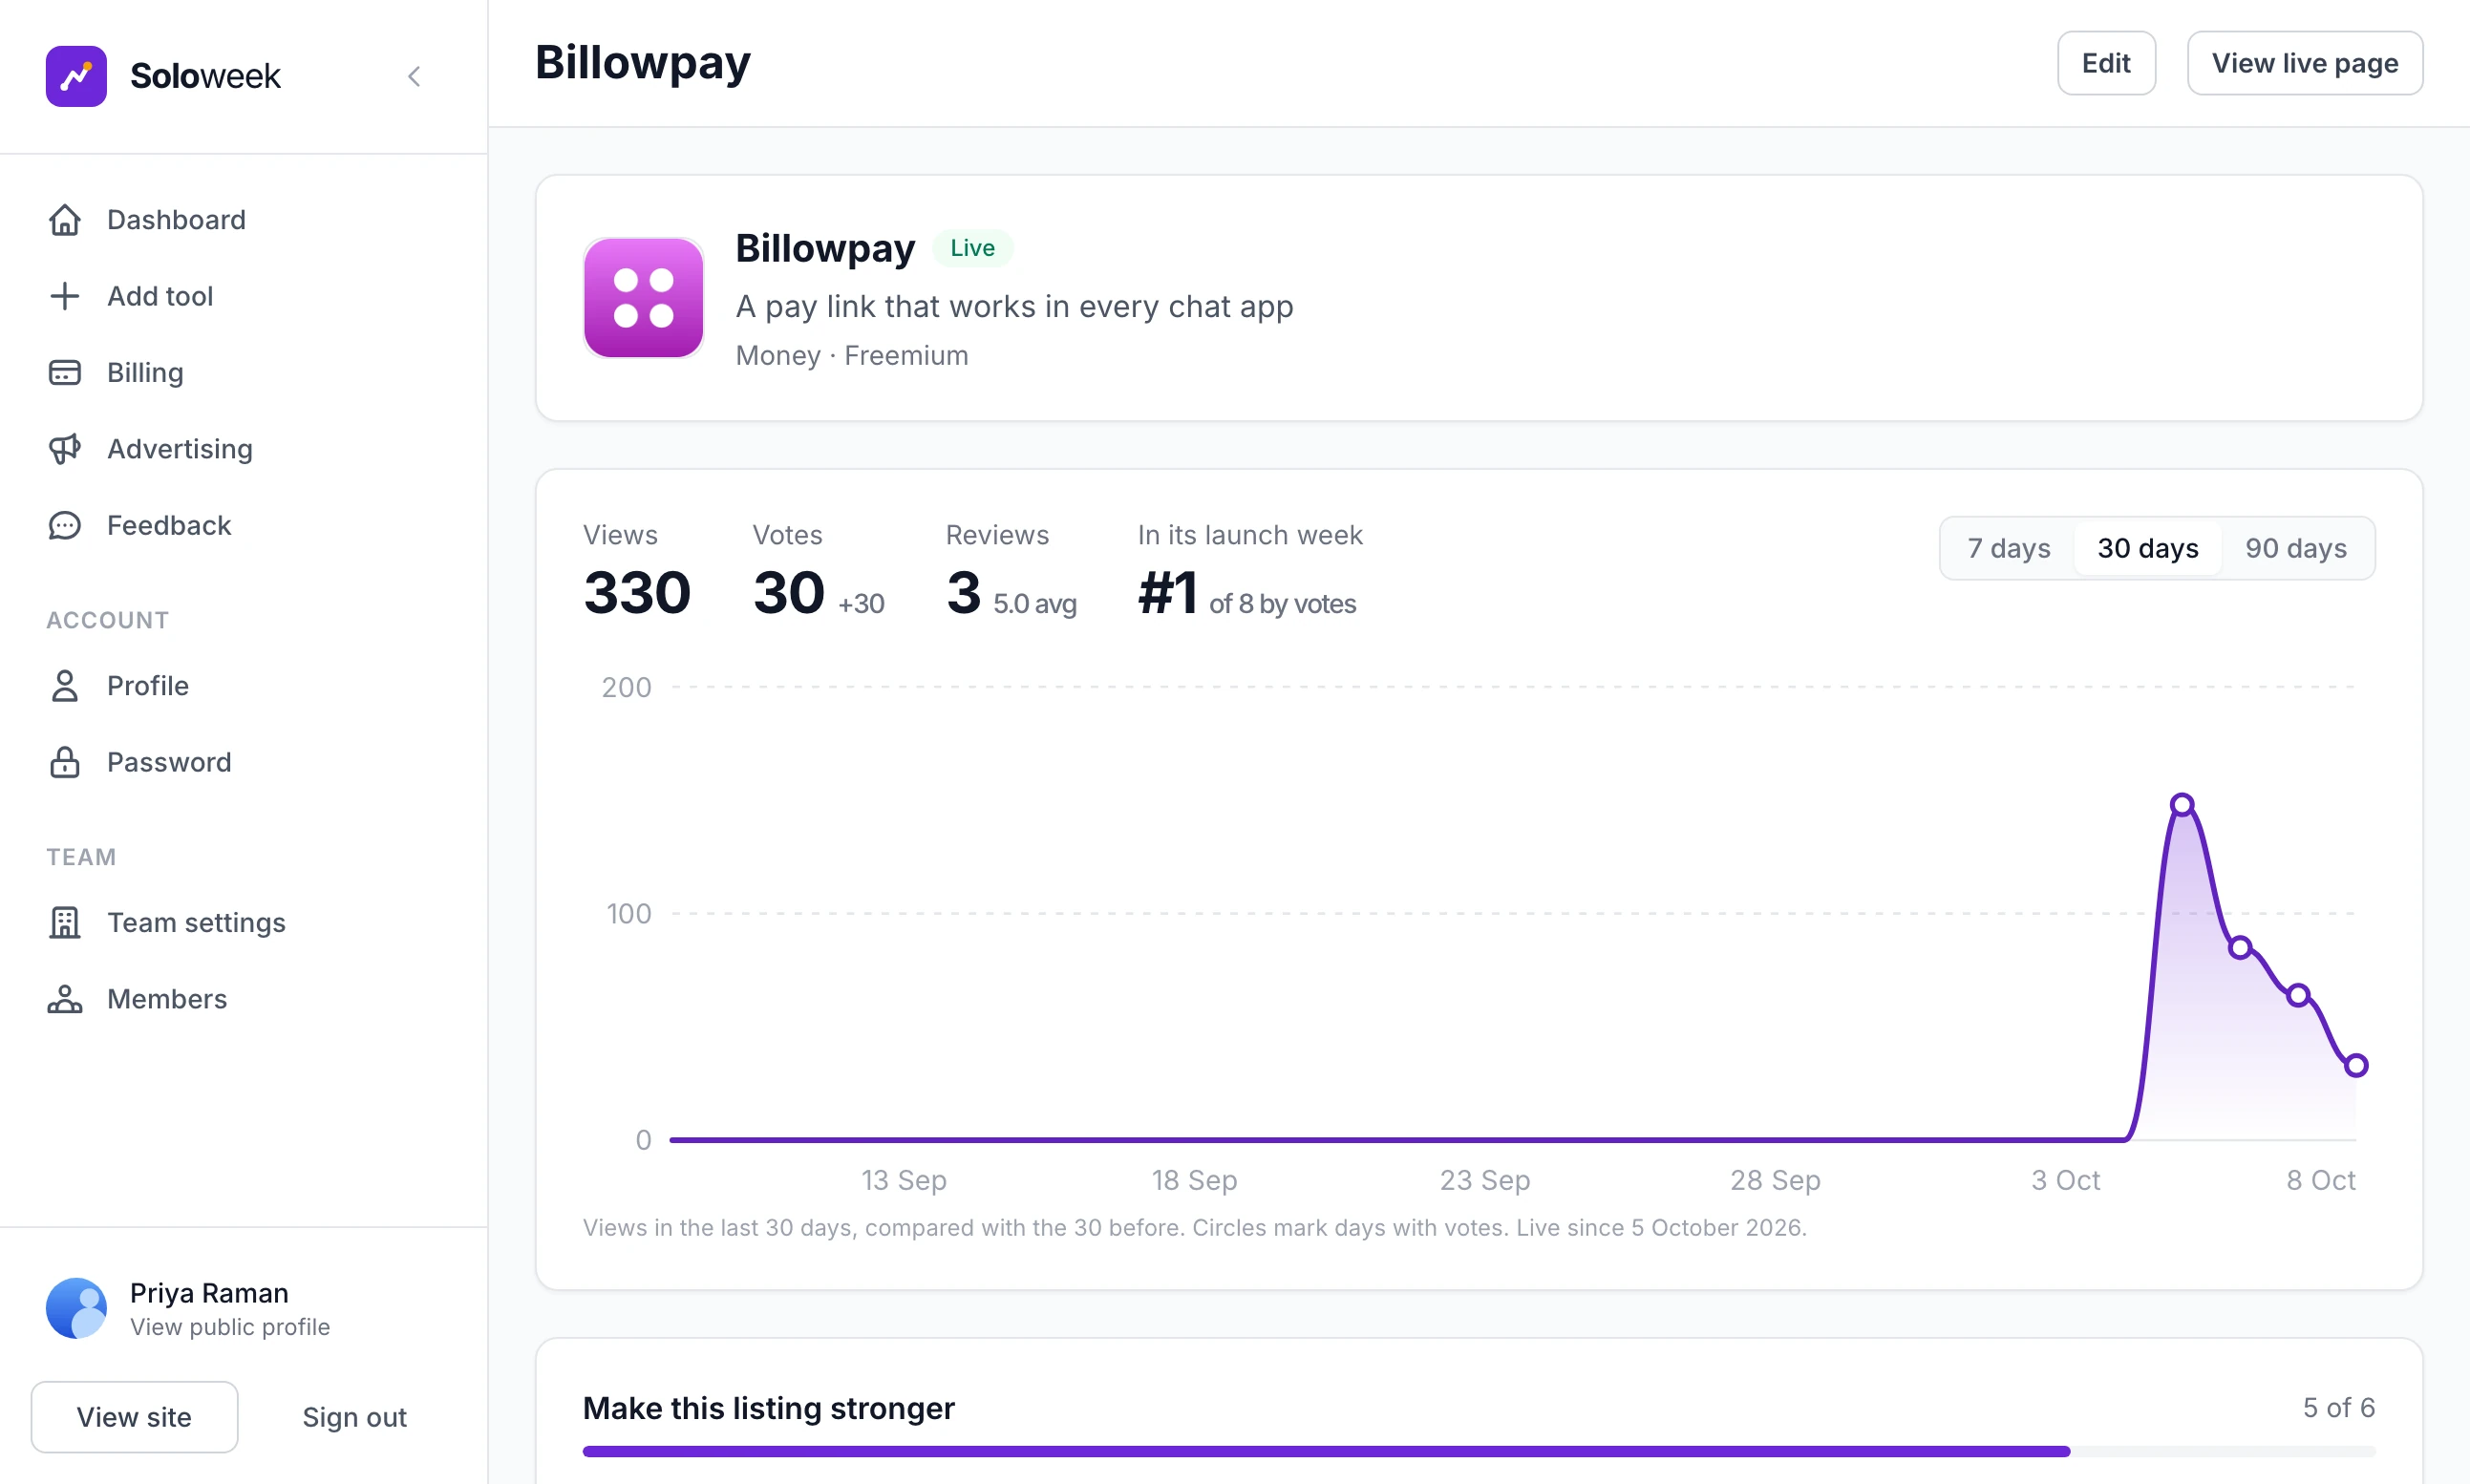
For a live listing the page shows:
Views in the chosen period, with the change on the period before.
Votes: every vote the listing has had, with the number gained in the period beside it.
Reviews and the average rating, if reviews are switched on.
In its launch week, for example "#2 of 9 by votes". This is its place among the listings that launched in the same Monday-to-Sunday week, by total votes. Featured listings are not put first here, so it can differ from the chip on the home page.
Make this listing stronger: a checklist of six things, each with an Add link into the editor. They are a description of 200 characters or more, their own logo, one image, three key features, a pricing model and one social link. The list disappears when all six are done.
Upgrades: each paid extra that applies, with an Add for button and its price, or a Yours badge. When every featured place is taken the row offers Tell me when one is free.
Before launch day the same page counts down under Goes live in and shows the checklist as Before launch day. A draft or a booked listing has a Delete this tool button at the foot. A live one cannot be deleted by its maker.
The share kit and the website badge#
Lower on a live listing's page are two cards.
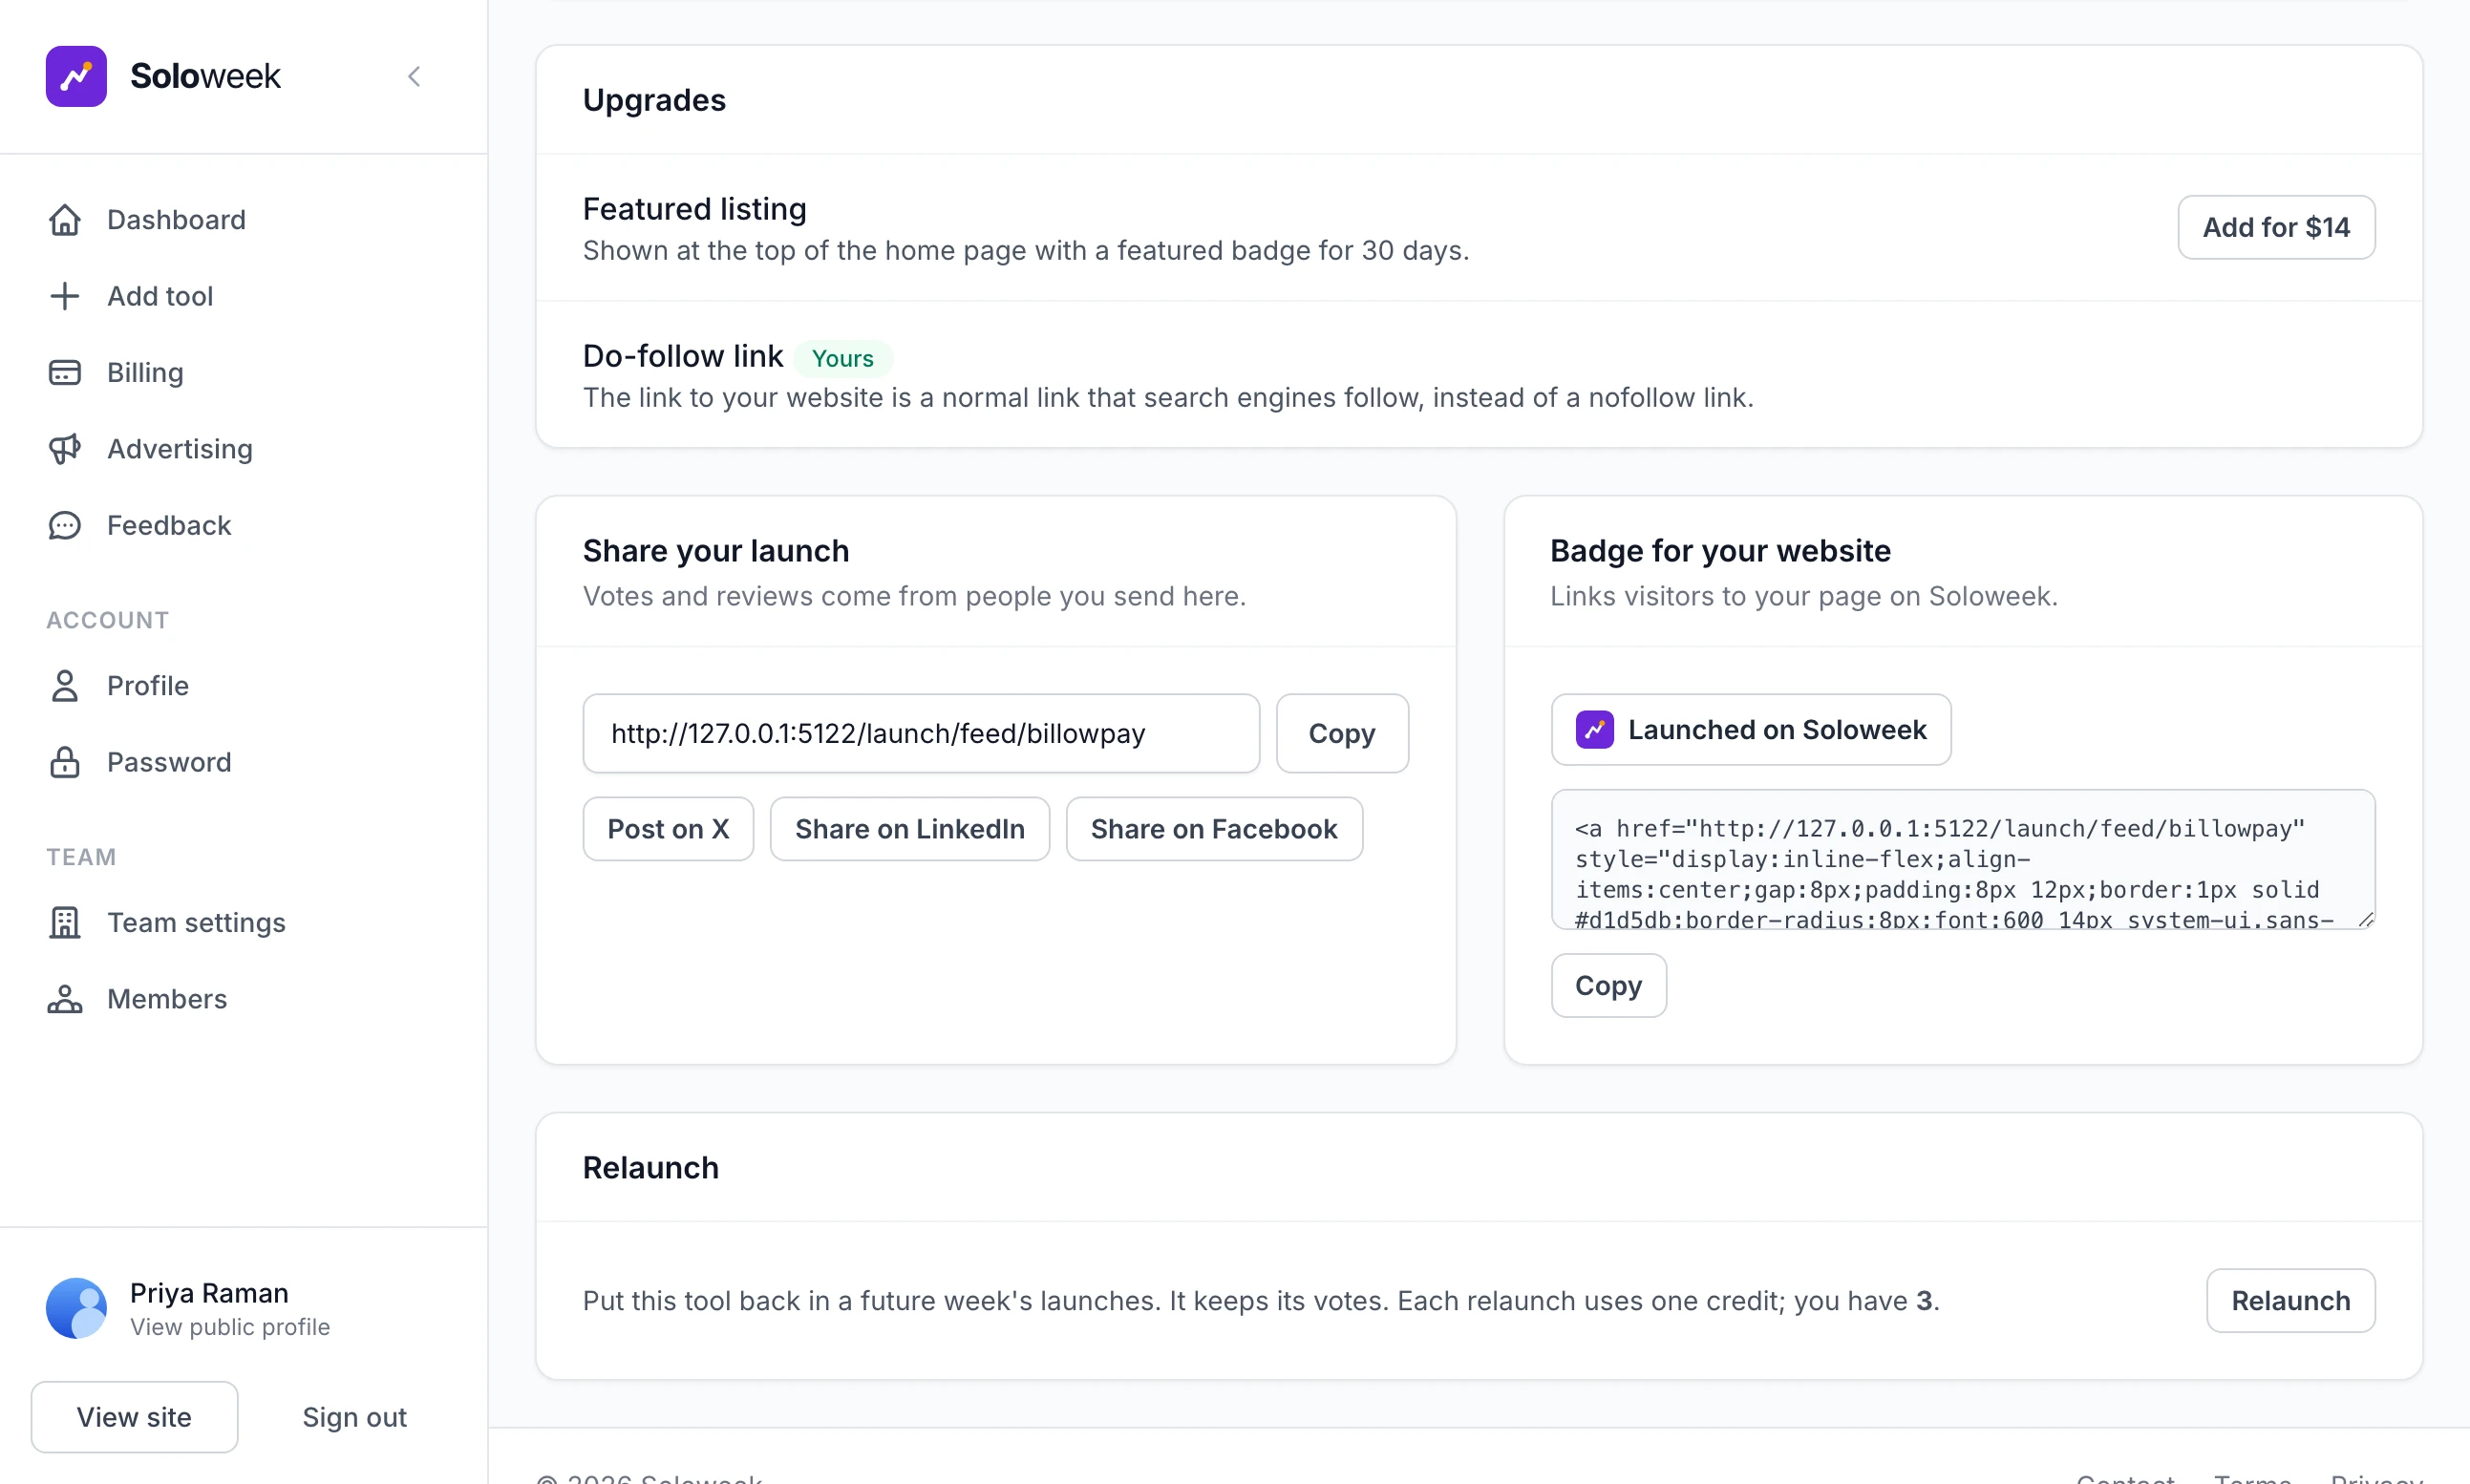
Share your launch holds the listing's address with a Copy button, and Post on X, Share on LinkedIn and Share on Facebook, which open those sites with the link filled in. A booked listing has the same card, headed Line up your launch day.
Badge for your website is a box of HTML with a Copy button. Be exact with makers about what it is: a link to their listing on your site, styled as a small outlined button, with the words "Launched on" and your site's name. It carries no picture, no rank and no vote count. It never changes, and it is the same for every live listing apart from the address it points to. If you have uploaded a logo, the preview on the page shows it beside the words. The HTML that is copied does not include it.
Relaunching with a credit#
On a weekly site a live listing's page ends with a Relaunch card that says how many credits the account has. Relaunch opens the week picker again, headed with the listing's name, and the button reads Use 1 credit and relaunch.
The credit is taken when the booking is confirmed.
On the day the listing is back in that week's list with all its votes and reviews, and the maker is emailed that it "is back on Soloweek this week".
Its launch date and its In its launch week line stay as they were.
With no credits left the button reads Get credits, if you sell them.
A rolling site has no relaunch. If you sell a Bump, it is offered on the same page instead.
Billing#
Billing in the maker's sidebar shows their relaunch credits, how many featured places are free and what they have paid to date. Each booked or live listing has a row saying whether it has a featured listing and a do-follow link, with an Add link and the price where it does not. Then come the extras you sell, any subscriptions with a Stop button and a Payment history with each payment marked Paid or Refunded. Until Stripe is connected the page says that paid upgrades are not on sale yet. What you sell and your prices covers what appears here.
Advertising#
Advertising is in the sidebar while the Advertising feature is switched on. A maker with no adverts sees the monthly price, the two places an advert can run with Free now or Taken on each, and a Create an advert button. Once they have one, the page lists each advert with its state, views, clicks and click rate. Buttons beside it edit, move or pause it. Sell advert places follows an advert from design to payment.
Team members#
With Team invites switched on under Site Settings, Features, the person who opened an account gets a Team heading in their sidebar with Team settings and Members. From Members they click Invite User and give a name, an email address and a role of Member or Viewer. The invitation is an email holding a temporary password, so it needs an email server. An account holds up to 5 people, and they share its listings, bookings and relaunch credits.
A maker sees "Please verify your email address before logging in. Check your inbox for the verification link."
They have not clicked the link in the confirmation email, or it never arrived. Check that email is working first. Setting their Status to Active in the admin does not let them in: only the link confirms the address.
In version 2.9.0 the sign-in page has no button for a new link, and signing up again with the same address is refused. Send the link again is only on the Check your inbox page. Send the maker this address, with your domain and their email in it, and a new link is emailed to them:
https://your-domain.com/auth/[email protected]A maker wants a live listing taken down
They are told "A live launch cannot be deleted. Contact us if you need it taken down." Delete it for them from All Launches. A maker can also close their whole account from Profile, which removes their listings with it.
Can a maker turn off the reminder emails?
Yes. Profile has a News and reminders tick box. Unticking it stops draft reminders and the request for a review. Emails about their bookings and payments are still sent.
Stuck on a step? Send a message.