Deploy to a server
Put Launch Lab on a server of your own by one of the three routes the kit supports, with a certificate, an admin account and the settings a live site needs.
Updated 9 Oct 2026 · written for Launch Lab 2.9.0
On this page
Launch Lab runs on a server in three ways. This guide helps you choose one, takes a site from a bare server to the setup wizard and lists the settings that matter once the site is public. Every command on the server is run as root, in the kit's folder. The examples use a site called gadgets, the domain example.com and the folder /opt/launchlab. Put your own in their place.
Three ways to run it#
| Route | Choose it when | HTTPS | Background jobs |
|---|---|---|---|
A. scripts/deploy.sh | You want several sites on one server, or the server also runs other projects. The script touches only its own containers, images and nginx files. | You put a certificate in place. nginx serves it. | Cron on the server, installed for you. |
B. docker compose up | You want one site on a server of its own. Caddy takes ports 80 and 443. | Caddy fetches and renews the certificate. | A jobs container, started for you. |
| C. No Docker | Your host has no Docker, or you already run Python apps your own way. | Your own reverse proxy. | A cron line you add. |
All three run the same code, and all three keep a site's data in one instance folder.
Route A: deploy.sh#
You need a server where nginx keeps its sites in /etc/nginx/sites-available and sites-enabled, as Debian and Ubuntu do, with ports 80 and 443 open. The script installs nothing: Docker and nginx must be there first. Each site may use up to 768 MB of memory.
Step 1: Put the code on the server
With repository access, clone it. With the zip, copy it up and unpack it.
With repository accessgit clone YOUR-REPOSITORY-ADDRESS /opt/launchlabWith the zip, on your computerscp launch-lab-2.9.0.zip root@YOUR-SERVER-IP:/opt/With the zip, on the servercd /opt unzip launch-lab-2.9.0.zip mv launch-lab-2.9.0 launchlabStep 2: Install Docker, nginx and cron
Install Docker by the instructions for your system at docs.docker.com/engine/install. Then:
bashapt-get update && apt-get install -y nginx cron nginx -vStep 3: Run first-run
bashcd /opt/launchlab scripts/deploy.sh first-runIt builds the image every site runs from, called
launchlab, and installs two cron lines: the background jobs every 15 minutes and a backup at 03:30. It ends with "Ready. Add your first site with: scripts/deploy.sh add-site NAME DOMAIN".Step 4: Point the domain at the server
In your DNS, add an A record for
example.comand one forwww.example.com, both pointing at the server's IP address. The nginx file the kit writes answers both names.Step 5: Put the certificate in place
The script does not fetch a certificate. It looks for two files, named after the domain, and publishes the site only when both exist:
text/etc/ssl/launchlab/example.com.pem /etc/ssl/launchlab/example.com.keyThe folder is not made for you:
mkdir -p /etc/ssl/launchlab. Where the certificate comes from is below.Step 6: Add the site
bashscripts/deploy.sh add-site gadgets example.comThe name takes lower-case letters, numbers and dashes. Add
--closedat the end to start the site in coming-soon mode: see Opening day. When the site answers, the script prints:What add-site printsSite 'gadgets' is running on 127.0.0.1:5301. https://example.com now reaches the site 'gadgets' (port 5301). Finish setup in your browser once the site is public (the link stops working when setup is done): https://example.com/setup?token=A-LONG-CODEStep 7: Open the setup link
Open the address
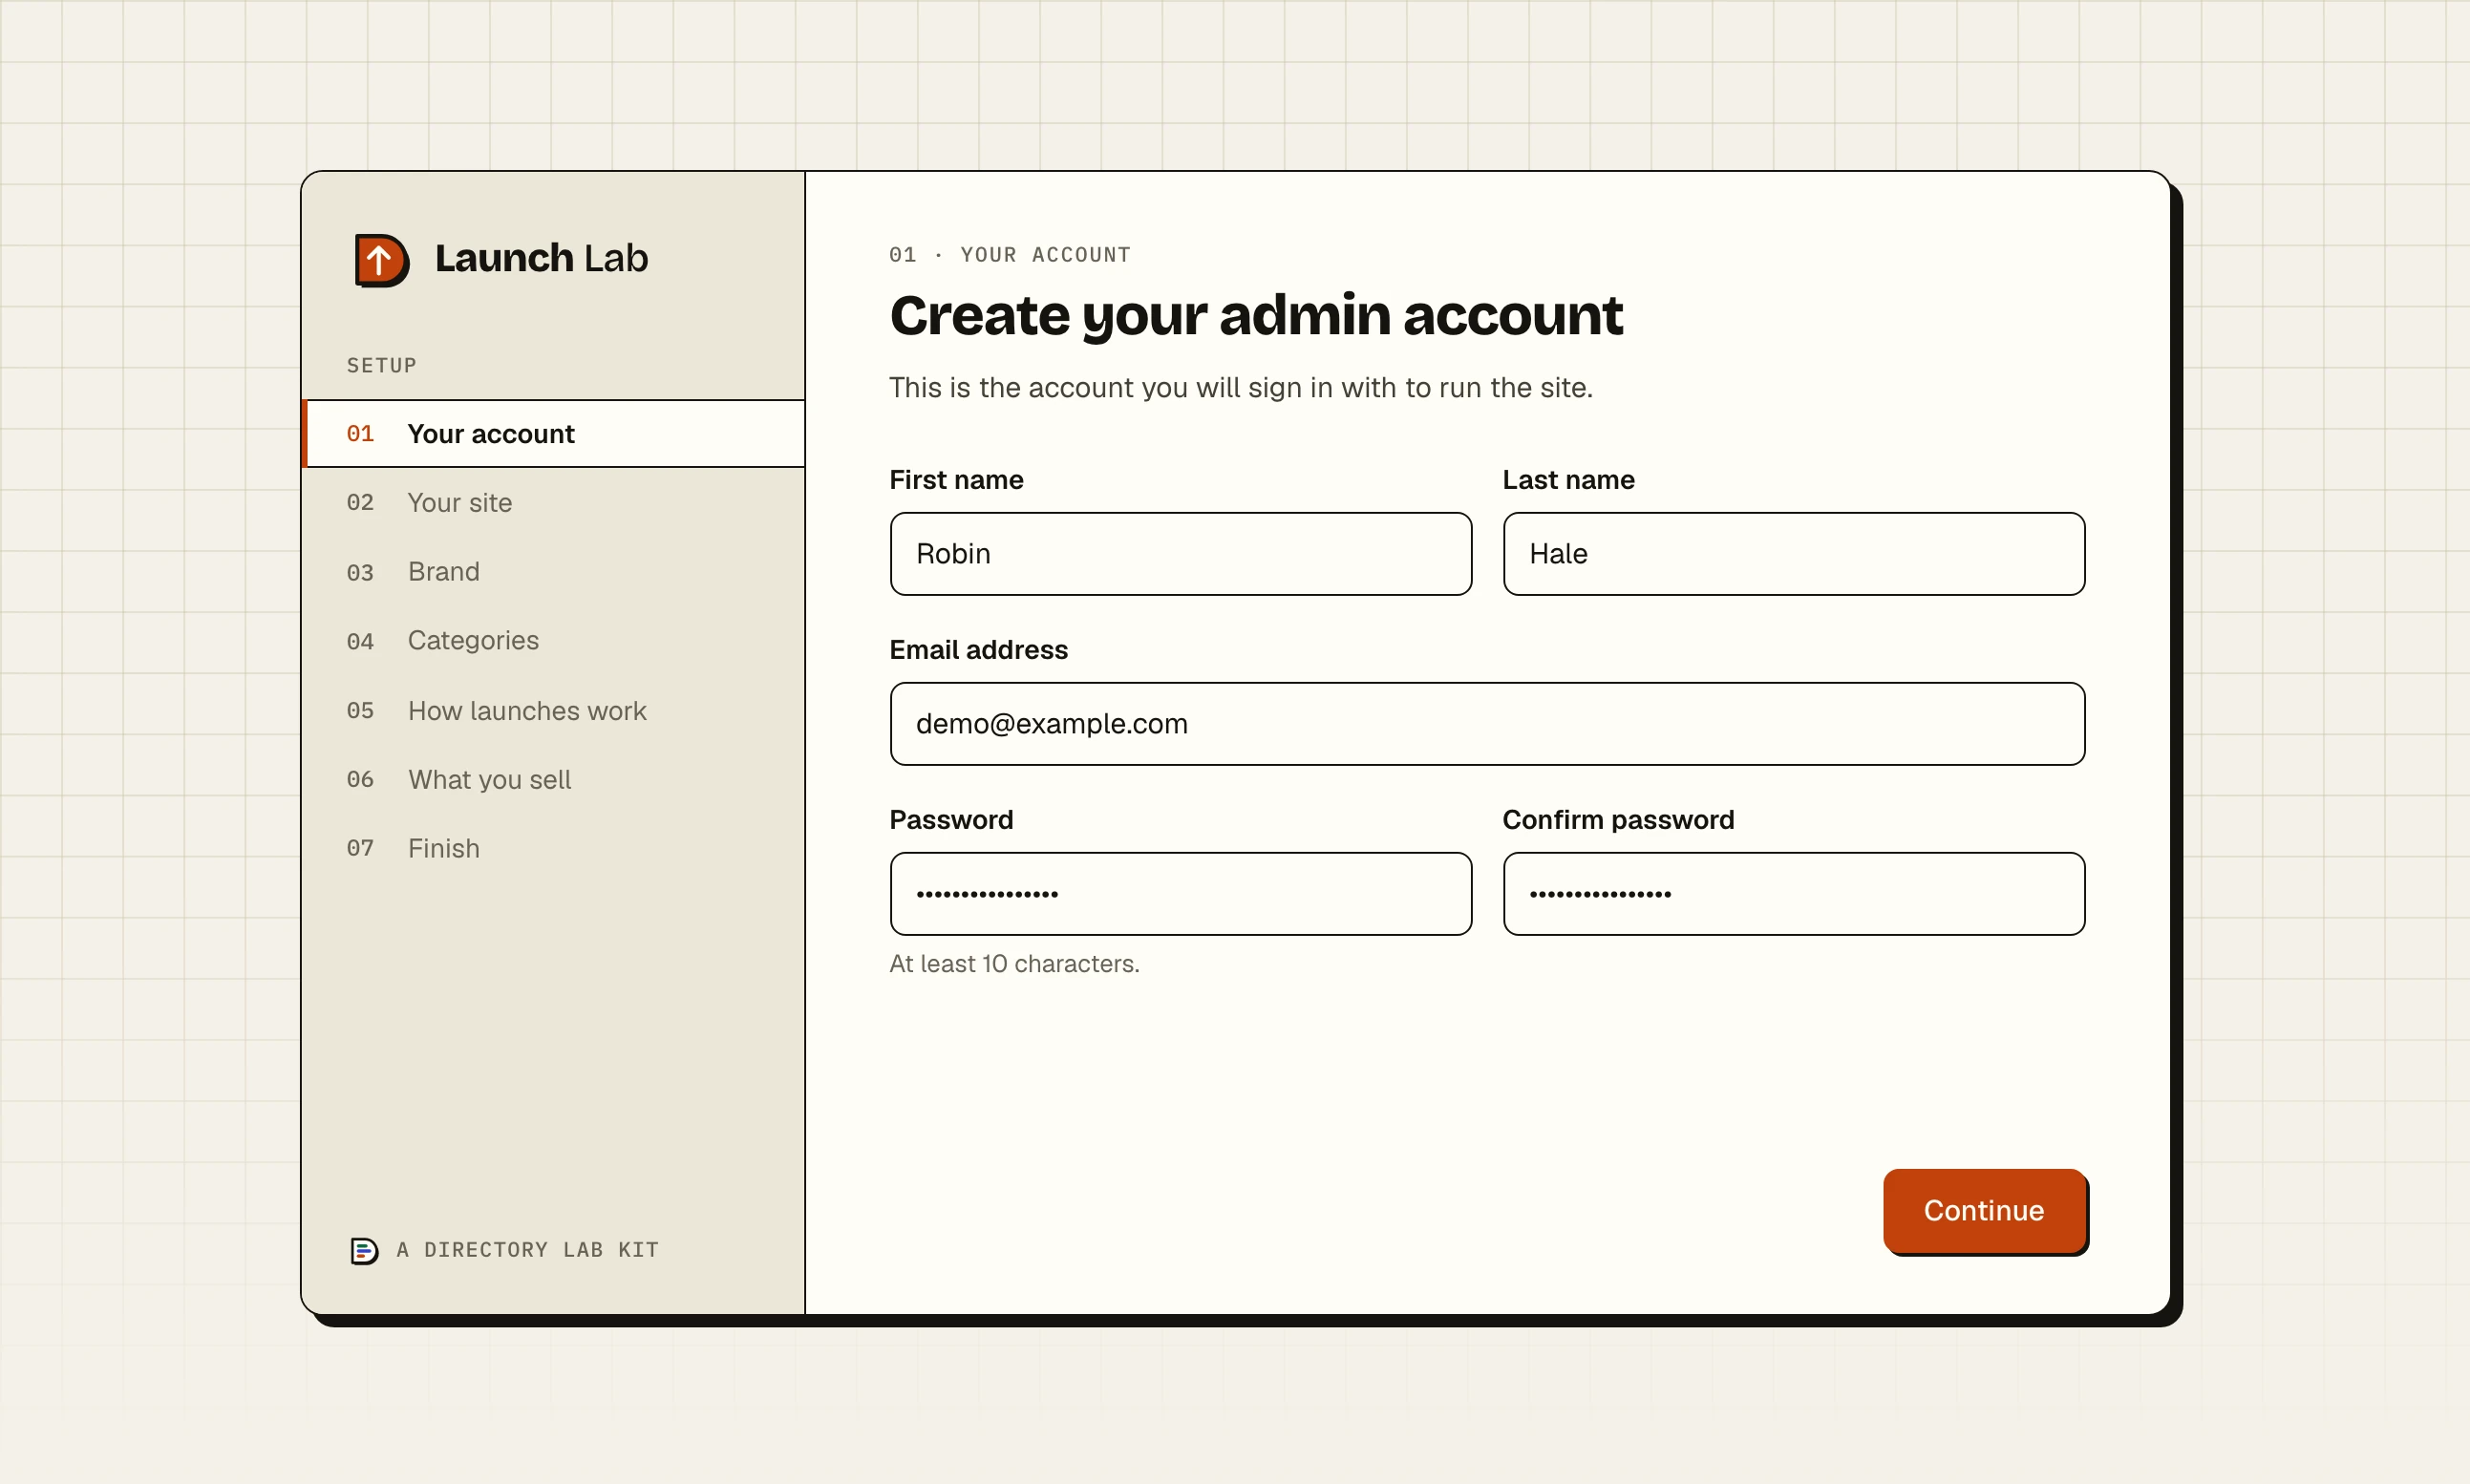
add-siteprinted. The code in it proves you run the server, so the wizard opens at its first step. Complete it as in The setup wizard, step by step. You land in the admin, signed in, with a message that ends "is ready. You are signed in as the site admin."
Where the certificate comes from#
The comment at the top of scripts/nginx-site.conf.template names two sources. Either way, the certificate must cover example.com and www.example.com.
Cloudflare, when the domain is proxied through it. Create an Origin Certificate under SSL/TLS, Origin Server. Save the certificate as the
.pemfile and the private key as the.keyfile, and set Cloudflare's SSL mode to Full (strict).Let's Encrypt, otherwise. With certbot, for example:
apt-get install -y certbot python3-certbot-nginx
certbot certonly --nginx -d example.com -d www.example.com --deploy-hook "systemctl reload nginx"
ln -s /etc/letsencrypt/live/example.com/fullchain.pem /etc/ssl/launchlab/example.com.pem
ln -s /etc/letsencrypt/live/example.com/privkey.pem /etc/ssl/launchlab/example.com.key
If the certificate arrives after add-site, publish the site with scripts/deploy.sh enable-https gadgets. It writes the nginx file, tests it and reloads nginx, then prints "https://example.com now reaches the site 'gadgets' (port 5301)."
What add-site creates#
| What | Where and how |
|---|---|
| A folder | sites/gadgets/, holding .env, .port, .domain and instance/. |
| The data | sites/gadgets/instance/: the database app.db, the uploads folder and setup_token until setup is done. |
| A settings file | sites/gadgets/.env, with a new 64-character SECRET_KEY, APP_DOMAIN=https://example.com, SESSION_COOKIE_SECURE=true, TRUSTED_PROXIES=1 and an empty DATABASE_URL. |
| A container | launchlab-gadgets. Docker restarts it if it stops. It runs two workers of four threads each. |
| A port | 5301 for the first site, then the next free one. Only the server itself can reach it: nginx passes visitors on. |
| An nginx file | /etc/nginx/sites-available/launchlab-gadgets, linked from sites-enabled. It sends http and www to https://example.com. |
The other commands#
scripts/deploy.sh status
scripts/deploy.sh logs gadgets
scripts/deploy.sh set-env gadgets WEB_CONCURRENCY=4
scripts/deploy.sh remove-site gadgetsstatusprints a row for each site: name, port, domain and UP or DOWN, with "(coming soon)", "(not public: no nginx site yet)" or "(setup not finished)" after it where they apply.logsshows the last 200 lines the site wrote and keeps following. Press Ctrl and C to stop.set-envchanges one line of the site's.envand restarts the site.KEY=with nothing after it removes the line. It ends "WEB_CONCURRENCY updated and gadgets restarted."remove-sitetakes the site out of nginx and stops its container. The data stays insites/gadgetsuntil you delete the folder yourself.
Route B: Docker Compose#
docker-compose.yml starts three containers: the site, a second copy that runs the background jobs every 15 minutes and Caddy. Caddy answers on ports 80 and 443 and fetches the certificate for your domain by itself. Point the domain at the server first.
Step 1: Write the .env file
bashcd /opt/launchlab cp .env.example .env nano .envTake the
#off theSITE_DOMAINline and set it toexample.com. SetAPP_DOMAIN=https://example.com. LeaveSECRET_KEY=empty: the site makes its own and keeps it ininstance/secret_key.Step 2: Make the data folder
bashmkdir -p instance chown -R 1000:1000 instanceThe container runs as user 1000 and must be able to write here.
Step 3: Start it
bashdocker compose up -d --buildStep 4: Read the setup code and open the wizard
bashdocker compose logs app | grep "Setup code"Open
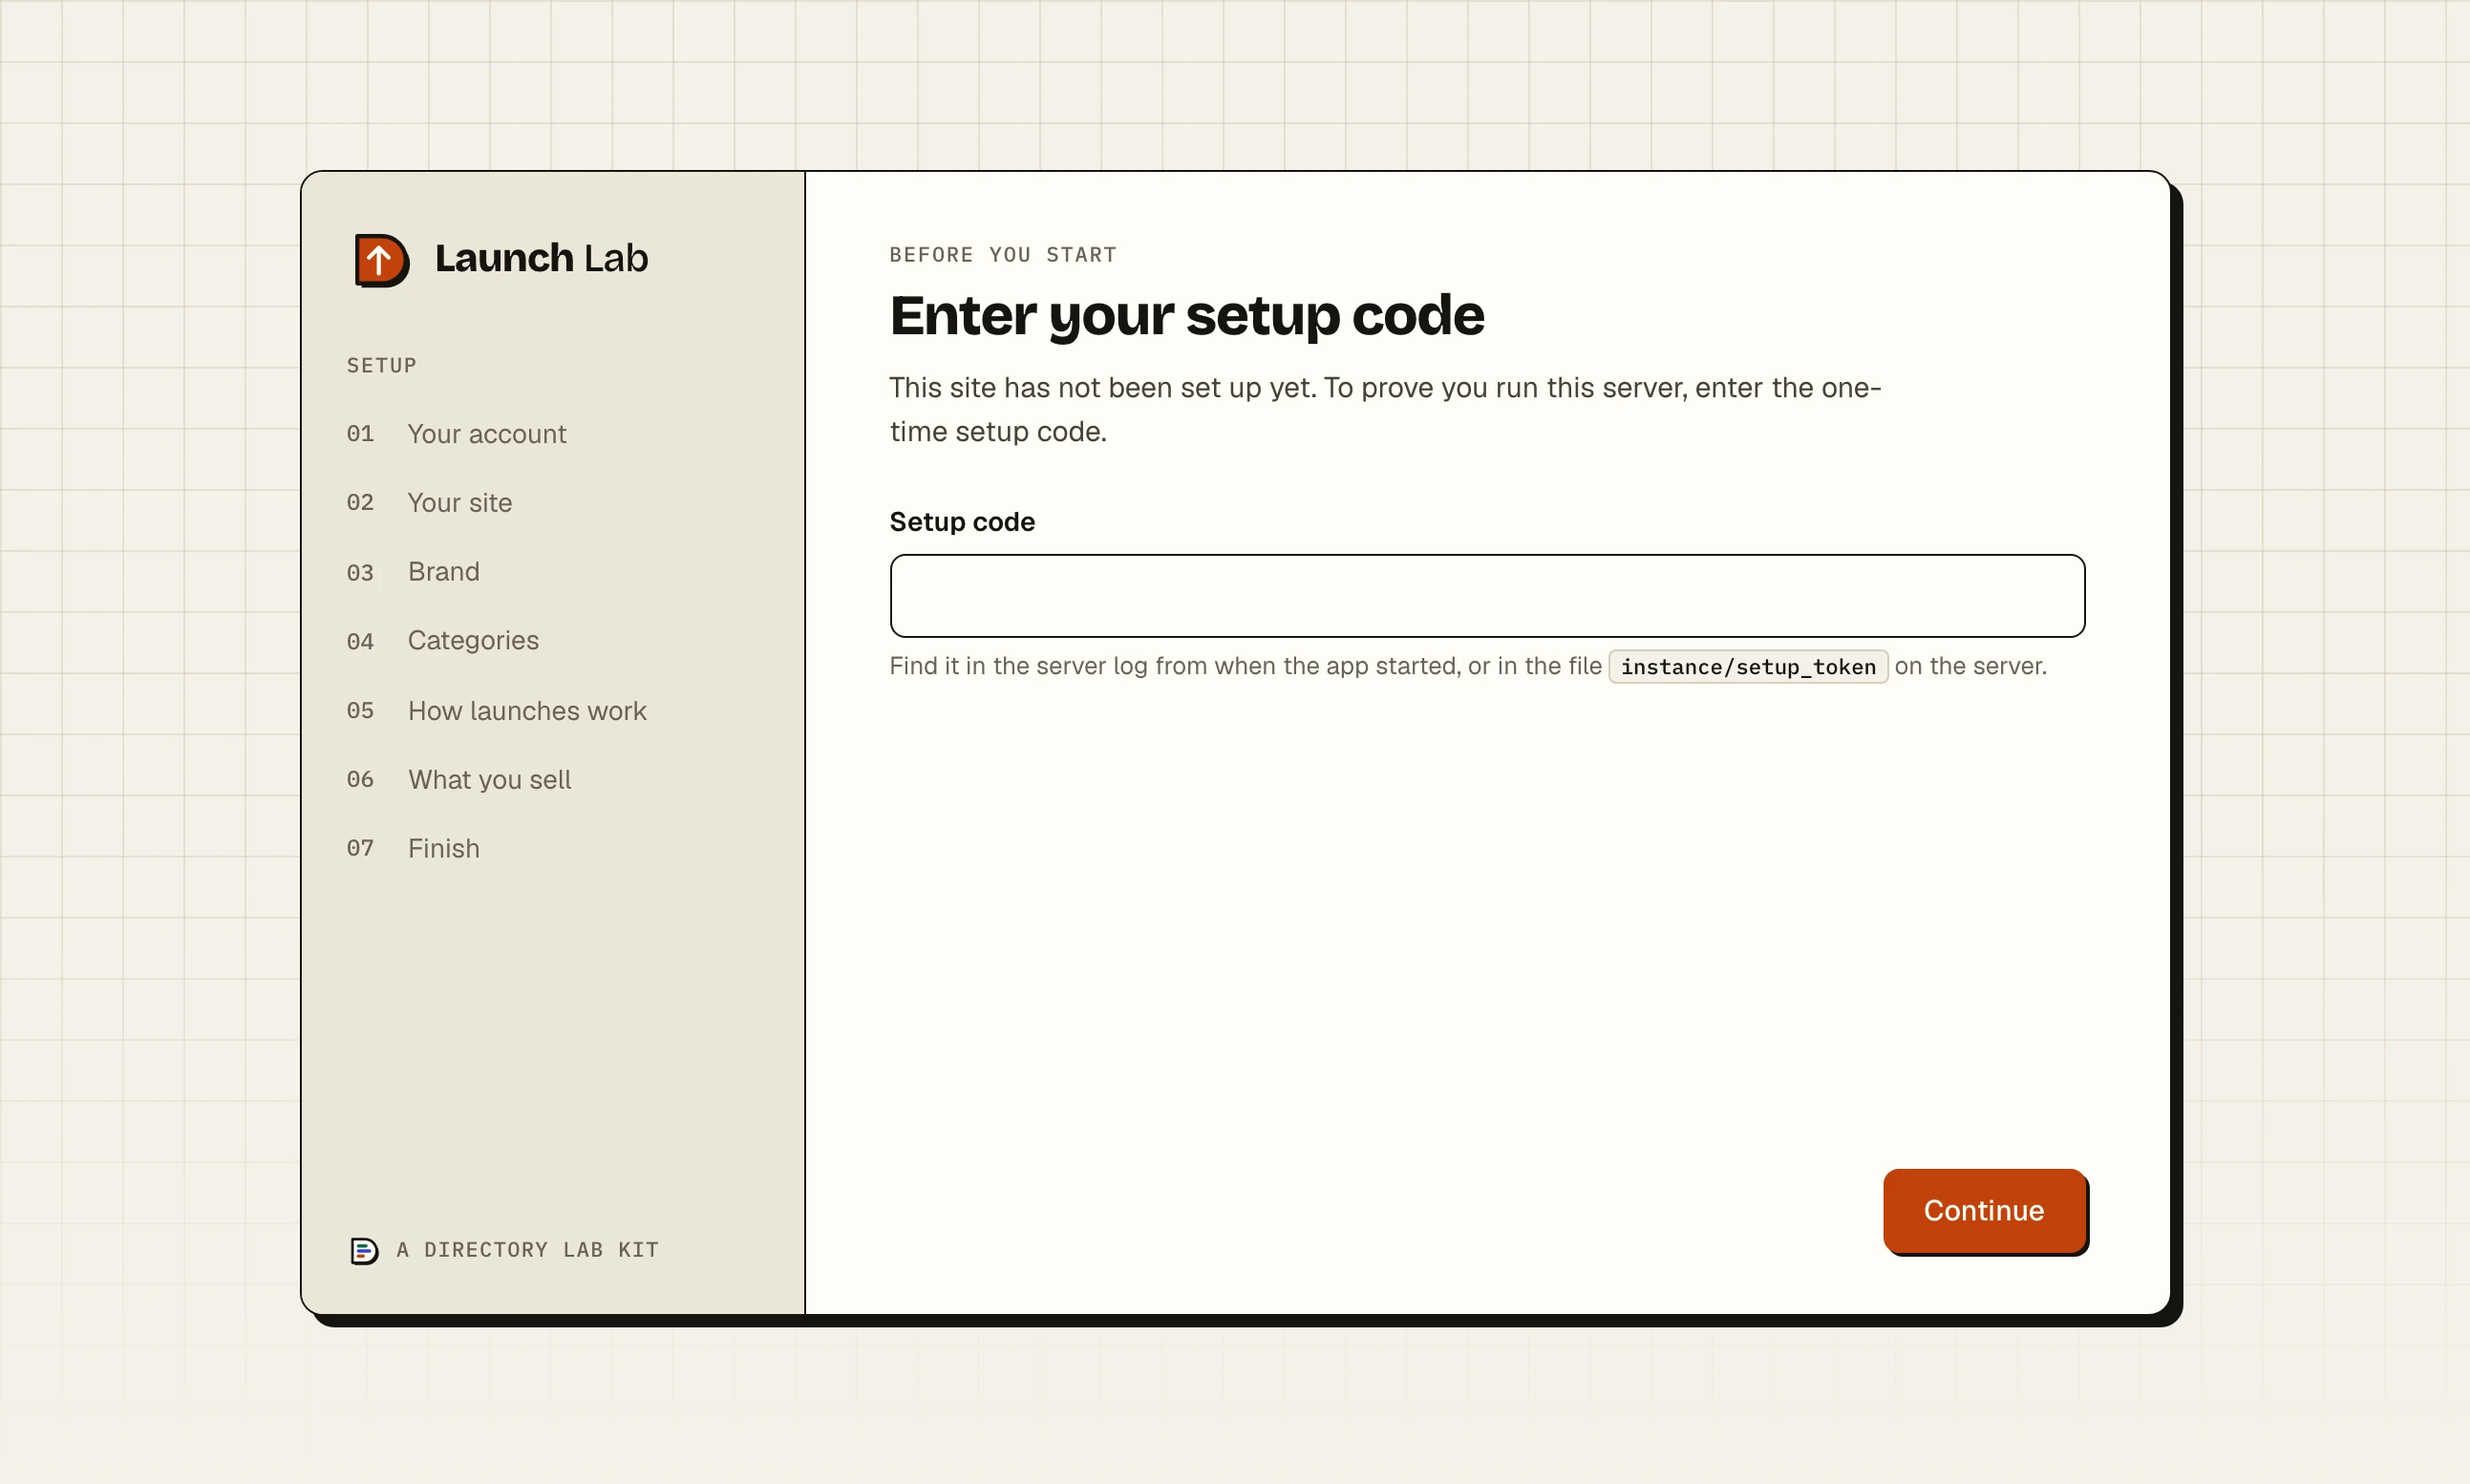
https://example.com/setup. The page is headed "Enter your setup code". Paste the code into Setup code and click Continue.
Route C: without Docker#
Install the kit as in Install Launch Lab on your computer, then change four things.
Run it with gunicorn, which
requirements.txtinstalls, not withpython run.py. Herevenvis the virtual environment you made when you installed the kit:
venv/bin/gunicorn run:app --preload --bind 127.0.0.1:8000 --workers 2 --threads 4 --timeout 60Keep it running. The kit has no service file. Use systemd or whatever your host provides.
Put a reverse proxy in front, with a certificate.
scripts/nginx-site.conf.templateis a working nginx file onceSITE_DOMAIN,SITE_PORTandSSL_DIRare replaced by hand. Then setTRUSTED_PROXIES=1,SESSION_COOKIE_SECURE=trueandAPP_DOMAIN=https://example.comin.env.Add the cron line shown on the System page: see Backups and scheduled jobs.
The setup code is printed when the app starts, in a line beginning "Setup required", and is in the file instance/setup_token.
Make the admin from the terminal#
scripts/setup_site.py does what the wizard does, with no browser and no setup code. It asks for a password of at least 10 characters, twice.
docker exec -it launchlab-gadgets python scripts/setup_site.py --name "Gadgets" --email [email protected] --url https://example.comUnder Compose, start the line with docker compose exec app. Without Docker, start it with venv/bin/python. Run it with --help for the other choices the wizard offers, such as --mode, --look and --categories.
SQLite or PostgreSQL#
With DATABASE_URL empty, the site keeps everything in one SQLite file, app.db, in its instance folder. That is what every route gives you. For PostgreSQL, set DATABASE_URL=postgresql://user:password@host:5432/dbname, and DATABASE_SSLMODE=require if your database host asks for it. The tables are made the first time the site starts. Under deploy.sh, set it with set-env, and give an address the container can reach: inside a container, localhost is the container itself.
The kit does not install or run PostgreSQL. Under deploy.sh, a PostgreSQL database is also left out of the nightly backup and of the snapshot update takes: see Backups and scheduled jobs.
The settings that matter on a server#
SECRET_KEY: signs sign-ins and locks the keys you save on Integrations.add-sitemakes one. A value under 16 characters, or one copied from an example file, stops the site at start. Never change it on a site in use: the saved keys can no longer be read.SESSION_COOKIE_SECURE=true: the sign-in cookie travels overhttpsonly. Both Docker routes set it. With it on, nobody can stay signed in over plainhttp.TRUSTED_PROXIES=1: the number of proxies in front of the site. Left at 0 behind a proxy, every visitor appears to come from the proxy's own address, so one visitor's rate limit or block falls on everyone.RATELIMIT_STORAGE_URI: leave it asmemory://..env.examplesuggestsredis://for a live site, andrequirements.txtinstalls no Redis package. Withmemory://each worker keeps its own count.
Email, Stripe, Google sign-in and bot protection are entered on Integrations under Tools, not in .env. What you save there is used ahead of the file.
Check that it is up#
curl https://example.com/healthA healthy site answers {"database":"ok","revision":"0012","status":"ok"}. If the database cannot be reached or was never set up, it answers with status 503 and "status":"error". The address works during setup and in coming-soon mode, so it suits an uptime monitor.
Upload size#
The site refuses any upload request over 16 MB. Under deploy.sh, nginx stops it sooner, at 12 MB, with a page reading "413 Request Entity Too Large". The limit is the line client_max_body_size 12M; in scripts/nginx-site.conf.template. Raise it to no more than 16M and run enable-https again.
After setup#
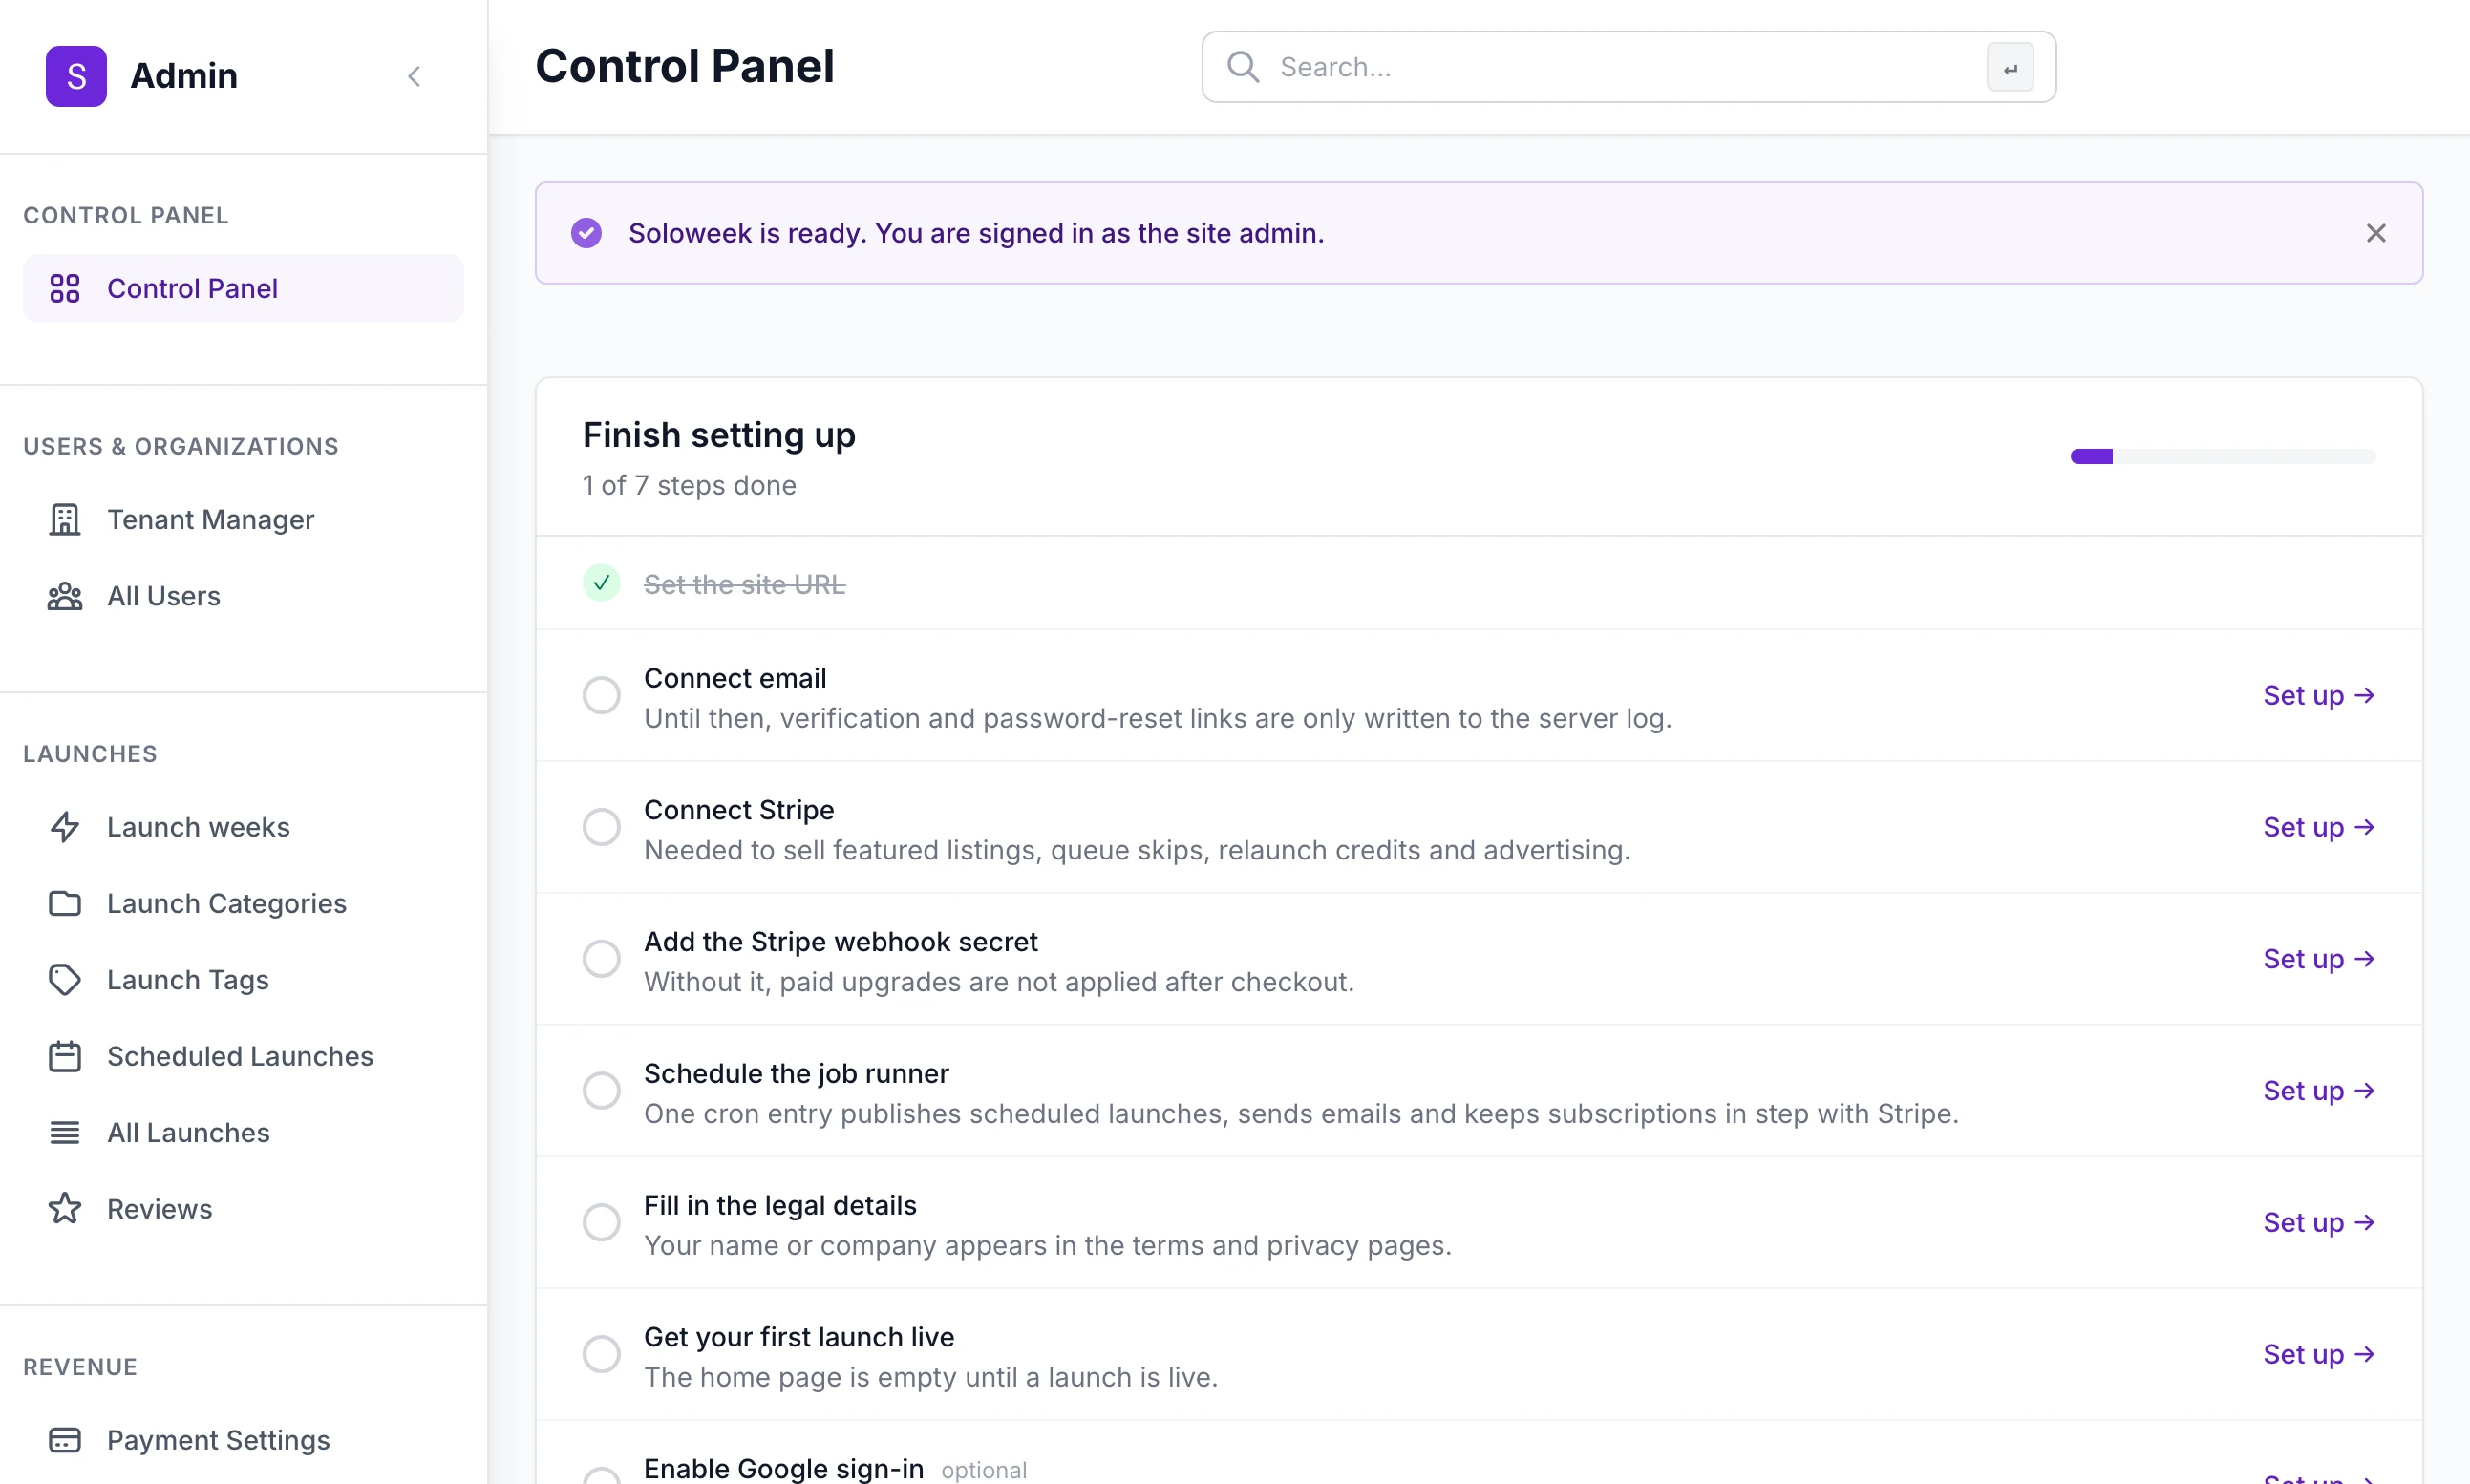
The admin dashboard opens with a list headed Finish setting up: the site address, email, Stripe, the job runner and the rest, each with a Set up link. Under both Docker routes, "Schedule the job runner" ticks itself within 15 minutes.
- Opening dayComing-soon mode and the checklist before you open.
- Backups and scheduled jobsWhat runs on the server and how to restore.
- Updating Launch LabMove to a new version.
add-site says "A site called 'gadgets' already exists."
An earlier attempt got as far as writing the site's folder. To start again from nothing:
scripts/deploy.sh remove-site gadgets
rm -rf sites/gadgets
The browser shows 502 Bad Gateway
nginx is running and the site's container is not answering. Run scripts/deploy.sh status, then scripts/deploy.sh logs gadgets to see why it stopped.
Can I change the domain later?
Yes. Put a certificate for the new name in /etc/ssl/launchlab, then run scripts/deploy.sh set-env gadgets SITE_DOMAIN=new-example.com. The script restarts the site and writes a new nginx file. Then change Site URL on the General tab of Site Settings, which the links in emails use.
Can I bring over a site I built on my computer?
Yes. Make the site with add-site, then replace its data with your own instance folder: see Restore a backup, which uses the same command.
Stuck on a step? Send a message.