Fill the site with a niche pack
Write your starter listings as two files, check them with a dry run and load them with one command, so the site opens with launches already on it.
Updated 9 Oct 2026 · written for Launch Lab 2.9.0
On this page
A niche pack is a folder of starter listings that you load from the terminal with one command. What it creates shows up on the home page and in All Launches, Launch Categories and Launch Tags, all under Launches in the admin sidebar. A launch site with nothing on it gets no launches: a maker who finds an empty list does not submit, and a visitor has nothing to vote on. A pack puts listings you chose on the site first, and you hand each one to its real maker when they turn up.
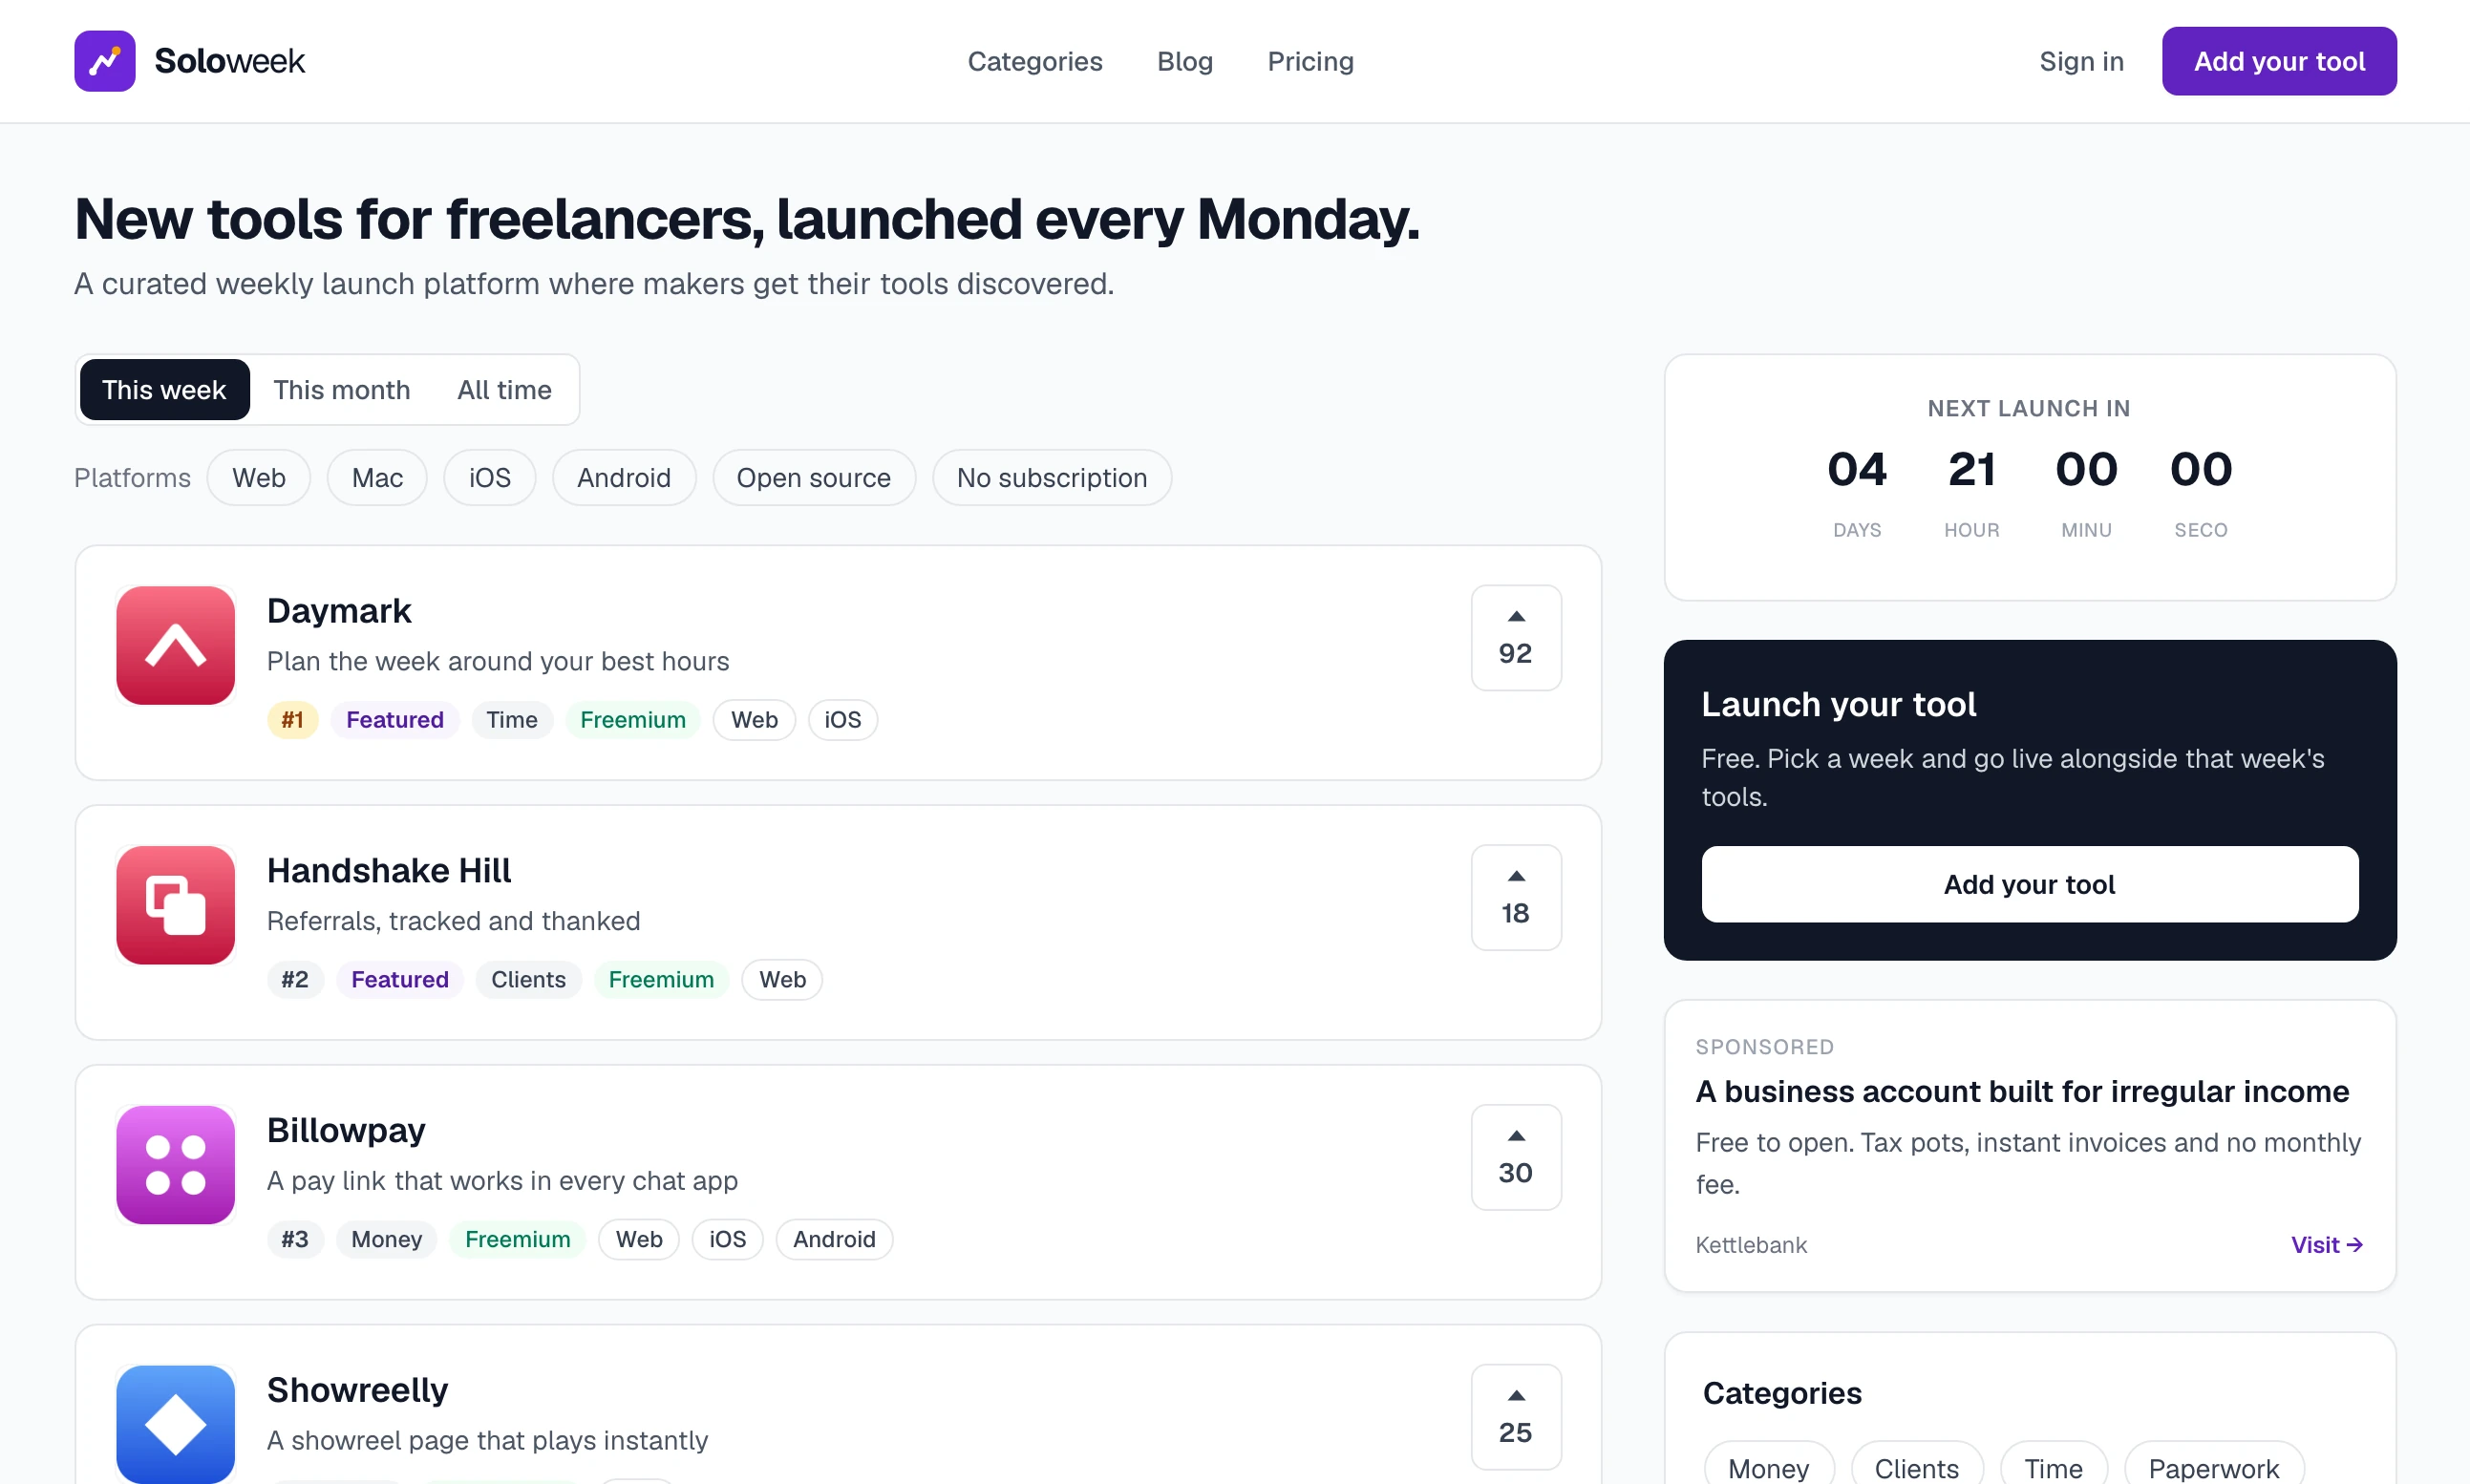
These guides say "listing" and "maker". Your site uses its own words, set in Make it your niche.
What a pack holds#
my-niche/
  site.json       the categories, the tags and the account that owns the listings
  products.json   the listings, in the order they should go live
logos/ logo files, if you have themsite.json#
| Key | Needed | What it is |
|---|---|---|
curator.username | Yes | The username of the account that will own the listings. |
curator.email | Yes | That account's email address. Use one you can read and that no other account on the site has: the "you're live" email for each booked listing is sent to it. |
curator.first_name, curator.last_name, curator.bio | No | Shown on each listing as the maker, and on the account's profile page. |
categories | Yes, at least one | A list. Each entry needs a name. description, icon and color are optional. |
tags | No | A list. Each entry needs a name of up to 50 characters with a letter or a number in it. description is optional. |
tag_wording | No | singular and plural: what the site calls its tags. Used only if both tag fields on the Wording tab are empty. |
An icon is a Bootstrap Icons name such as bi-briefcase. A color is one of gray, slate, red, orange, amber, yellow, green, emerald, teal, cyan, blue, indigo, purple, pink or rose. With no colour a category is blue.
products.json#
A list, one entry for each listing.
| Key | Needed | What it is |
|---|---|---|
name | Yes | Up to 100 characters. |
tagline | Yes | One line, up to 200 characters. |
description | Yes | The full description. Line breaks are kept: write one as \n. |
website_url | Yes | The listing's own website, up to 300 characters. |
category | Yes | Exactly as one of the names in site.json, capitals included. |
pricing_model | No | Free, Freemium, Paid, Subscription or One-time. |
tags | No | Up to five names, each exactly as in site.json. |
features | No | A list of short lines. The first six are kept, each up to 100 characters. |
logo_file | No | Where the logo is inside the pack folder, for example logos/penny-post.png. Use a PNG, JPG or WebP. It is shrunk to fit 200 by 200 pixels. |
A listing with no logo, or whose logo file is not in the folder, gets a coloured tile with its first letter.
An example pack#
These two files make a complete pack. Save them in a folder called my-niche inside the Launch Lab folder's niches folder. The kit's own example, with eight listings, is beside it in niches/example.
{
  "curator": {
    "username": "sitepicks",
    "email": "[email protected]",
    "first_name": "Site",
    "last_name": "Picks",
    "bio": "Listings added by the site while it gets going."
  },
  "categories": [
    {
      "name": "Money",
      "description": "Invoices, payments and tax",
      "icon": "bi-briefcase",
      "color": "green"
    },
    {
      "name": "Time",
      "description": "Tracking hours and planning the week",
      "icon": "bi-laptop",
      "color": "blue"
    }
  ],
  "tag_wording": { "singular": "platform", "plural": "platforms" },
  "tags": [
    { "name": "Web", "description": "Runs in a browser" },
    { "name": "iOS" }
  ]
}[
{
"name": "Penny Post",
"tagline": "Invoices that send their own reminders",
"description": "Send an invoice once and Penny Post follows it up until it is paid.\n\nMade for people who work alone.",
"website_url": "https://pennypost.example.com/",
"category": "Money",
"pricing_model": "Freemium",
"tags": ["Web"],
"features": ["Automatic reminders", "Card payments", "Late fee calculator"],
"logo_file": "logos/penny-post.png"
},
{
"name": "Blockhour",
"tagline": "Plan the week around your best hours",
"description": "Blockhour turns a list of jobs into a week you can keep to.",
"website_url": "https://blockhour.example.com/",
"category": "Time",
"pricing_model": "Subscription",
"tags": ["Web", "iOS"]
}
]Load the pack#
Run the setup wizard first: a pack needs a site with an admin. Then open a terminal in the Launch Lab folder, set up as in Install Launch Lab on your computer.
Step 1: Check it with a dry run
Terminalflask --app run.py niche import niches/my-niche --dry-runNothing is written. A sound pack prints one line for each listing: the date it would go live, its name, its category and its tags.
What the dry run prints2026-10-05 Penny Post [Money] (Web) 2026-10-05 Blockhour [Time] (Web, iOS)A pack with mistakes prints "Fix the pack first:" and every problem it found, such as "Blockhour: unknown category 'Hours'". Fix the files and run it again.
Step 2: Load it
Terminalflask --app run.py niche import niches/my-nicheYou see "Created 2 launches (2 live now), skipped 0 already present." Both are live because both fit into the current week.
Step 3: Look at the result
Open the home page, then All Launches under Launches in the admin. The listings are there, under the Account your own admin belongs to.
The options#
| Add to the command | What it does |
|---|---|
--dry-run | Checks the files and prints the plan. Changes nothing. It lists every listing in the file, even ones a real import would skip, and prints weekly dates on a rolling site too. |
--per-week 8 | Puts 8 listings in each launch week, in place of the site's own number. It also changes a setting: see the warning below. |
--demo | Marks the listings as demo content, so they can all be removed later in one go. |
What an import changes#
Categories. Each category in the pack is created. One that already exists by that name is updated: its description, icon and colour are replaced where the pack gives them, it is put in the pack's order and it is switched on. Every other category that no listing uses is deleted. On a new site that removes the starter categories, Apps, Tools, Hardware, Services, Learning and Other, or the ones you typed in the setup wizard, unless the pack names them. A category with a listing in it, even a draft, is kept.
Tags. Each tag is created, or updated and switched on if it exists. A pack never deletes a tag.
The curator. If no account has the curator's username, one is created inside your first admin's account. It has no password, so nobody can sign in as it, and it is left out of email campaigns. Its picture is your site's logo. If an account with that username exists already, it is used as it is. Because the listings sit in your own account, they are on your own dashboard too, where you can edit them like any listing of yours.
Listings. Each one is created with its name, tagline, description, website, category, pricing, tags, features and logo. A pack carries no screenshots, votes or reviews.
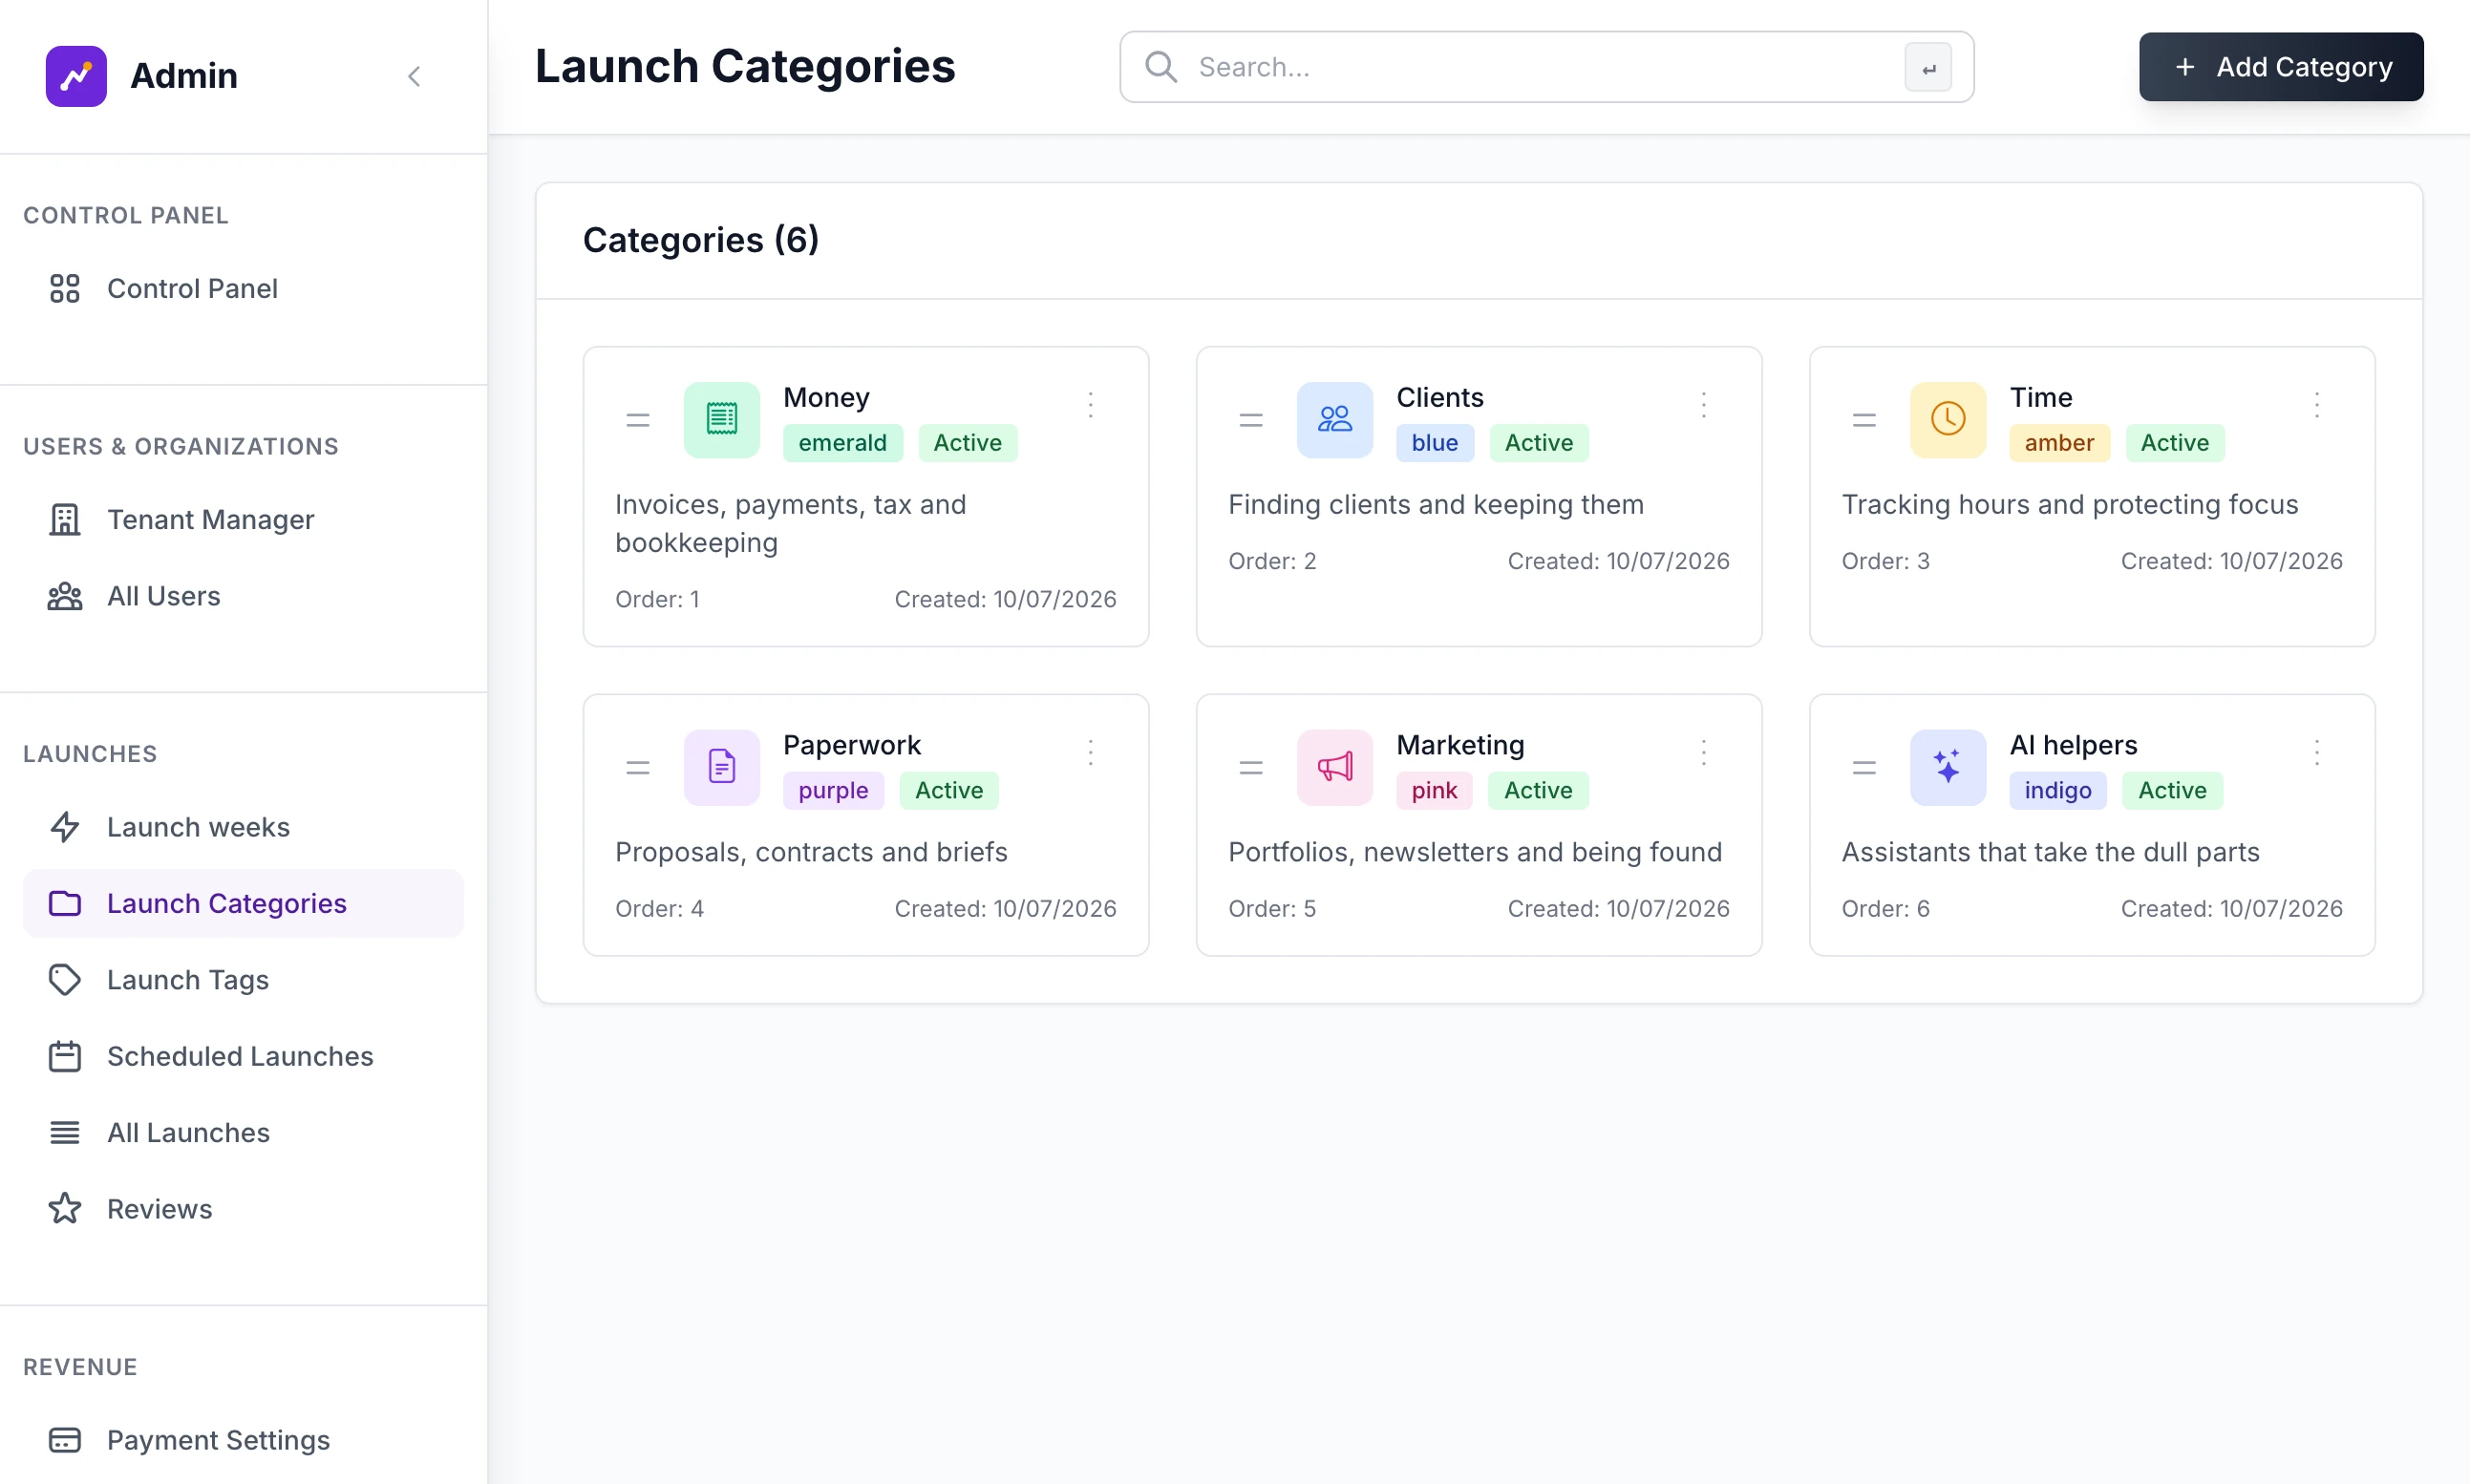
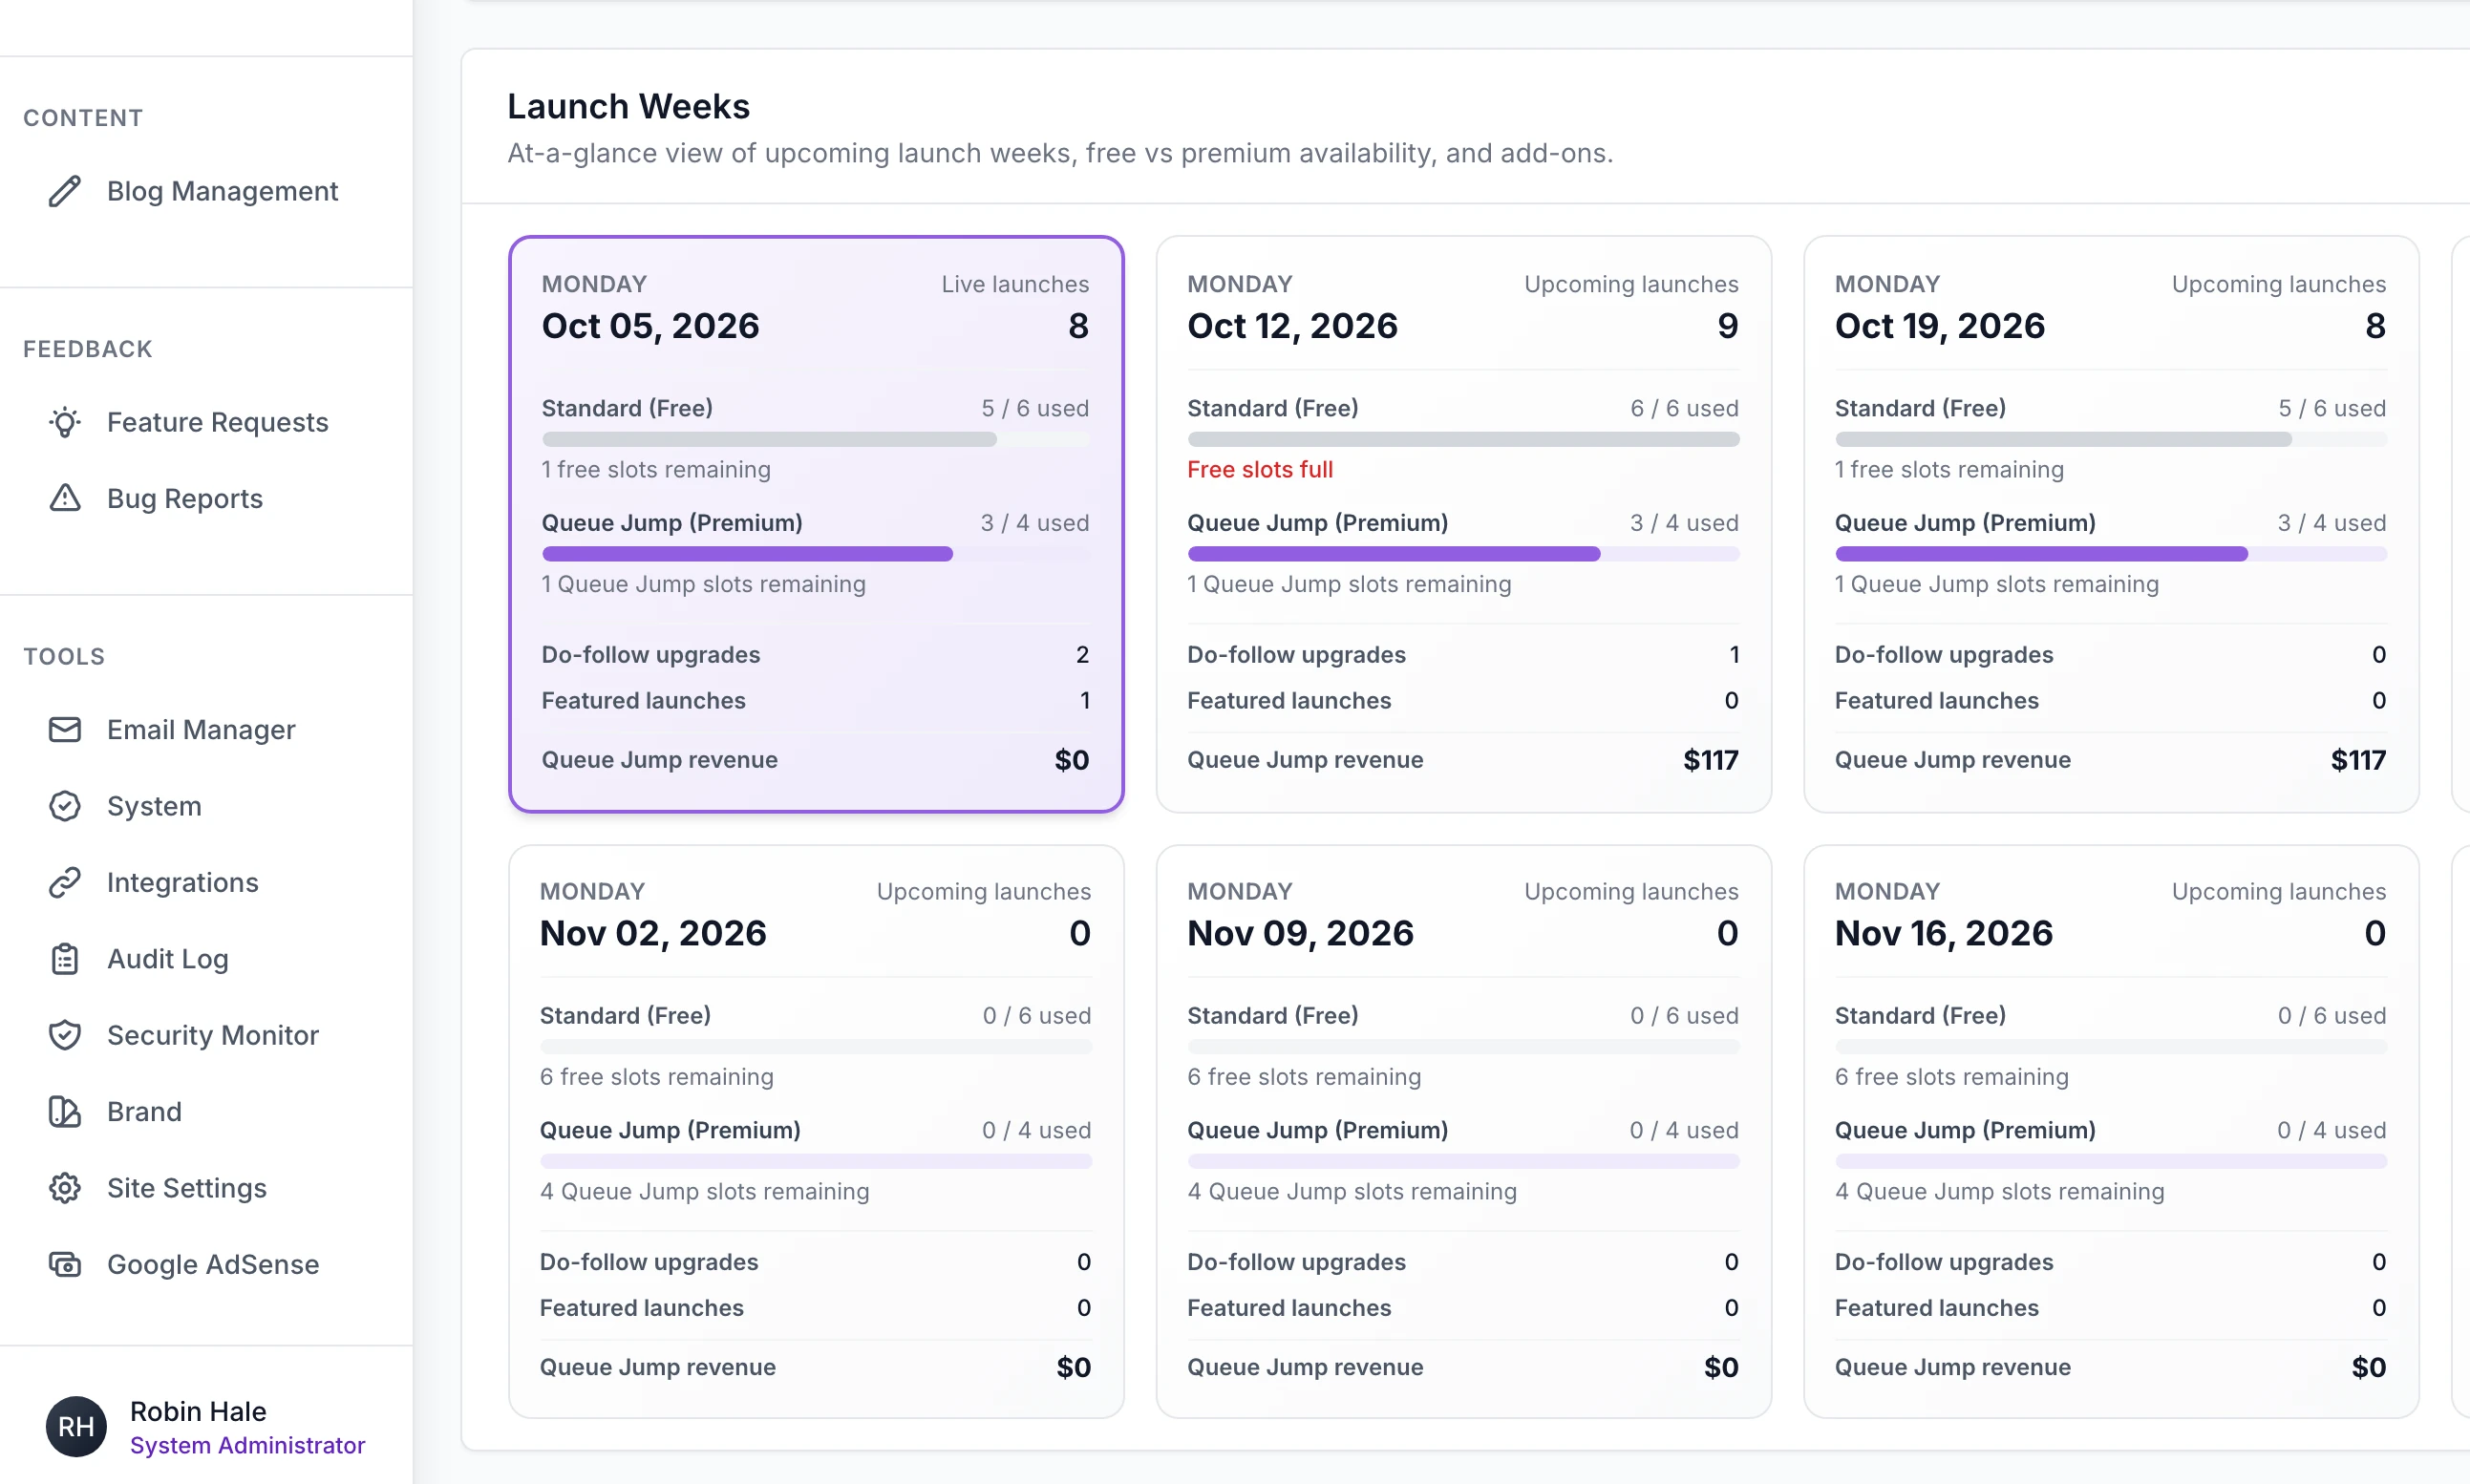
On a weekly site#
The pack is dealt out in file order, a fixed number to a week. That number is --per-week, or without it the site's Free places a week (10 if that is set to 0).
The first group goes live at once, dated to the current launch week: the most recent launch day, today included.
Each later group is booked for the launch day one week after the group before it. Those listings wait with a free booking and go live on their date, when the daily job publishes that day's launches. See Backups and scheduled jobs.
Dates are worked out in UTC.
On a rolling site#
Every listing goes live at once and nothing is booked. Their go-live times are set three hours apart, the first in the file being the newest, so the Newest list follows the order of the file.
Run it again#
Running the same command again is safe. A listing is skipped when any listing on the site, in any state, has the same name or the same website address. The last line counts them: "Created 0 launches (0 live now), skipped 2 already present."
Before you add listings to a pack and load it a second time:
Categories and tags are applied again. A description, icon or colour you changed in the admin goes back to the pack's, a category you hid is shown again, and unused categories outside the pack are deleted again.
A new listing's week is counted from its position in the whole file and from the week you run the command in, not from where the last import stopped. Use
--dry-runto see the dates.An import does not look at what is already booked. It can put more free bookings into a week than Free places a week allows.
Hand a listing to its real maker#
When the person who makes a listing wants to manage it, move it to them.
Step 1: Ask the maker to create an account
They sign up on your site in the ordinary way.
Step 2: Tick the listing
Open All Launches under Launches. Find the listing with the box marked "Search name, website or category" and tick it. You can tick several.
Step 3: Choose the account and click Move
In the row that starts "With the ticked launches:", pick the maker's account from Move to account… and click Move. You see "Moved 1 launches to" and the account's name.
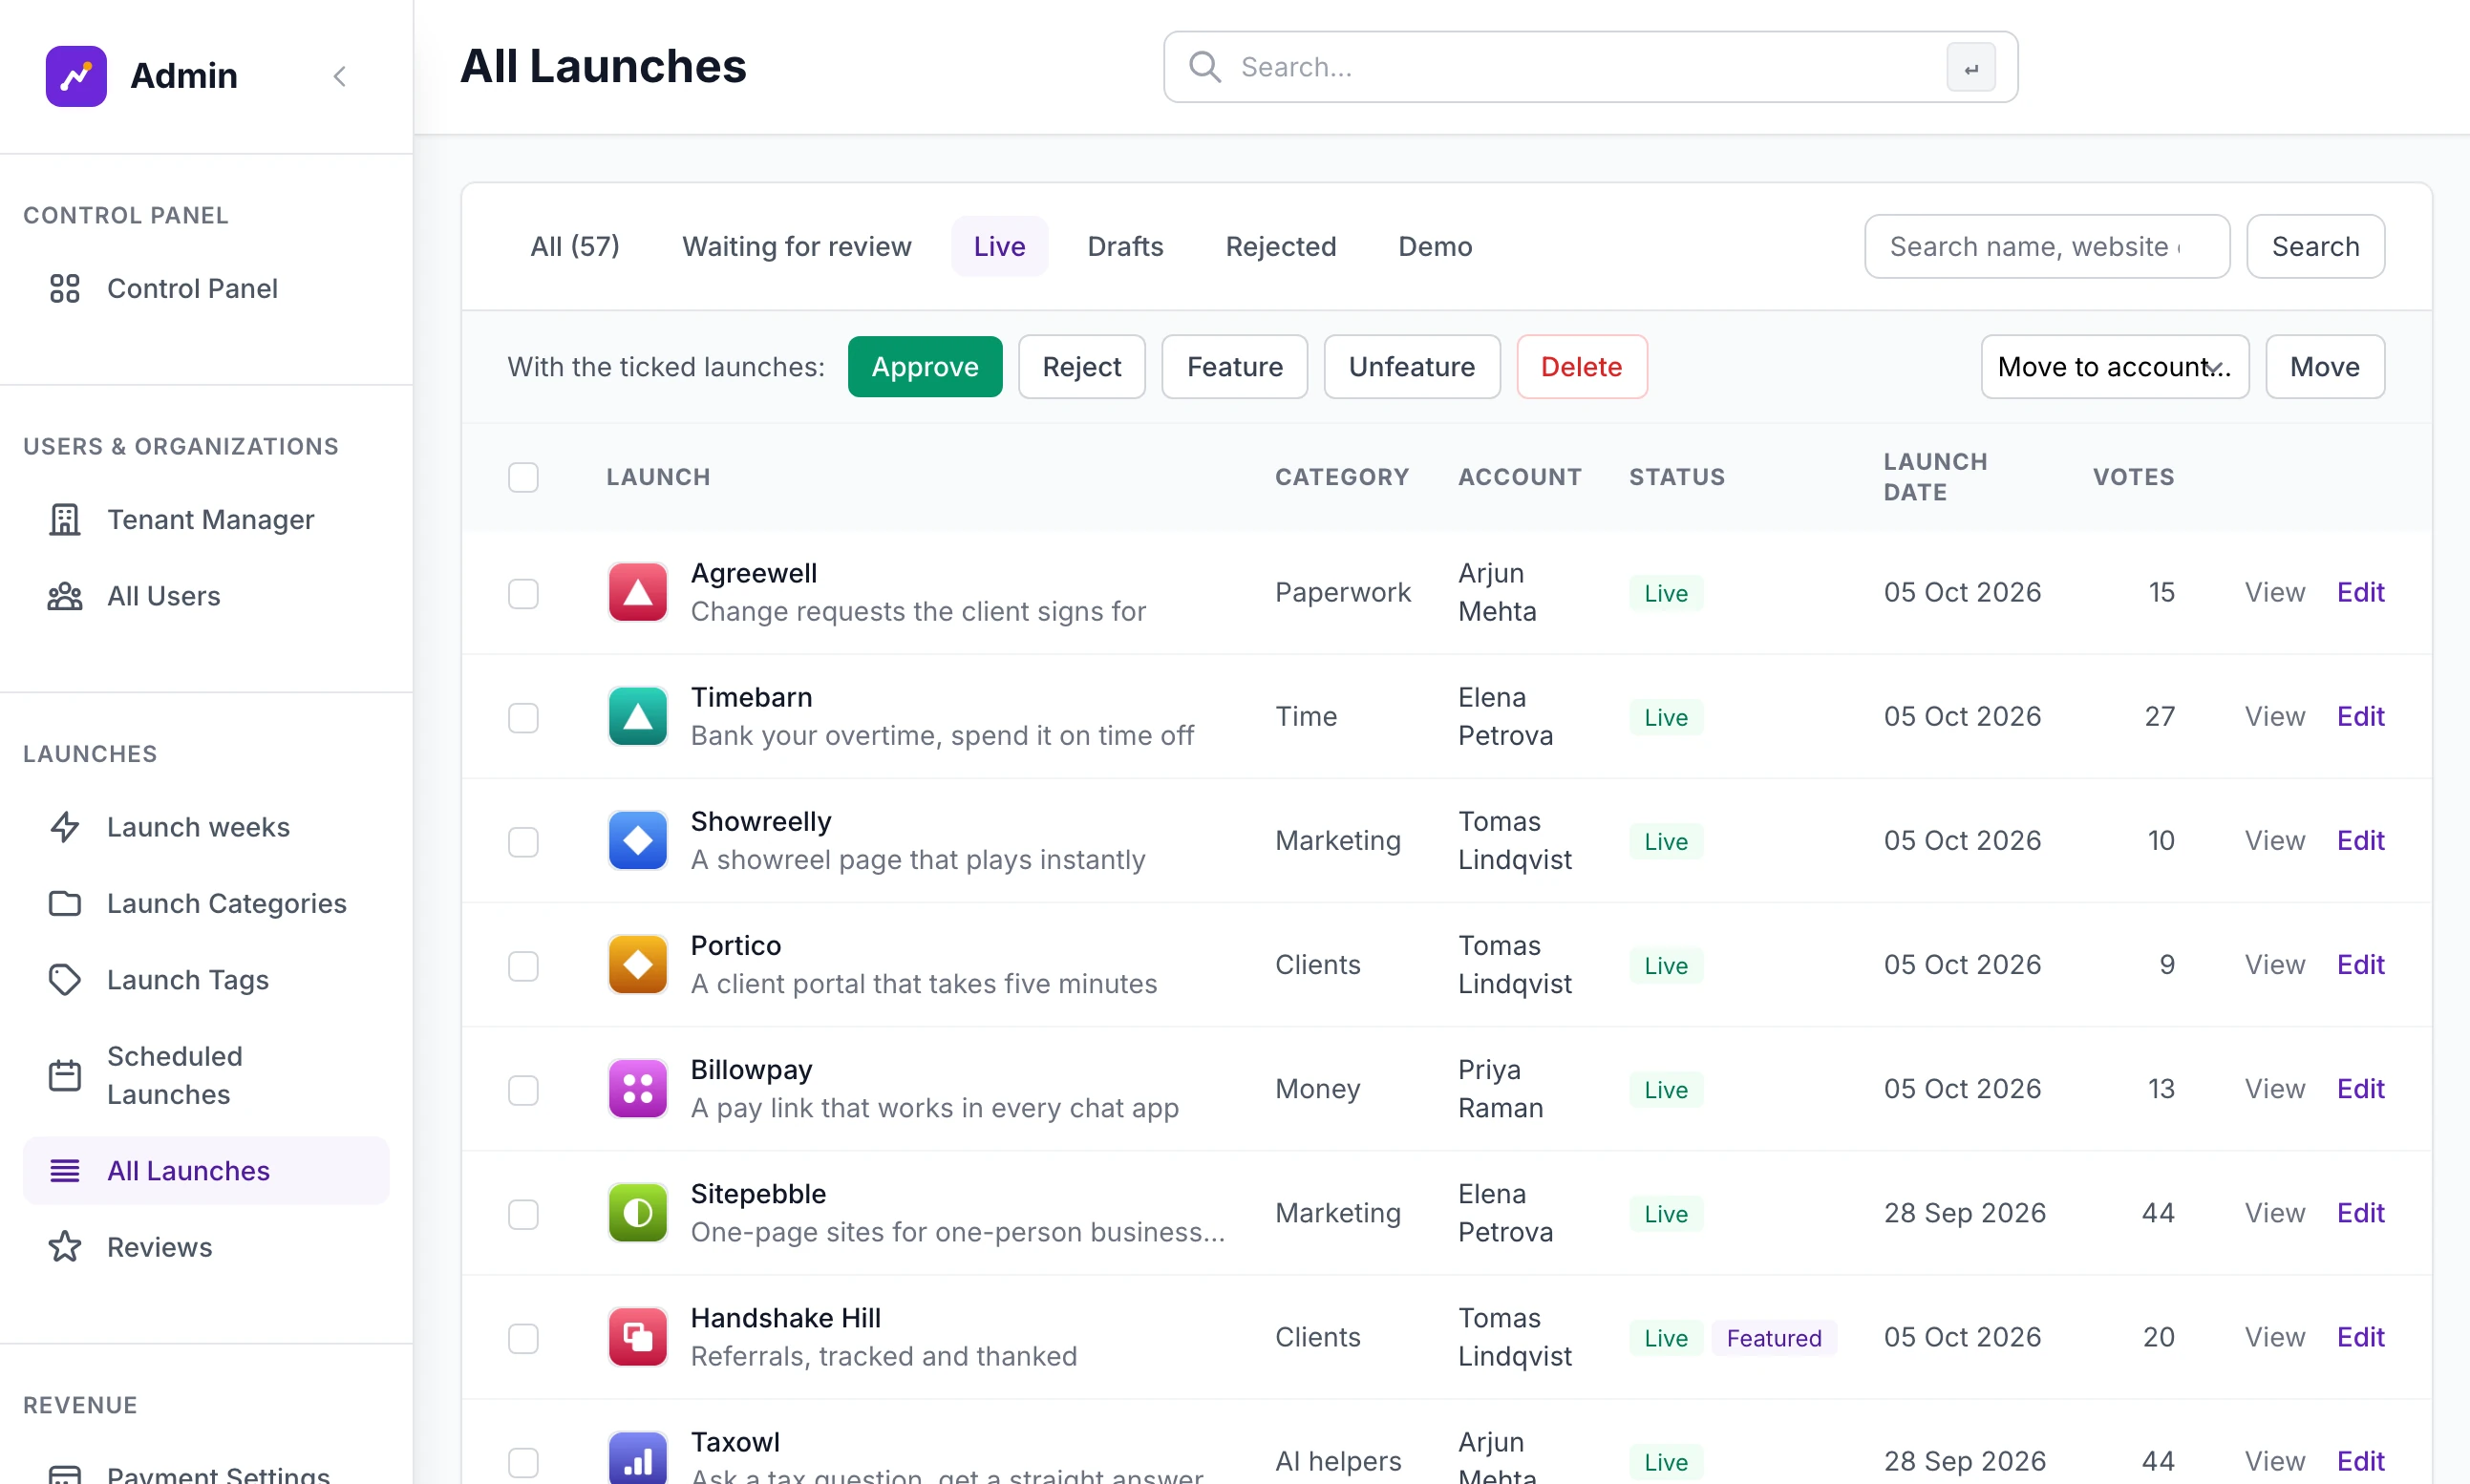
The listing now belongs to that account and to its first member, and any booking it has moves with it. It keeps its page, its votes and its reviews. It also stops being demo content, so removing demo content later leaves it alone.
Demo content#
Add --demo when the pack is only there to show how the site looks:
flask --app run.py niche import niches/example --demoDemo listings carry a Demo badge in All Launches, which has a Demo filter of its own. The Add example launches box at the end of the setup wizard does the same thing with the kit's eight example listings.
To remove them, open System under Tools and scroll to Demo content. It reads "8 demo launches (and the demo account that owns them) are on the site so it does not look empty." Click Remove demo content. You see "Demo content removed: 8 launches and 1 demo accounts."
The same thing from the terminal is flask --app run.py niche remove-demo.
On a server#
Under Docker the command runs inside the site's container. scripts/deploy.sh has no command for niche packs, so you run it yourself. Copy the pack folder into the site's data folder on the server, sites/NAME/instance/, which the container sees as /app/instance. Then, with your site's name in place of NAME:
docker exec launchlab-NAME flask niche import /app/instance/my-niche --dry-run
docker exec launchlab-NAME flask niche import /app/instance/my-niche
Inside the container the command is plain flask, with no --app run.py.
"Run setup first: the site has no admin yet."
The pack was loaded before the setup wizard was finished. Open the site in your browser, complete the wizard, and run the command again.
"site.json: the curator needs a username and an email"
Both are required, inside a curator block as in the example. The other messages follow the same pattern and name the file or the listing at fault: "Penny Post: missing tagline", "Blockhour: unknown tag 'Mac'", "Blockhour: at most 5 tags".
Can I load a second, different pack?
Yes. Its listings are added and its tags join the ones already there. A category from the first pack is kept as long as a listing uses it. An empty one that the second pack does not name is deleted.
A maker says there are no free weeks
The pack's bookings hold them. Open Payment Settings under Revenue and raise Free places a week under Weekly launch schedule. Every week, including the ones the pack is booked into, then has more free places than the pack uses.
Can a pack bring in votes, screenshots or reviews?
No. A pack holds only the keys in the two tables above. Votes and reviews come from visitors, and screenshots are added in the listing's own editor.
Stuck on a step? Send a message.