Email and the emails the site sends
Connect an email server, test it and know every email your site sends by itself and when.
Updated 9 Oct 2026 · written for Launch Lab 2.9.0
On this page
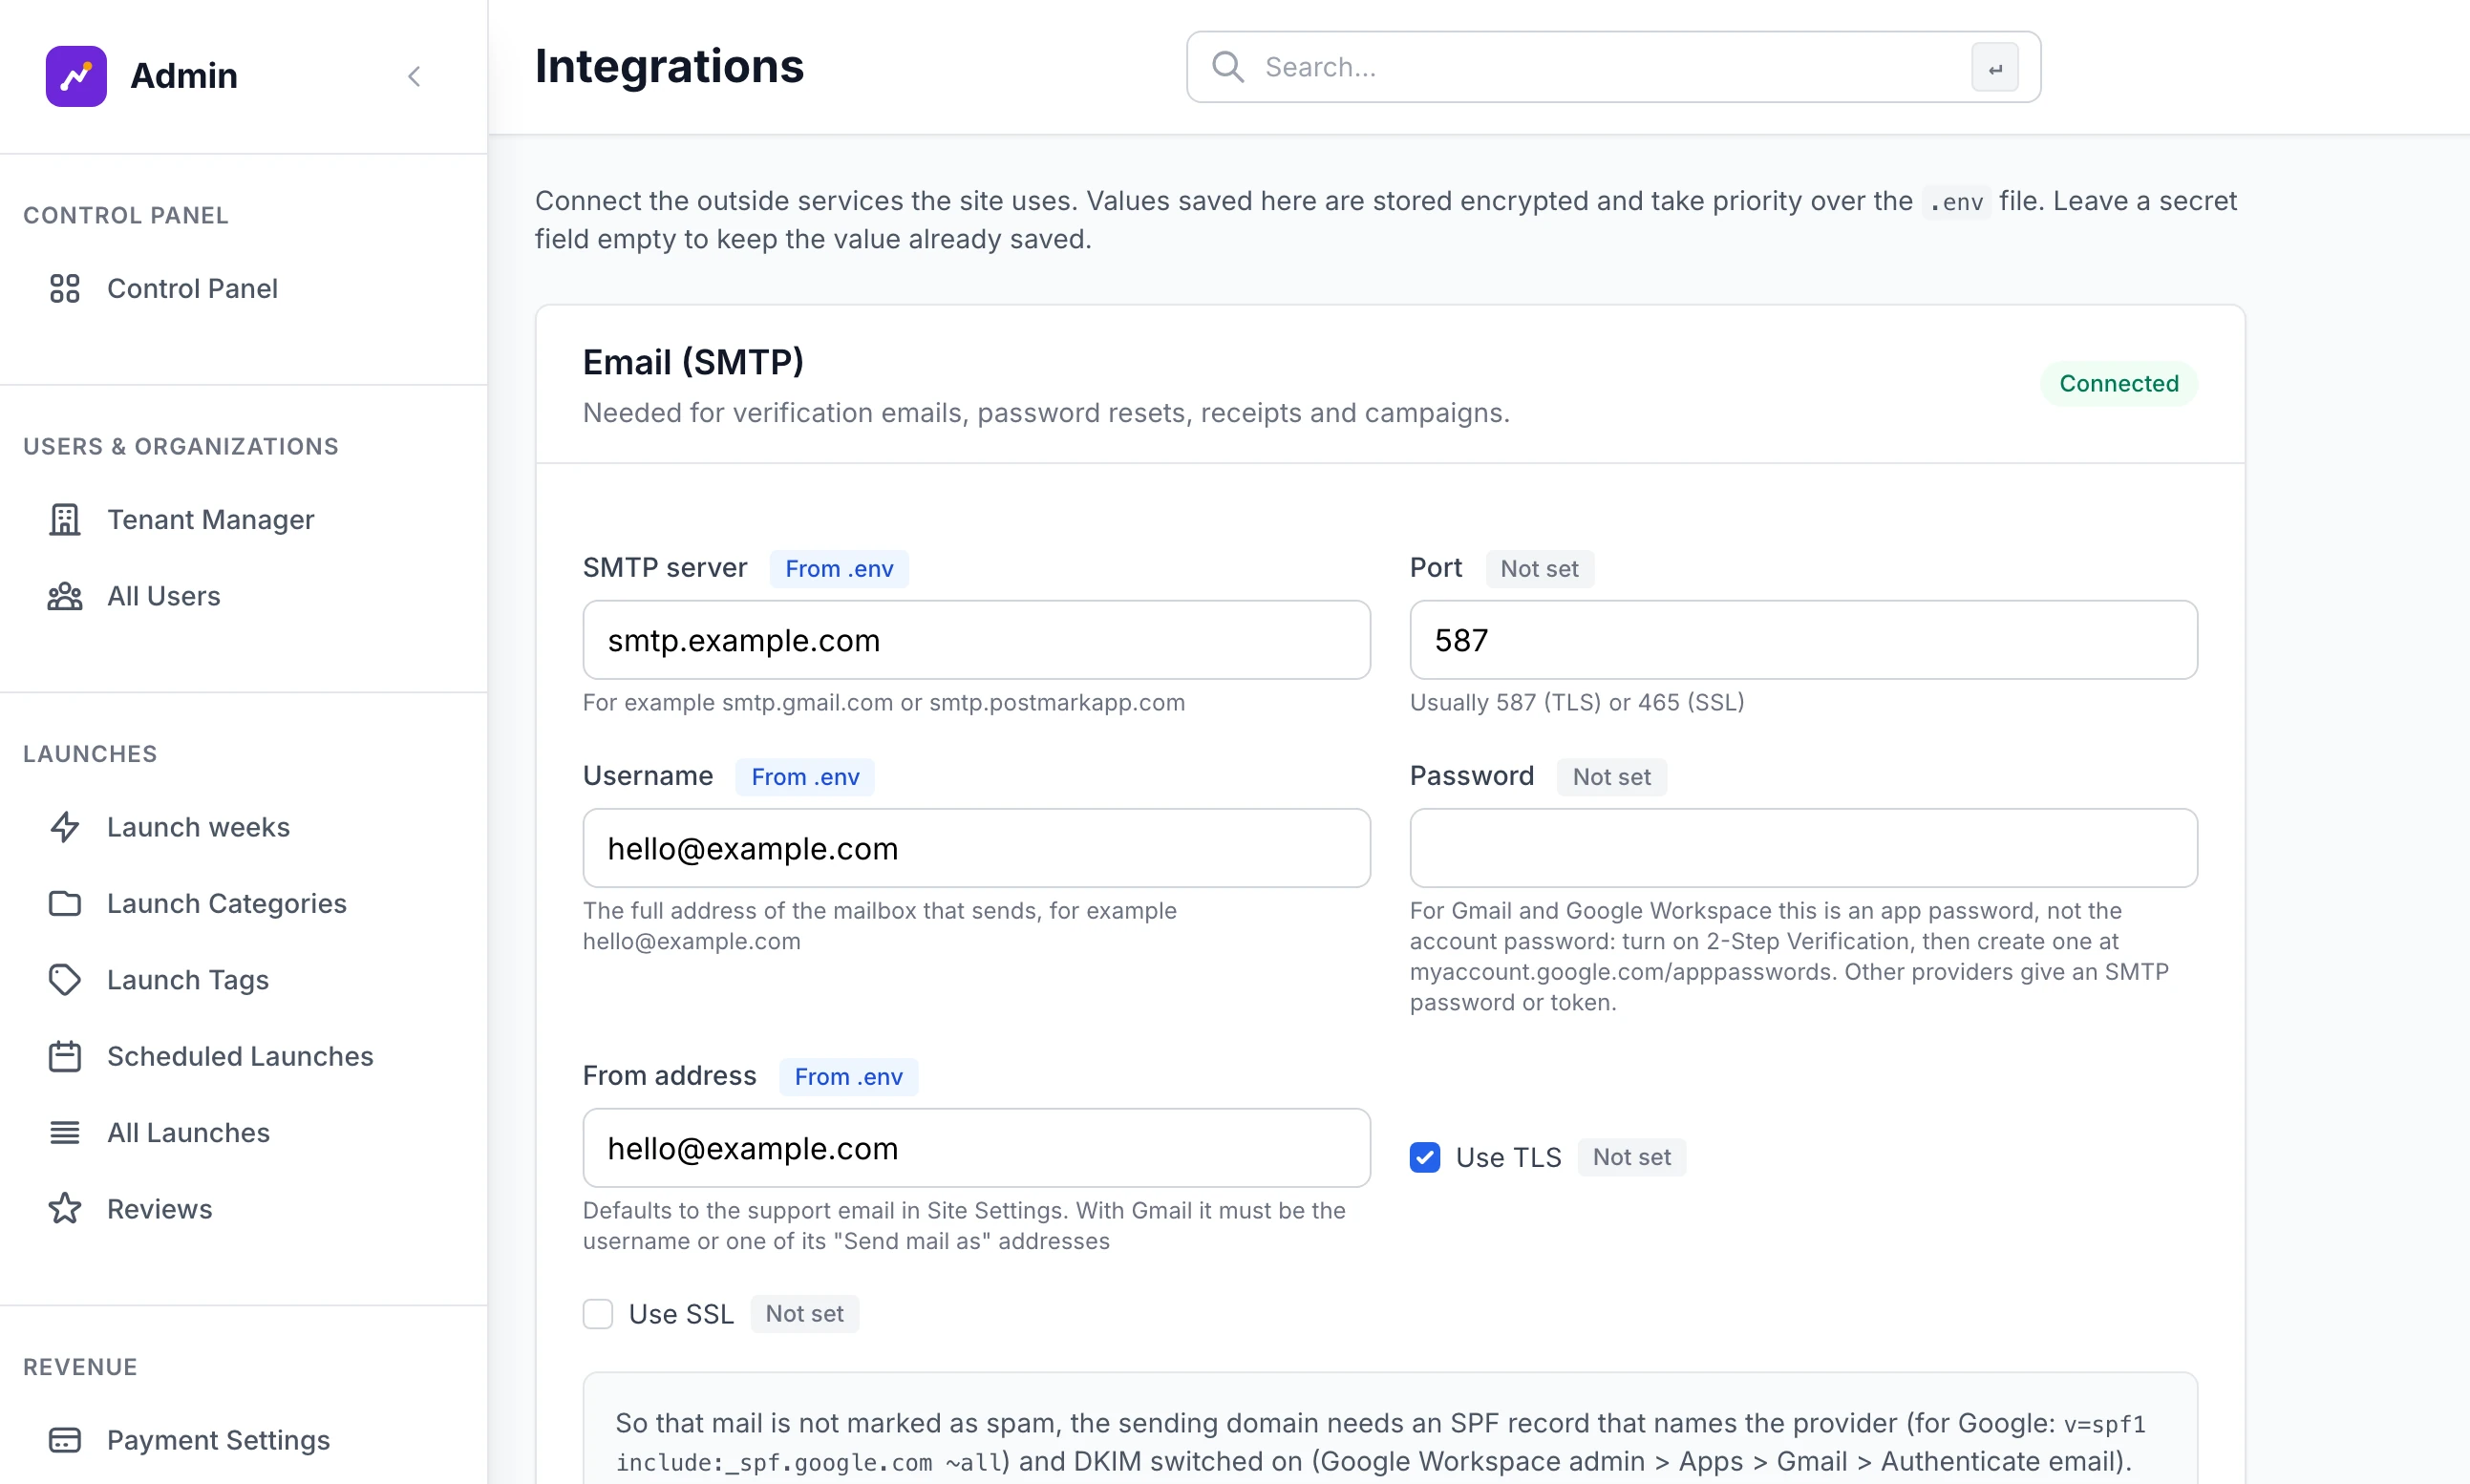
Open Integrations under Tools in the admin sidebar. The first card, Email (SMTP), connects the mail server that every email from your site goes out through: sign-up confirmations, password resets, receipts, launch-day notices and campaigns. Until it is filled in, your site sends nothing.
Your site uses its own words for a listing and for the person who launches it. This guide says listing and maker.
Get your SMTP details#
Launch Lab sends through any provider that offers SMTP, whether that is the company that hosts your mailbox or a service made for sending mail from websites. Open an account with one, verify your domain or sending address with it and collect five things from its settings:
| You need | What it is |
|---|---|
| Host | The server's name, for example smtp.your-provider.com |
| Port | Nearly always 587. Some providers use 465 |
| Username | Often the full sending address. Some providers issue a fixed name instead |
| Password | Often not your mailbox password, but an SMTP password, app password or token that you create in the provider's settings |
| TLS or SSL | Port 587 goes with TLS. Port 465 goes with SSL |
The provider also gives you DNS records for your domain, usually called SPF and DKIM. Add them where your domain is managed. Without them your emails are likely to be marked as spam.
Connect it#
Step 1: Fill in the server
On the Email (SMTP) card, type the host into SMTP server, then fill in Port, Username and Password.
Step 2: Choose TLS or SSL
Tick Use TLS for port 587, or Use SSL for port 465. Tick one, not both.
Step 3: Set the From address
From address is the address your emails come from. Leave it empty and the Support email from Site Settings, on the Contact & Social tab, is used. The sender's name is always your site's name. Most providers send only from an address or a domain you have verified with them.
Step 4: Confirm and save
Type your own password into Your password, to confirm and click Save. An admin who signs in with Google and has no password types their email address instead. You see "Email (SMTP) settings saved.", the card's badge turns to Connected and each field is marked Saved here.
Step 5: Send a test
Click Send test email to followed by your address. It goes to the address of the admin account you are signed in with, with the subject "Test email from" and your site's name. You see "Test email sent to" and that address, or "The mail server refused the message:" and the server's reason.
The password is never shown again. Its box reads "•••••••• (saved)". Leave it empty to keep the one saved.
Everything saved here is stored encrypted, using the
SECRET_KEYin your.envfile. ChangeSECRET_KEYand the saved values can no longer be read: type them in again.Connected means only that an SMTP server is filled in. The test email is what proves it works.
A change is in use within a minute.
Only a full admin can open Integrations. A read-only admin is turned away.
Use .env instead#
The same settings can live in your .env file:
MAIL_SERVER=smtp.your-provider.com
MAIL_PORT=587
MAIL_USE_TLS=true
MAIL_USE_SSL=false
[email protected]
MAIL_PASSWORD=paste-the-smtp-password-here
[email protected]
Restart the site after you change the file. A field read from there is marked From .env. A value saved on the Integrations page always wins over the same line in .env. Clear saved values (use .env) removes what was saved on the page: "Saved Email (SMTP) settings removed. Values from the .env file are used if present."
One setting exists only in .env. ADMIN_EMAIL is where the site's notices to you are sent. Without it they go to the Support email.
With no email server#
Launch Lab runs without email, which is how it works on your own computer. Three things are different:
Nothing is sent. Each email is written to the site's log instead, as a line that starts "Email is not connected - not sent to" with the address, the subject and the link the email carried. You can copy a password-reset link out of the log by hand. The log is the terminal the site was started in. On a server set up with the deploy script it is
scripts/deploy.sh logsfollowed by the site's name.New accounts are not asked to confirm their address. The person is signed in the moment they register, under "Welcome to" and your site's name.
Campaigns and automations are marked as sent, and nothing leaves. See Campaigns and automations.
What the site sends by itself#
These emails are written into the code. They carry your site's name, your brand and your site's words for a listing and a maker. They cannot be reworded from the admin. Each row gives the subject, with a listing's name or your site's name where the dots are.
To makers and account holders#
| When | |
|---|---|
| "Confirm your email for …" | Someone registers. The link works for 3 days |
| "Welcome to …" | They confirm their address, or sign in with Google for the first time |
| "Reset your … password" | They ask for a new password. The link works for 1 hour |
| "Your … password was changed" | They change their password |
| "Confirm your new email address for …" | They change their address. It goes to the new one |
| "You have been invited to …" | An account holder invites someone to their team. It carries a temporary password |
| "… is not scheduled yet" | A draft has been left untouched for 3 days. Sent once. On a rolling site the subject says it has not been submitted or is not live |
| "We have received …" | A listing is submitted for review, on a site that checks listings first |
| "… needs a few changes" | You send a listing back with a note |
| "… launches on 12 October" | A launch week is booked, free or paid |
| "… is live on …" | The listing goes live |
| "… is back on … this week" | A relaunch goes live |
| "How …'s launch week went" | On launch day, for each listing from the week before, with its views, votes, reviews and ranking by votes |
| "How was launching on …?" | A week after going live, asking for a review of your site. Sent once to each maker, and only with Feedback switched on |
| "…'s featured place ends on 3 November" | Three days before a paid featured place ends |
| "A featured place is free on …" | A place opens, to makers who asked to be told |
| "… has its first 5 votes" | The fifth vote arrives. Sent once |
| "New 5-star review of …" | A review is published on their listing. Not sent for a review that waits for your approval |
| "Your … receipt" | A payment completes, and each time an advert renews |
| "Your … refund" | A refund made in Stripe reaches the site: see Sales, transactions and refunds |
A maker can turn two groups off on their account page, under Emails. Votes and reviews covers the vote and review emails. News and reminders covers the draft reminder, the request for a review and your campaigns. The page says of the rest: "Emails about your account, launches and payments are always sent."
To advertisers#
| When | |
|---|---|
| "Your advert is live on …" | The first payment lands |
| "Your … advert is on hold: payment did not go through" | A monthly payment fails |
| "Your … advert has ended" | The subscription ends, for any reason |
| "Your … advert was taken down" | You reject the advert. It carries your reason |
To you#
These go to ADMIN_EMAIL, or to the Support email when that is not set.
| When | |
|---|---|
| "New User Registration - …" | Someone confirms their address or joins with Google |
| "New Scheduled Launch - …" | A launch week is booked |
| "New Launch Submitted - …" | A listing is submitted for review |
| "New Payment - …" | A payment completes or an advert subscription starts |
| "New Review Submitted - …" | A review is published on a listing |
| "New Platform Review: …" | A maker reviews your site |
| "Contact Form: …" | Someone sends the contact form |
Templates#
Open Email Manager under Tools and click Templates. The Email Manager's own first page is headed Email.
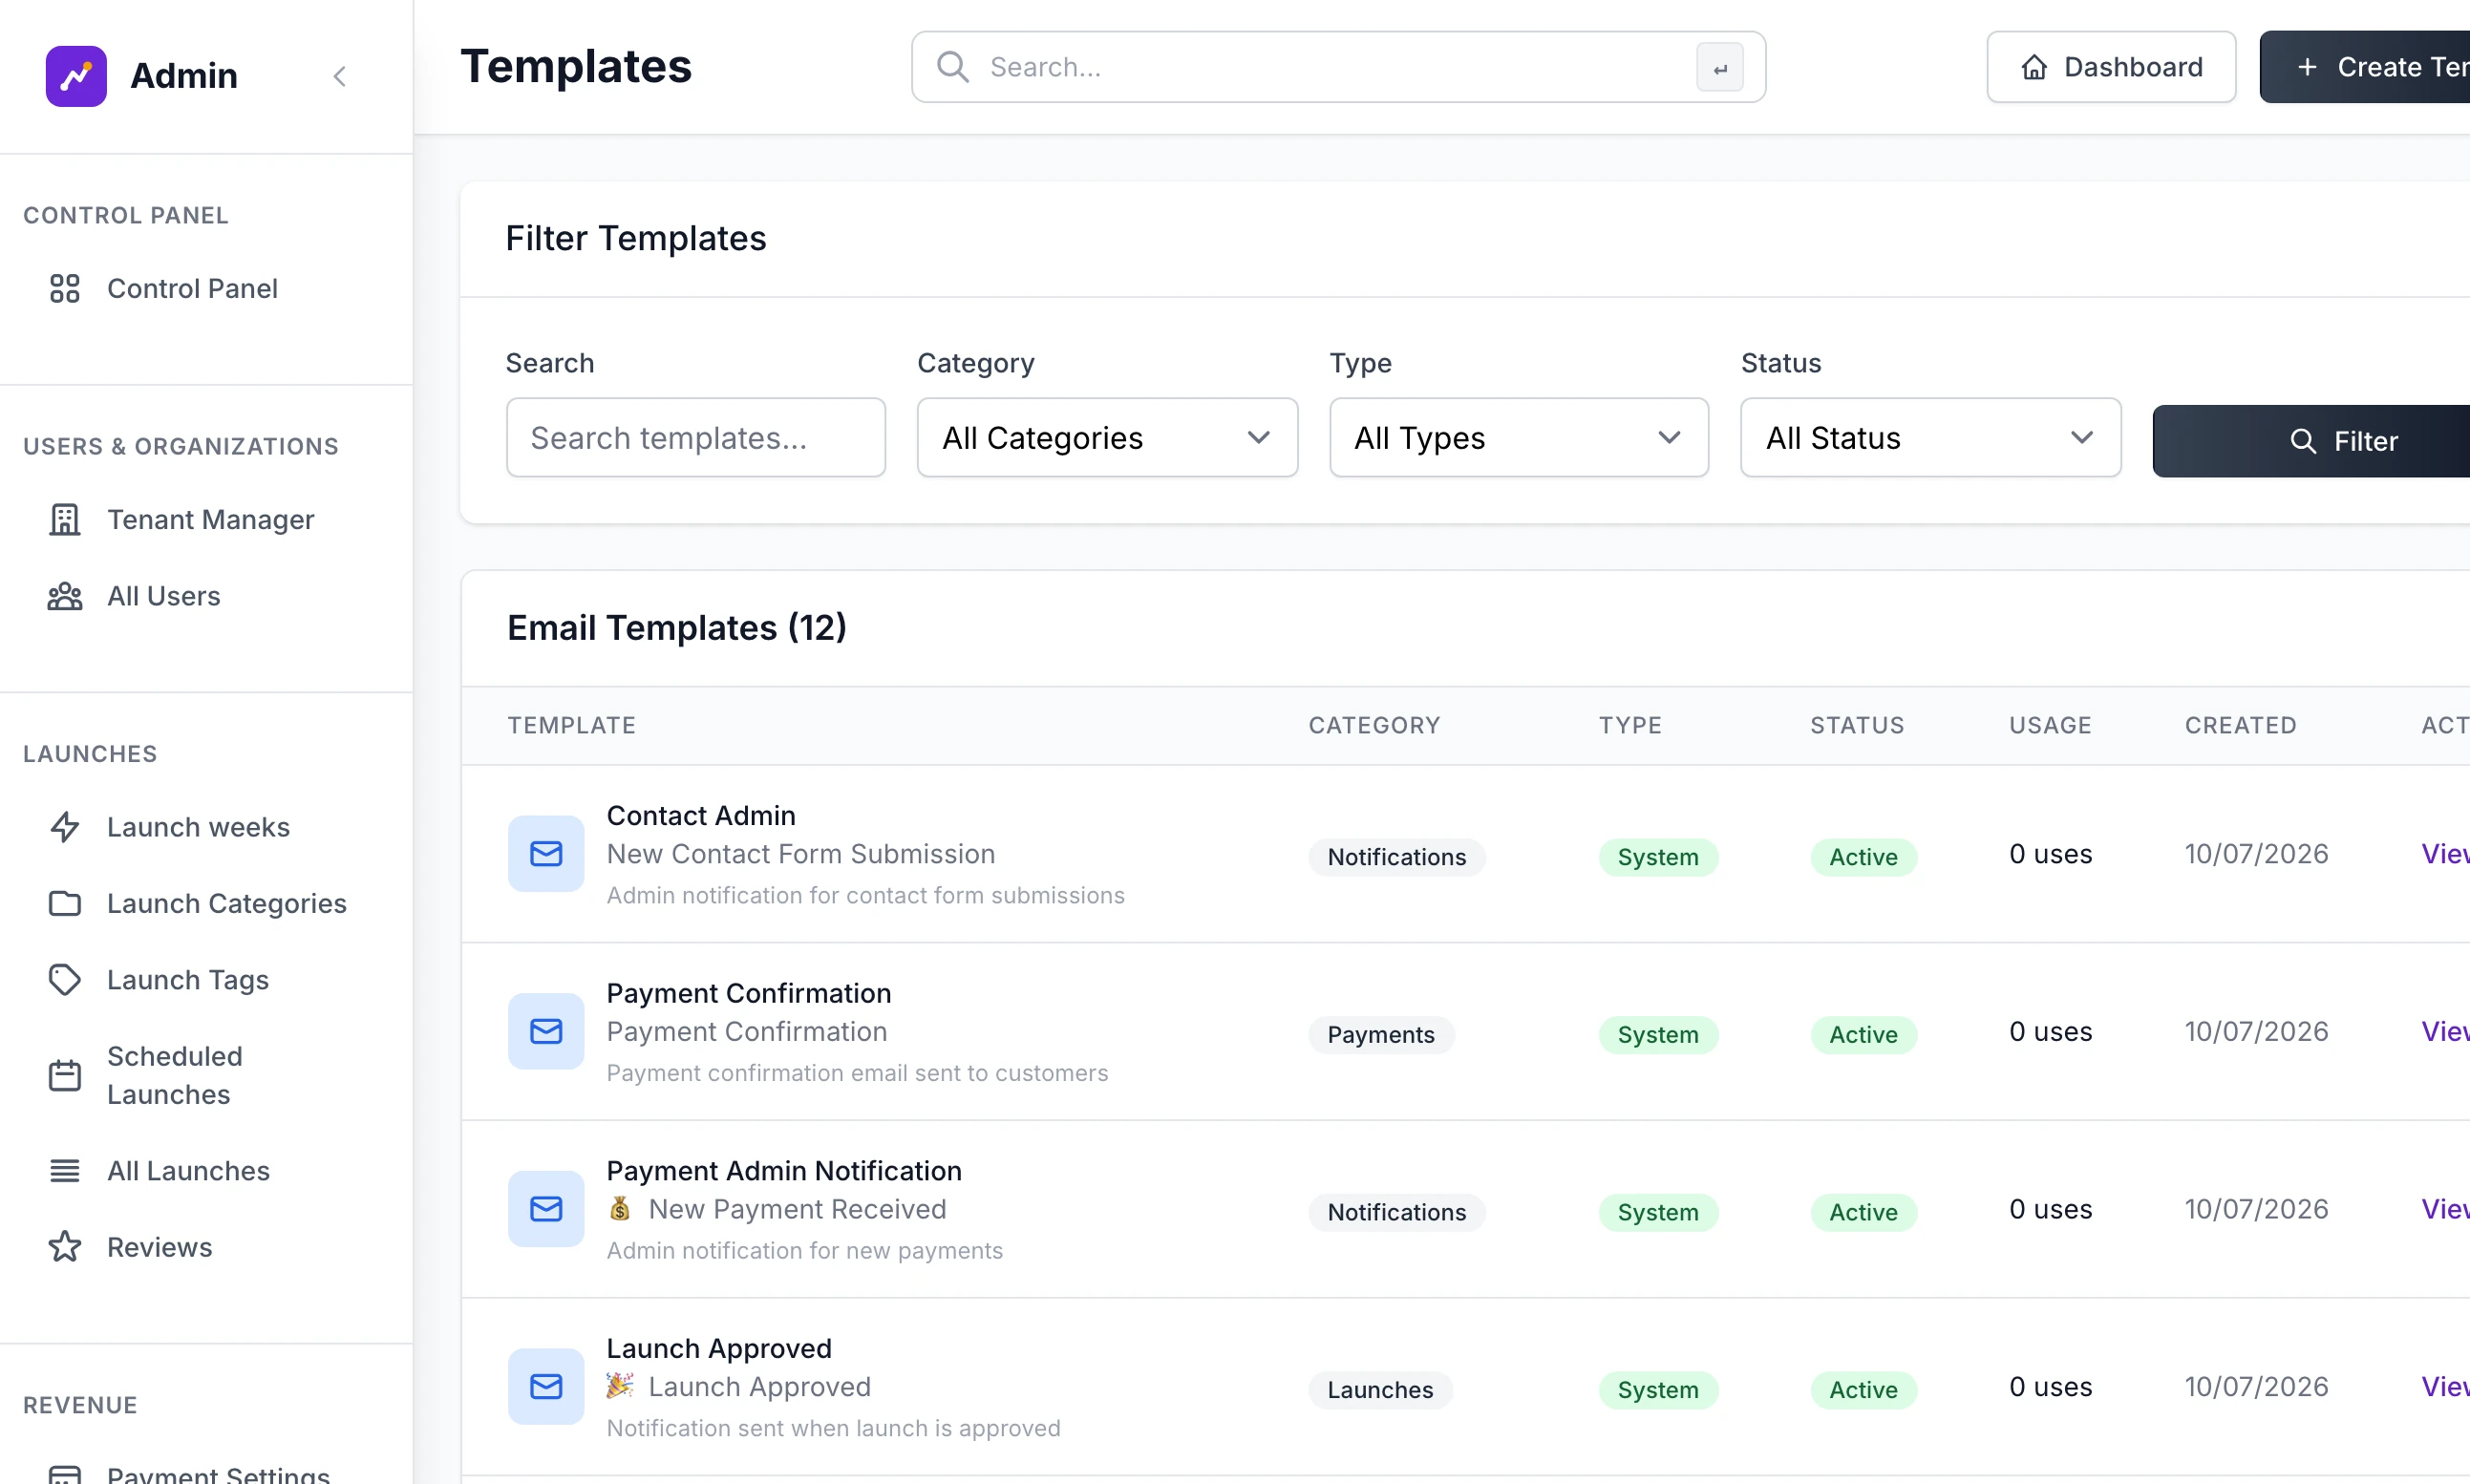
The list holds twelve templates of the type System and any of the type Custom that you add.
System templates can be read and not edited. View opens one with its details and an Email Preview filled with sample values. Show HTML shows the code behind it and Open in New Window shows it alone. There is no Edit.
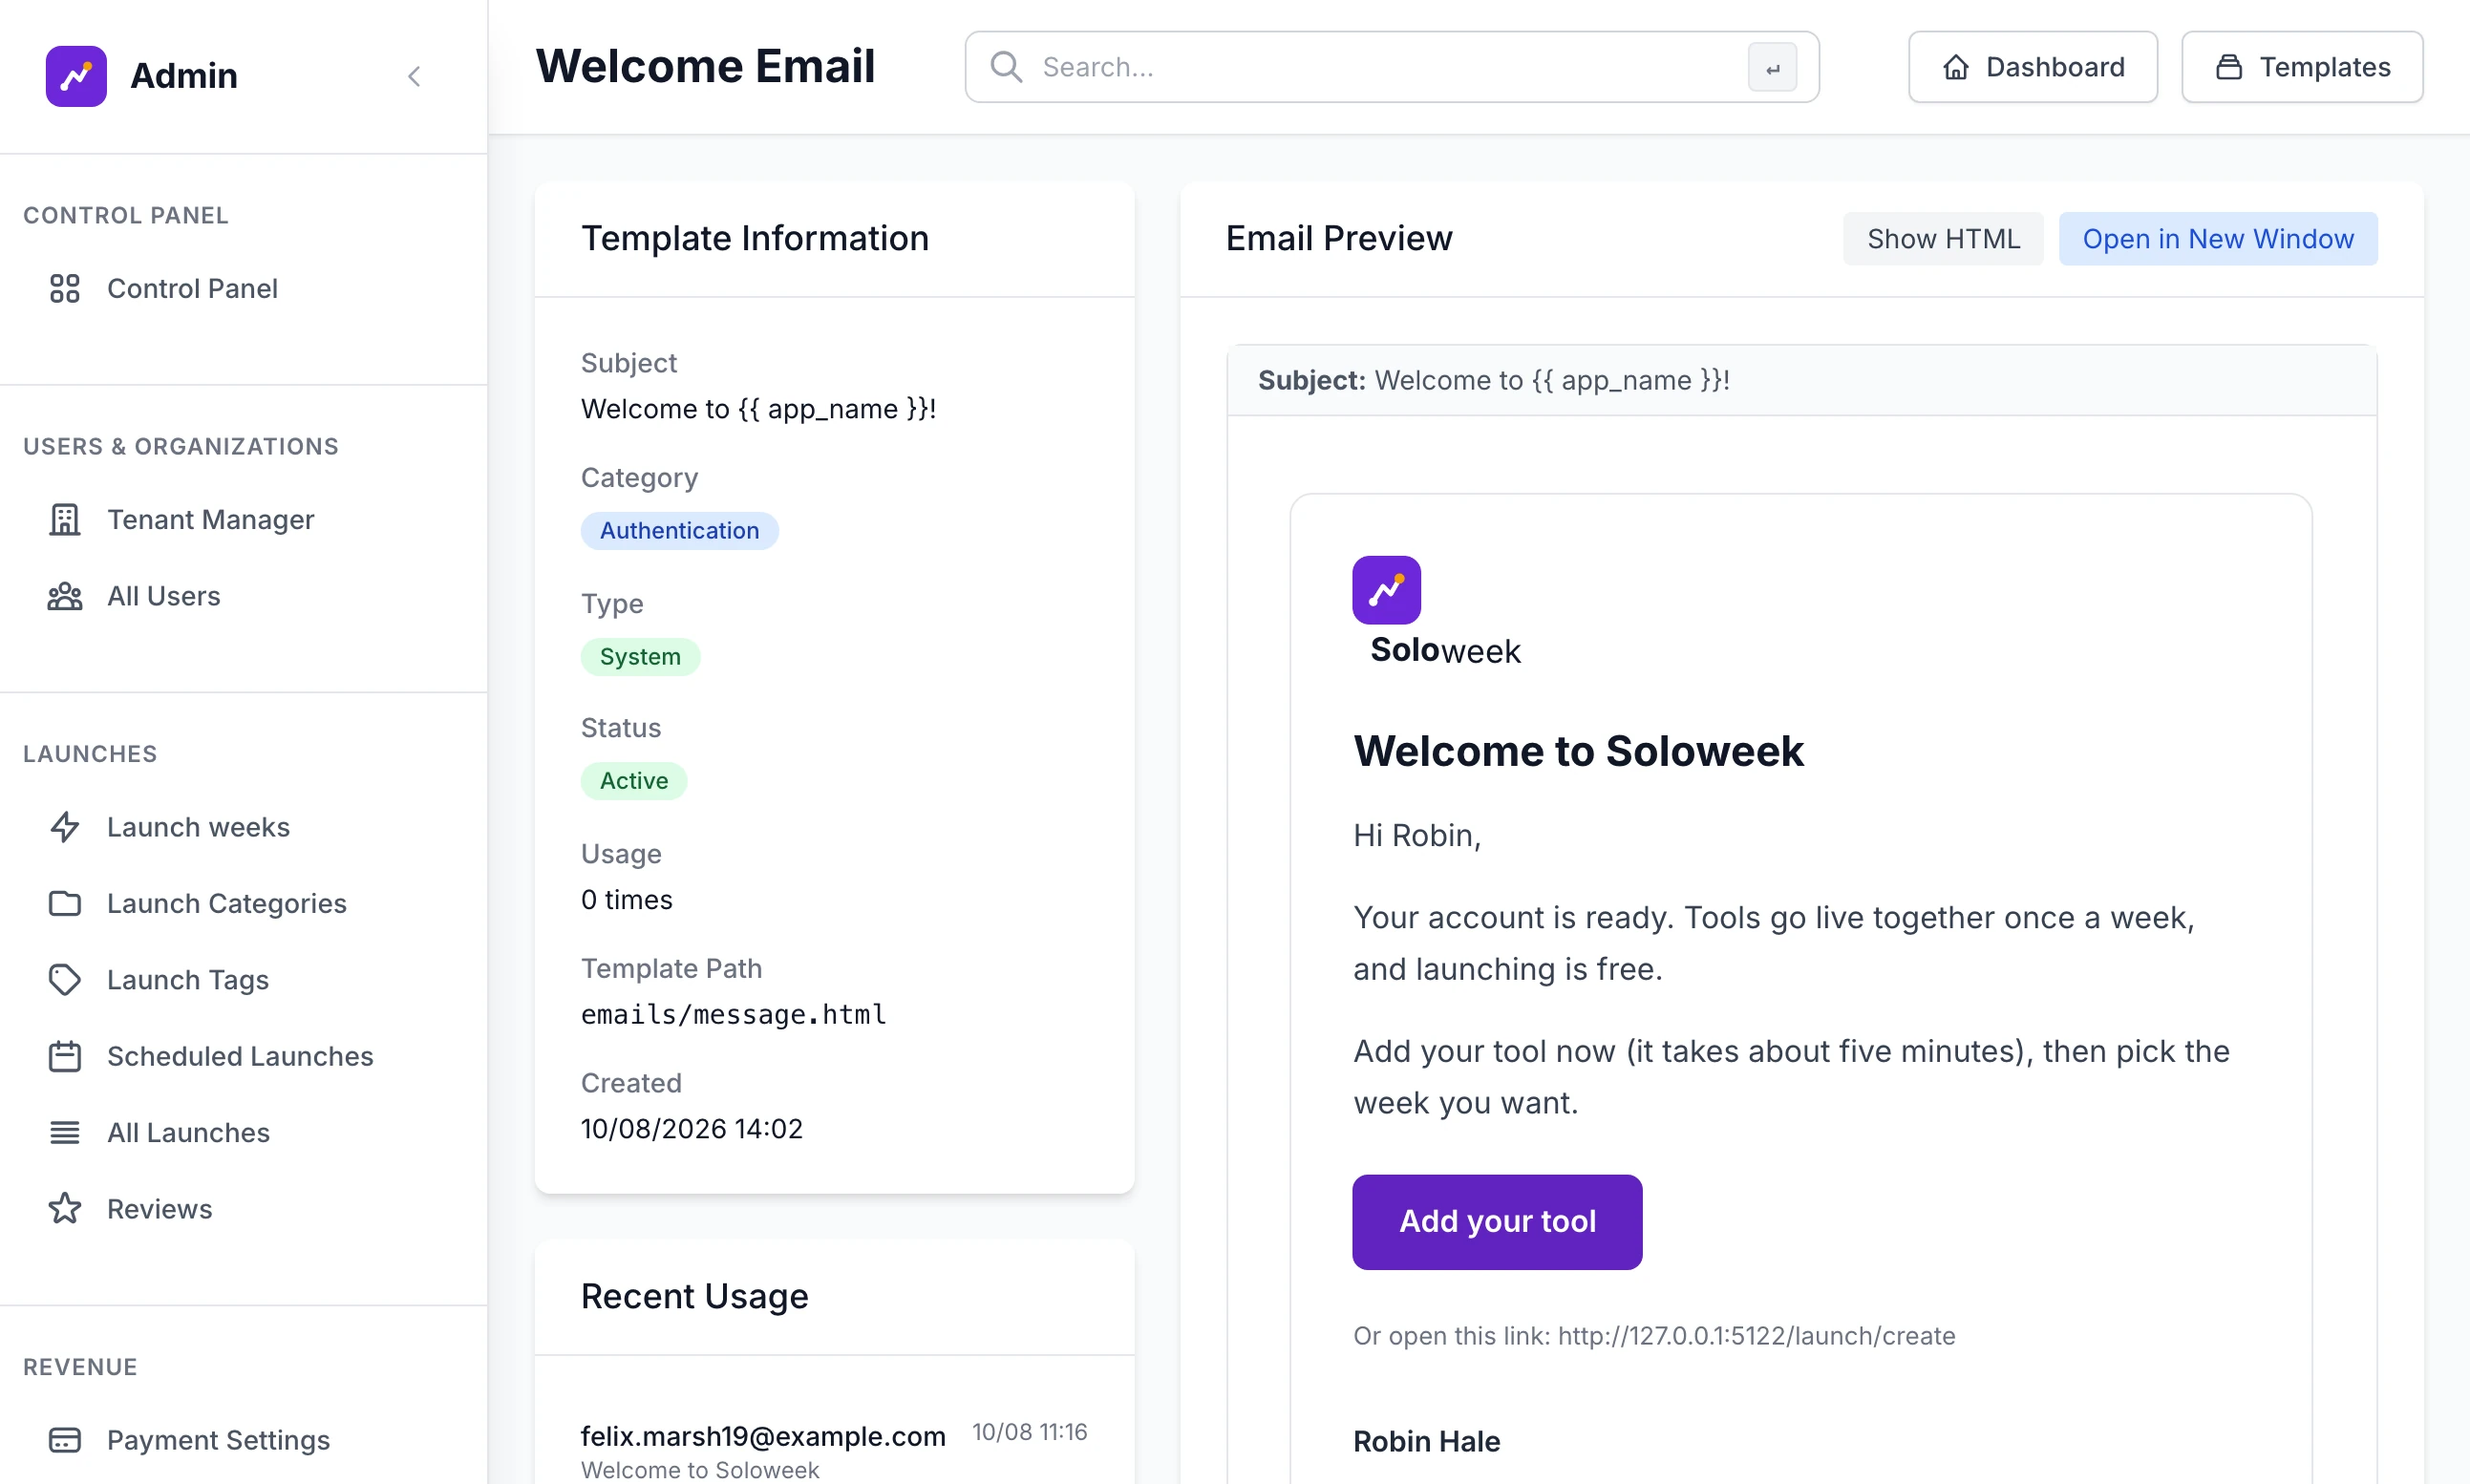
The twelve are a catalogue and not the whole list. The tables above are what the site sends, and the subject on a system template's row is a label, not always the subject that goes out.
Custom templates are yours. They do not replace any of the automatic emails. They are starting points to load into a campaign.
Step 1: Click Create Template
The form is headed Create Email Template.
Step 2: Fill it in
Template Name, Subject Line and HTML Content are needed. Category and Description help you find it later. The subject and the content can use tokens such as
{{ user.first_name }},{{ app_name }}and{{ support_email }}. The full list is under the content box.Step 3: Preview it
Preview Template opens what you have typed in a new window.
Step 4: Save it
Click Create Template at the foot of the form. You see "created successfully!" after the template's name, and its page opens.
From version 2.9.0, Edit on a custom template opens the same form filled in, with a Save changes button. In earlier versions Edit opened a page that did not exist.
Logs#
Click Logs in the Email Manager for every email your site has tried to send, 50 to a page: who it went to, the subject and the email it was, its type, its status and the date.
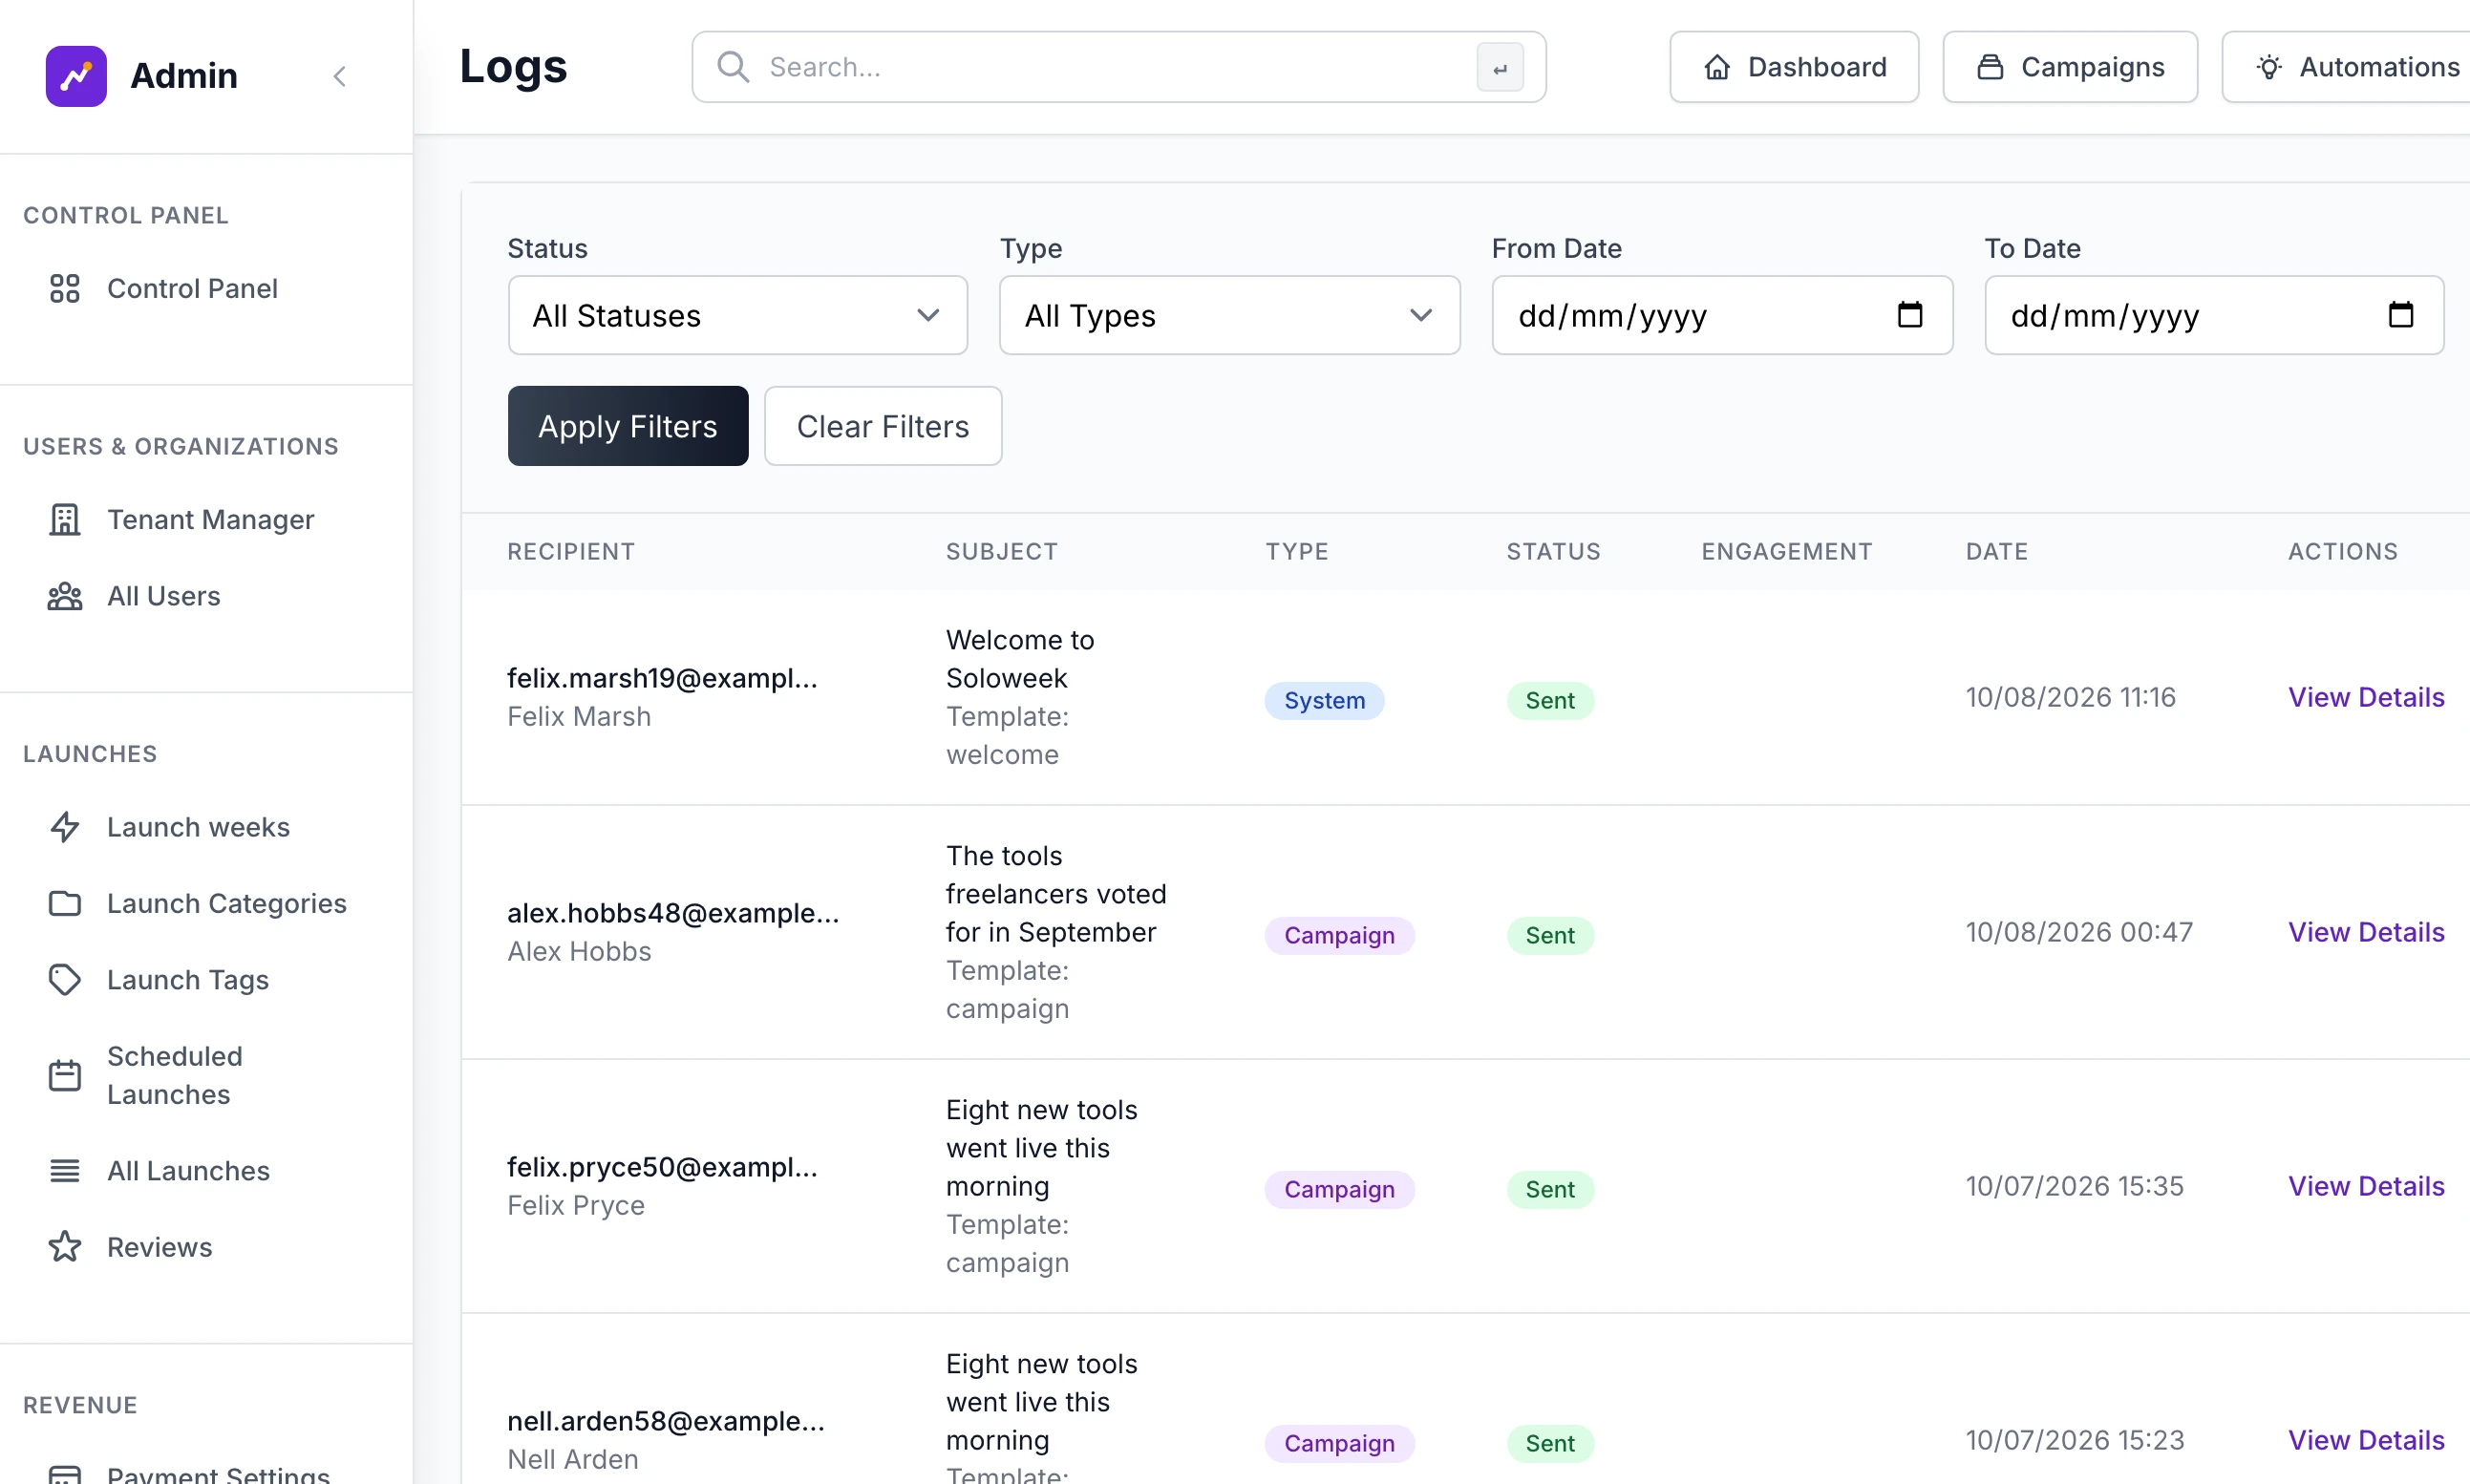
Sent means the mail server accepted the email. It does not mean it arrived.
Failed means the server refused it. View Details shows the server's reason.
From Date and To Date narrow the list.
"The mail server refused the message"
The server's own reason follows. Check the username and password against your provider's settings: many providers want a separate SMTP or app password. Check that Use TLS or Use SSL matches the port. Check that the From address is one the provider lets you send from.
"Save an SMTP server first."
The test button needs a saved server. Fill in SMTP server, save and try again.
"Enter your account password to save credentials."
The box above Save was empty or wrong. It wants the password you sign in to the admin with, not the mail server's.
A maker says the confirmation email never came
Look for their address in Logs. Failed gives you the reason. Sent means it left your site, so ask them to look in their spam folder and check your SPF and DKIM records. The page they were left on, Check your inbox, has a Send the link again button, which works up to five times an hour.
Can I change the wording of the automatic emails?
Not from the admin. They change with your site's name, your wording and your brand. Nothing else changes them.
Stuck on a step? Send a message.