Connect Stripe
Copy your keys from Stripe, create a price for each thing you sell, add the webhook, make a test payment and check the whole setup with one command.
Updated 8 Oct 2026 · written for Local Lab 1.2.1
On this page
Open Site Settings from the top of the Admin Dashboard, choose the Revenue tab and scroll down to Stripe API Keys. Everything Local Lab sells, featured listings and lead subscriptions, is paid for through your own Stripe account, and this is where the two are joined. You do it once.
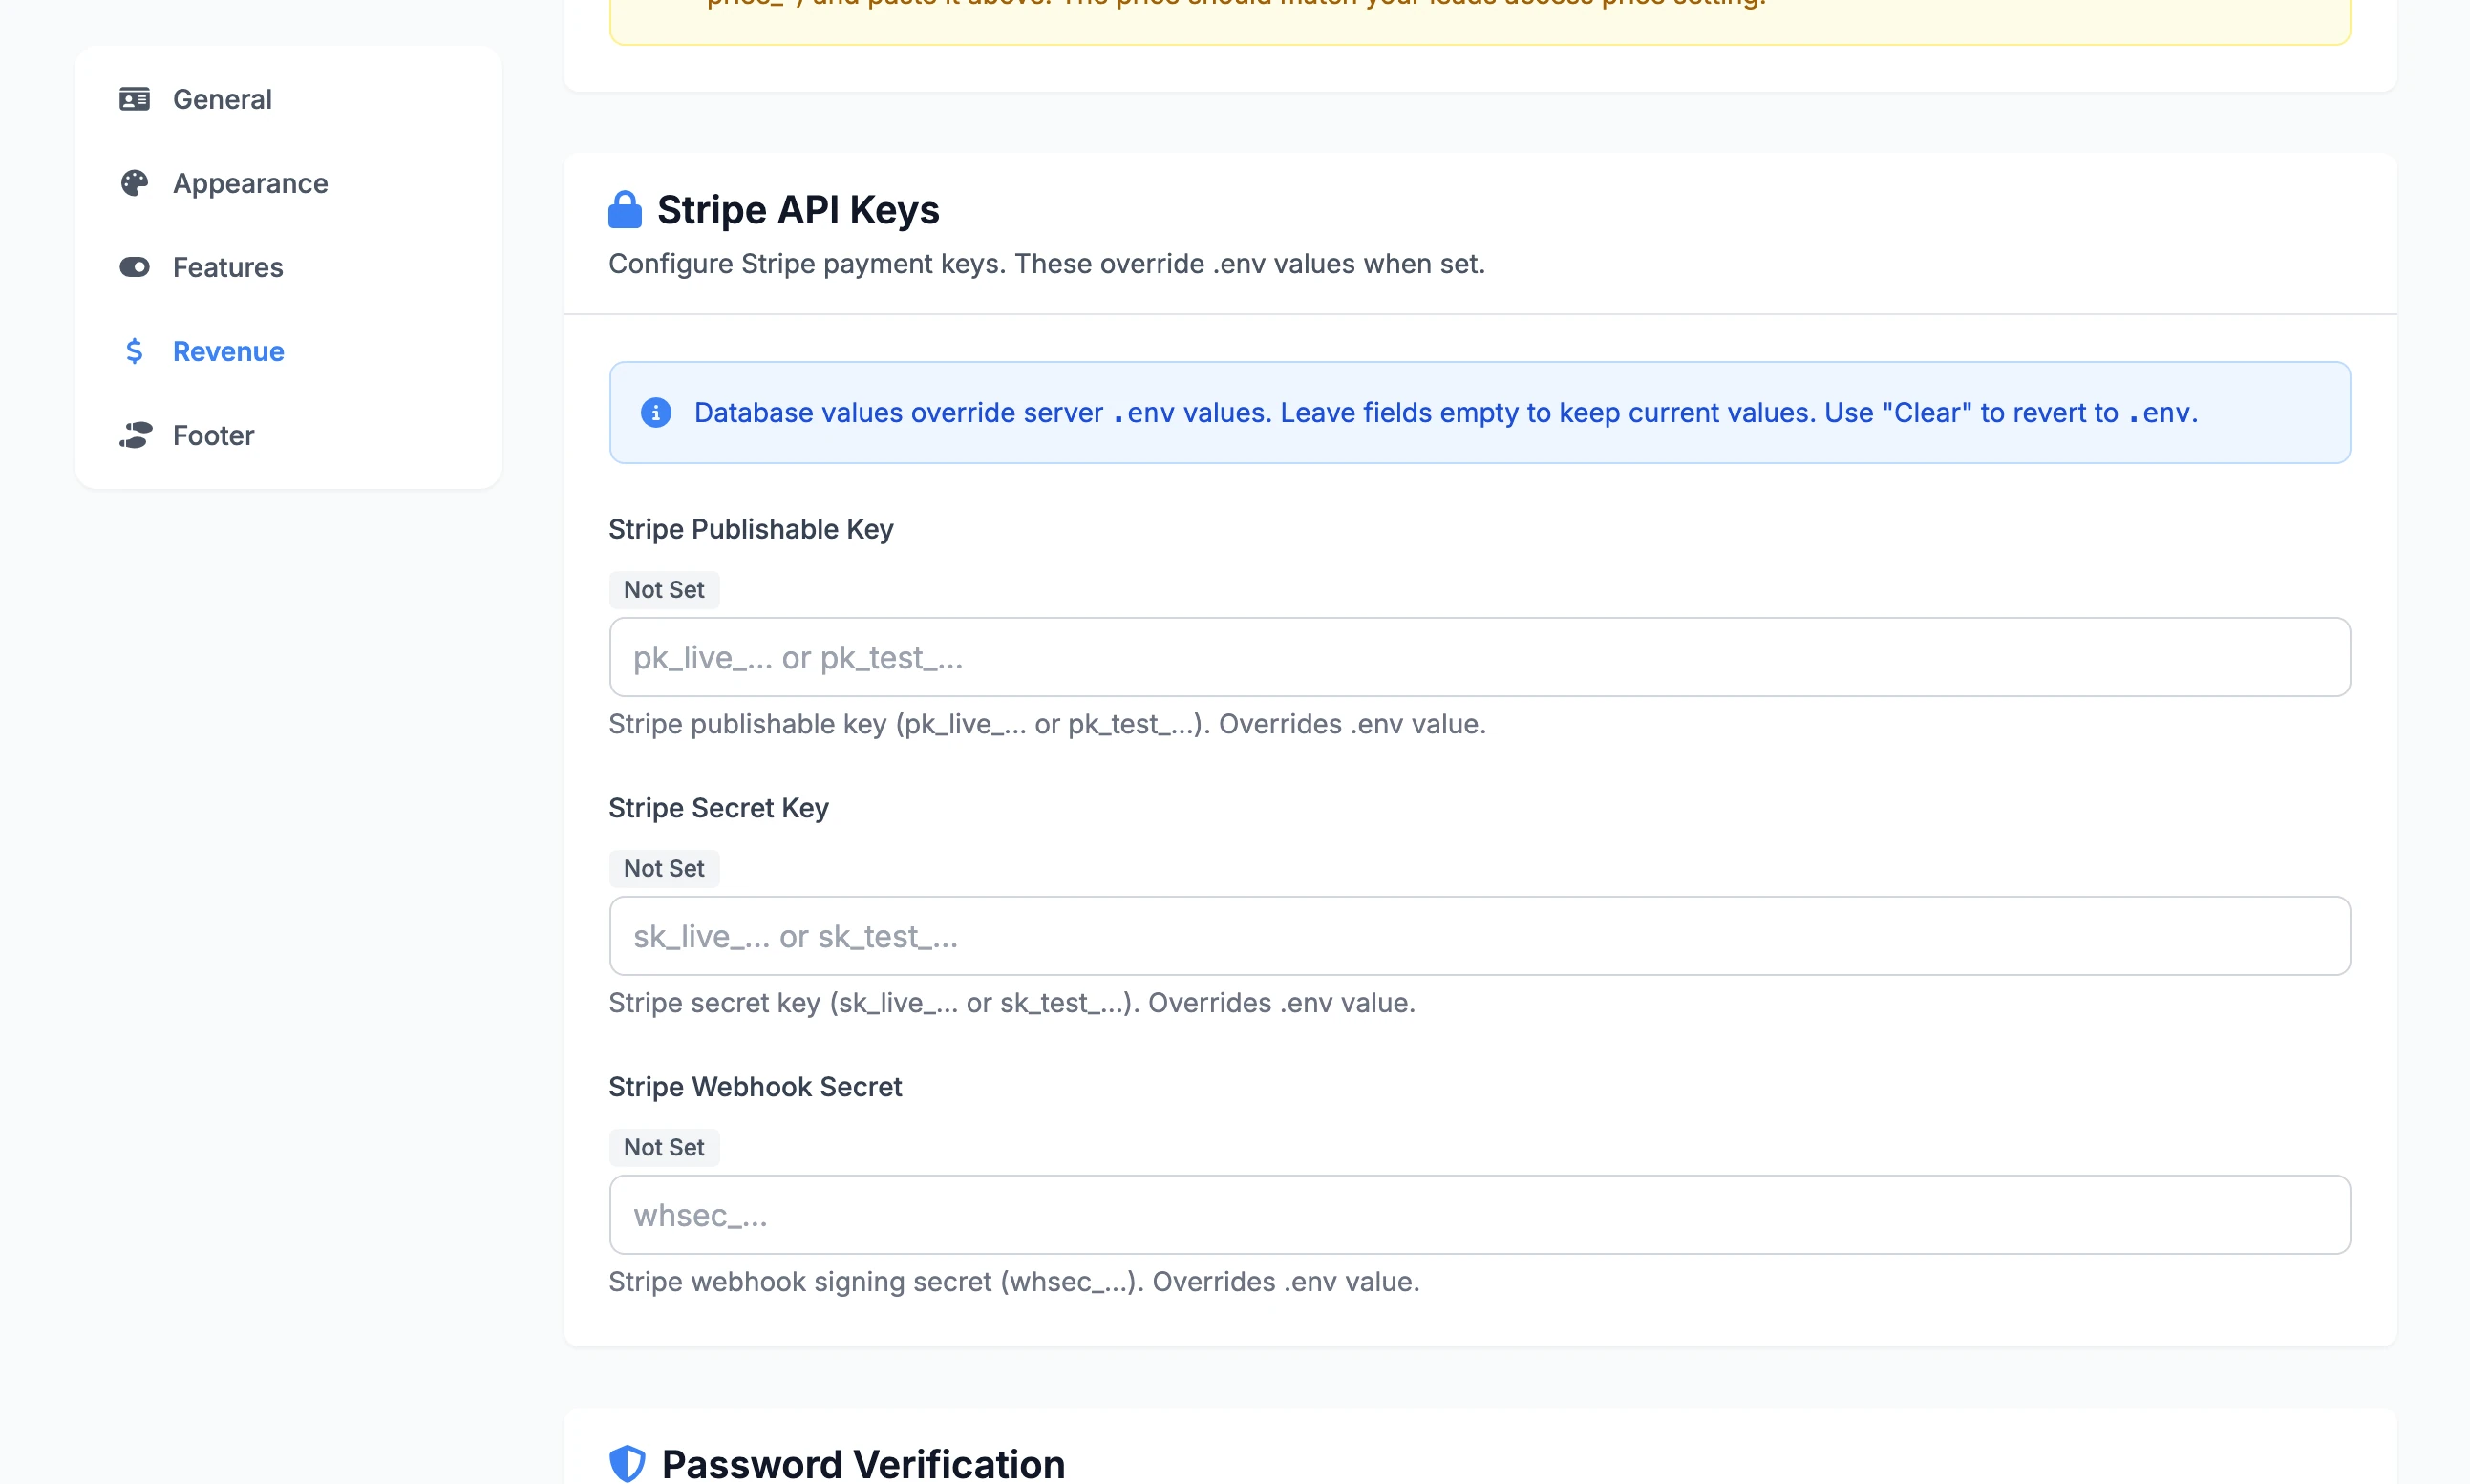
Save your keys#
Step 1: Copy your keys from Stripe
Sign in to Stripe and open dashboard.stripe.com/apikeys. Under Standard keys there are two rows, Publishable key and Secret key. Click a key to copy it. The secret key starts with
sk_and is the one that matters. The publishable key starts withpk_.Begin in a sandbox, Stripe's name for a test account: its keys start with
sk_test_andpk_test_and no money moves. Test mode and live mode covers the change to real payments.Step 2: Paste them in
Under Stripe API Keys, fill in Stripe Secret Key and Stripe Publishable Key. Leave Stripe Webhook Secret empty for now.
Step 3: Type your admin password
Under Password Verification, type the password you sign in with into Your Password. Without it nothing is saved and you see "You must enter your correct admin password to save credential changes."
Step 4: Click Save Settings
You see "Site settings updated successfully!". The badge beside each key changes to Database, and a Current: line shows the first seven and last four characters of what you saved. The keys are in use from the next page anyone loads.
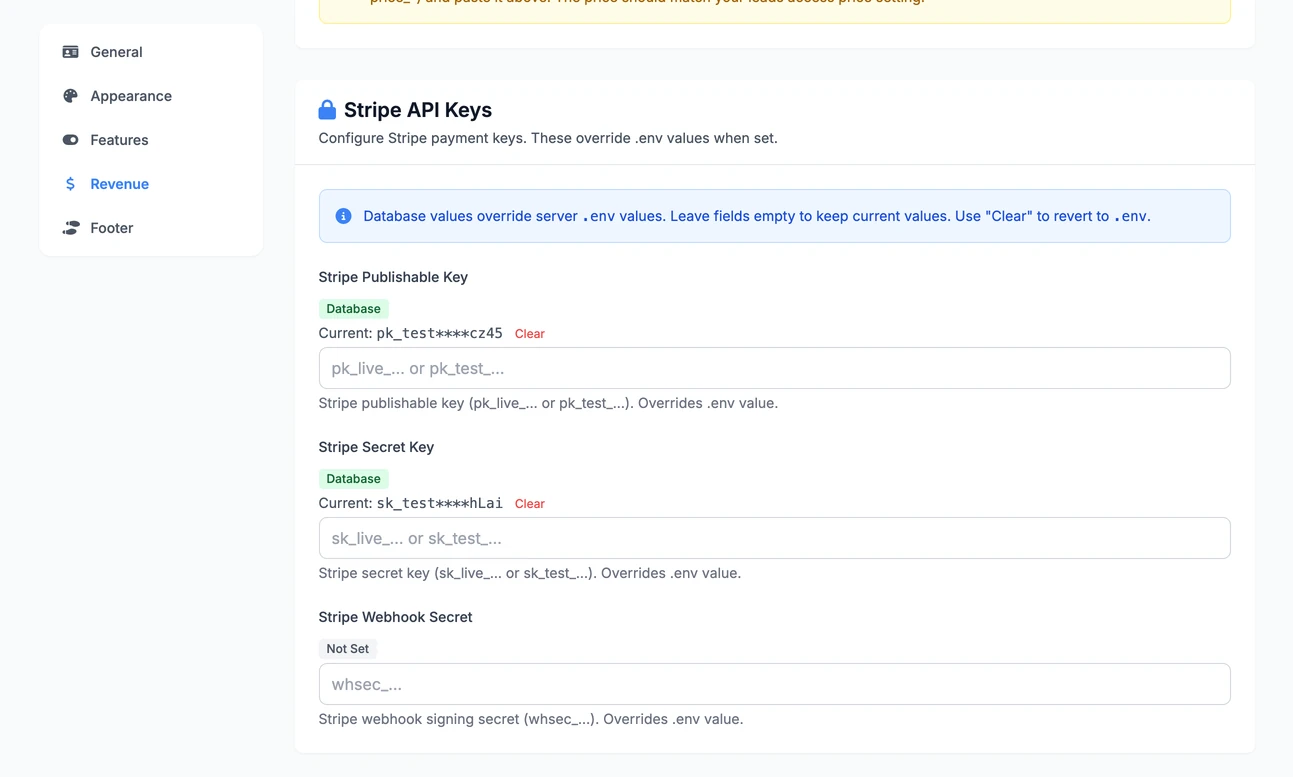
After saving, each key shows Database and a masked Current value.
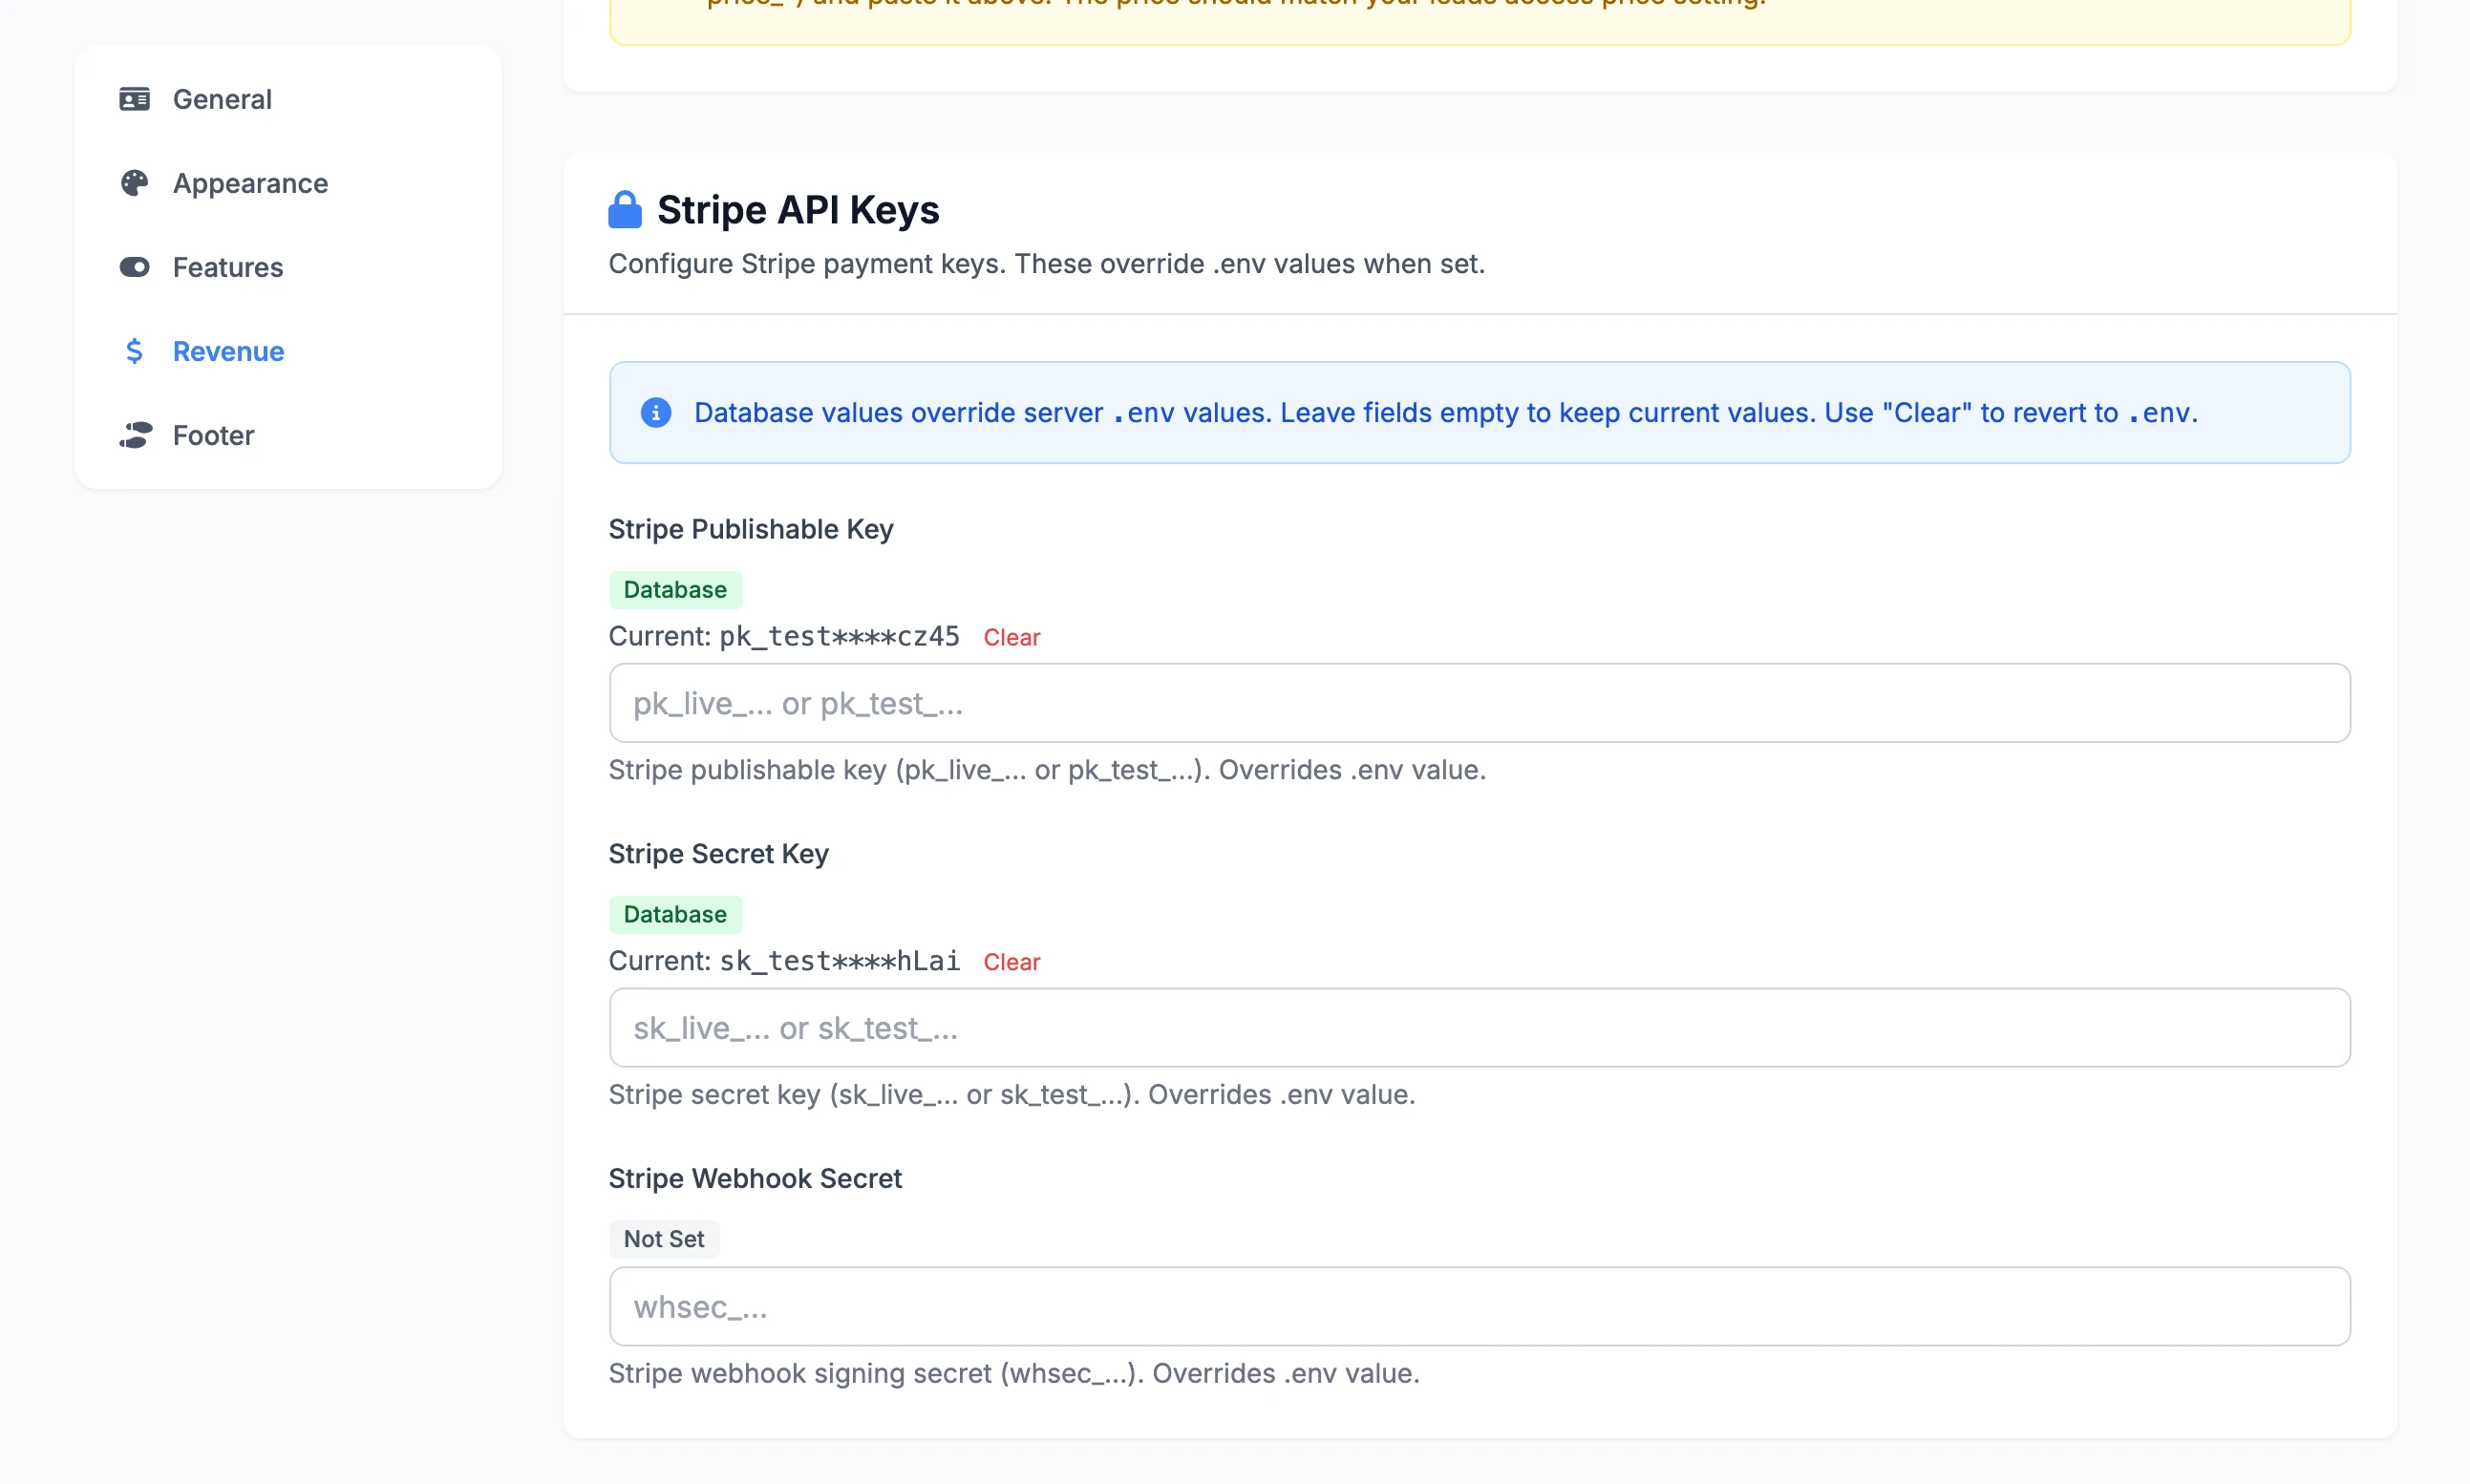
A field you leave empty keeps the value it already has, so you can change one key without retyping the others.
Where each key comes from#
Every key has a badge:
| Badge | It means |
|---|---|
| Database | Saved on this page. This is the one in use. |
| Environment | Not saved here, and found in your .env file as STRIPE_SECRET_KEY, STRIPE_PUBLISHABLE_KEY or STRIPE_WEBHOOK_SECRET. |
| Not Set | Not in either place. |
A key saved on this page always wins over the same key in .env. It is stored scrambled, using the SECRET_KEY from your .env file. Change SECRET_KEY and the saved keys can no longer be read: the badges go back to Environment or Not Set, and you type the keys in again.
The Clear link beside a saved key removes it from the database so that the .env value is used.
Create your prices#
Local Lab never creates a product or a price in Stripe. You create each price in your Stripe dashboard, copy its ID and paste it into the matching field on the Revenue tab. Do it once for each thing you sell.
Step 1: Add a product in Stripe
In Stripe, open Product catalogue and click Create product. Give it a Name, for example "City featured listing". Your buyers see this name on the payment page.
Step 2: Set the price
Under Pricing, choose One-off for a placement sold for a number of days, or Recurring for a subscription. Type the Amount, pick the currency beside it and click Add product.
Step 3: Copy the price ID
Click the product to open it. On the row under Pricing, click the three dots at the end and choose Copy price ID. The ID starts with
price_.Step 4: Paste it into the Revenue tab
Back in Site Settings, on the Revenue tab, paste the ID into the field from the table below and click Save Settings. A price ID is not a secret, so no password is asked for.
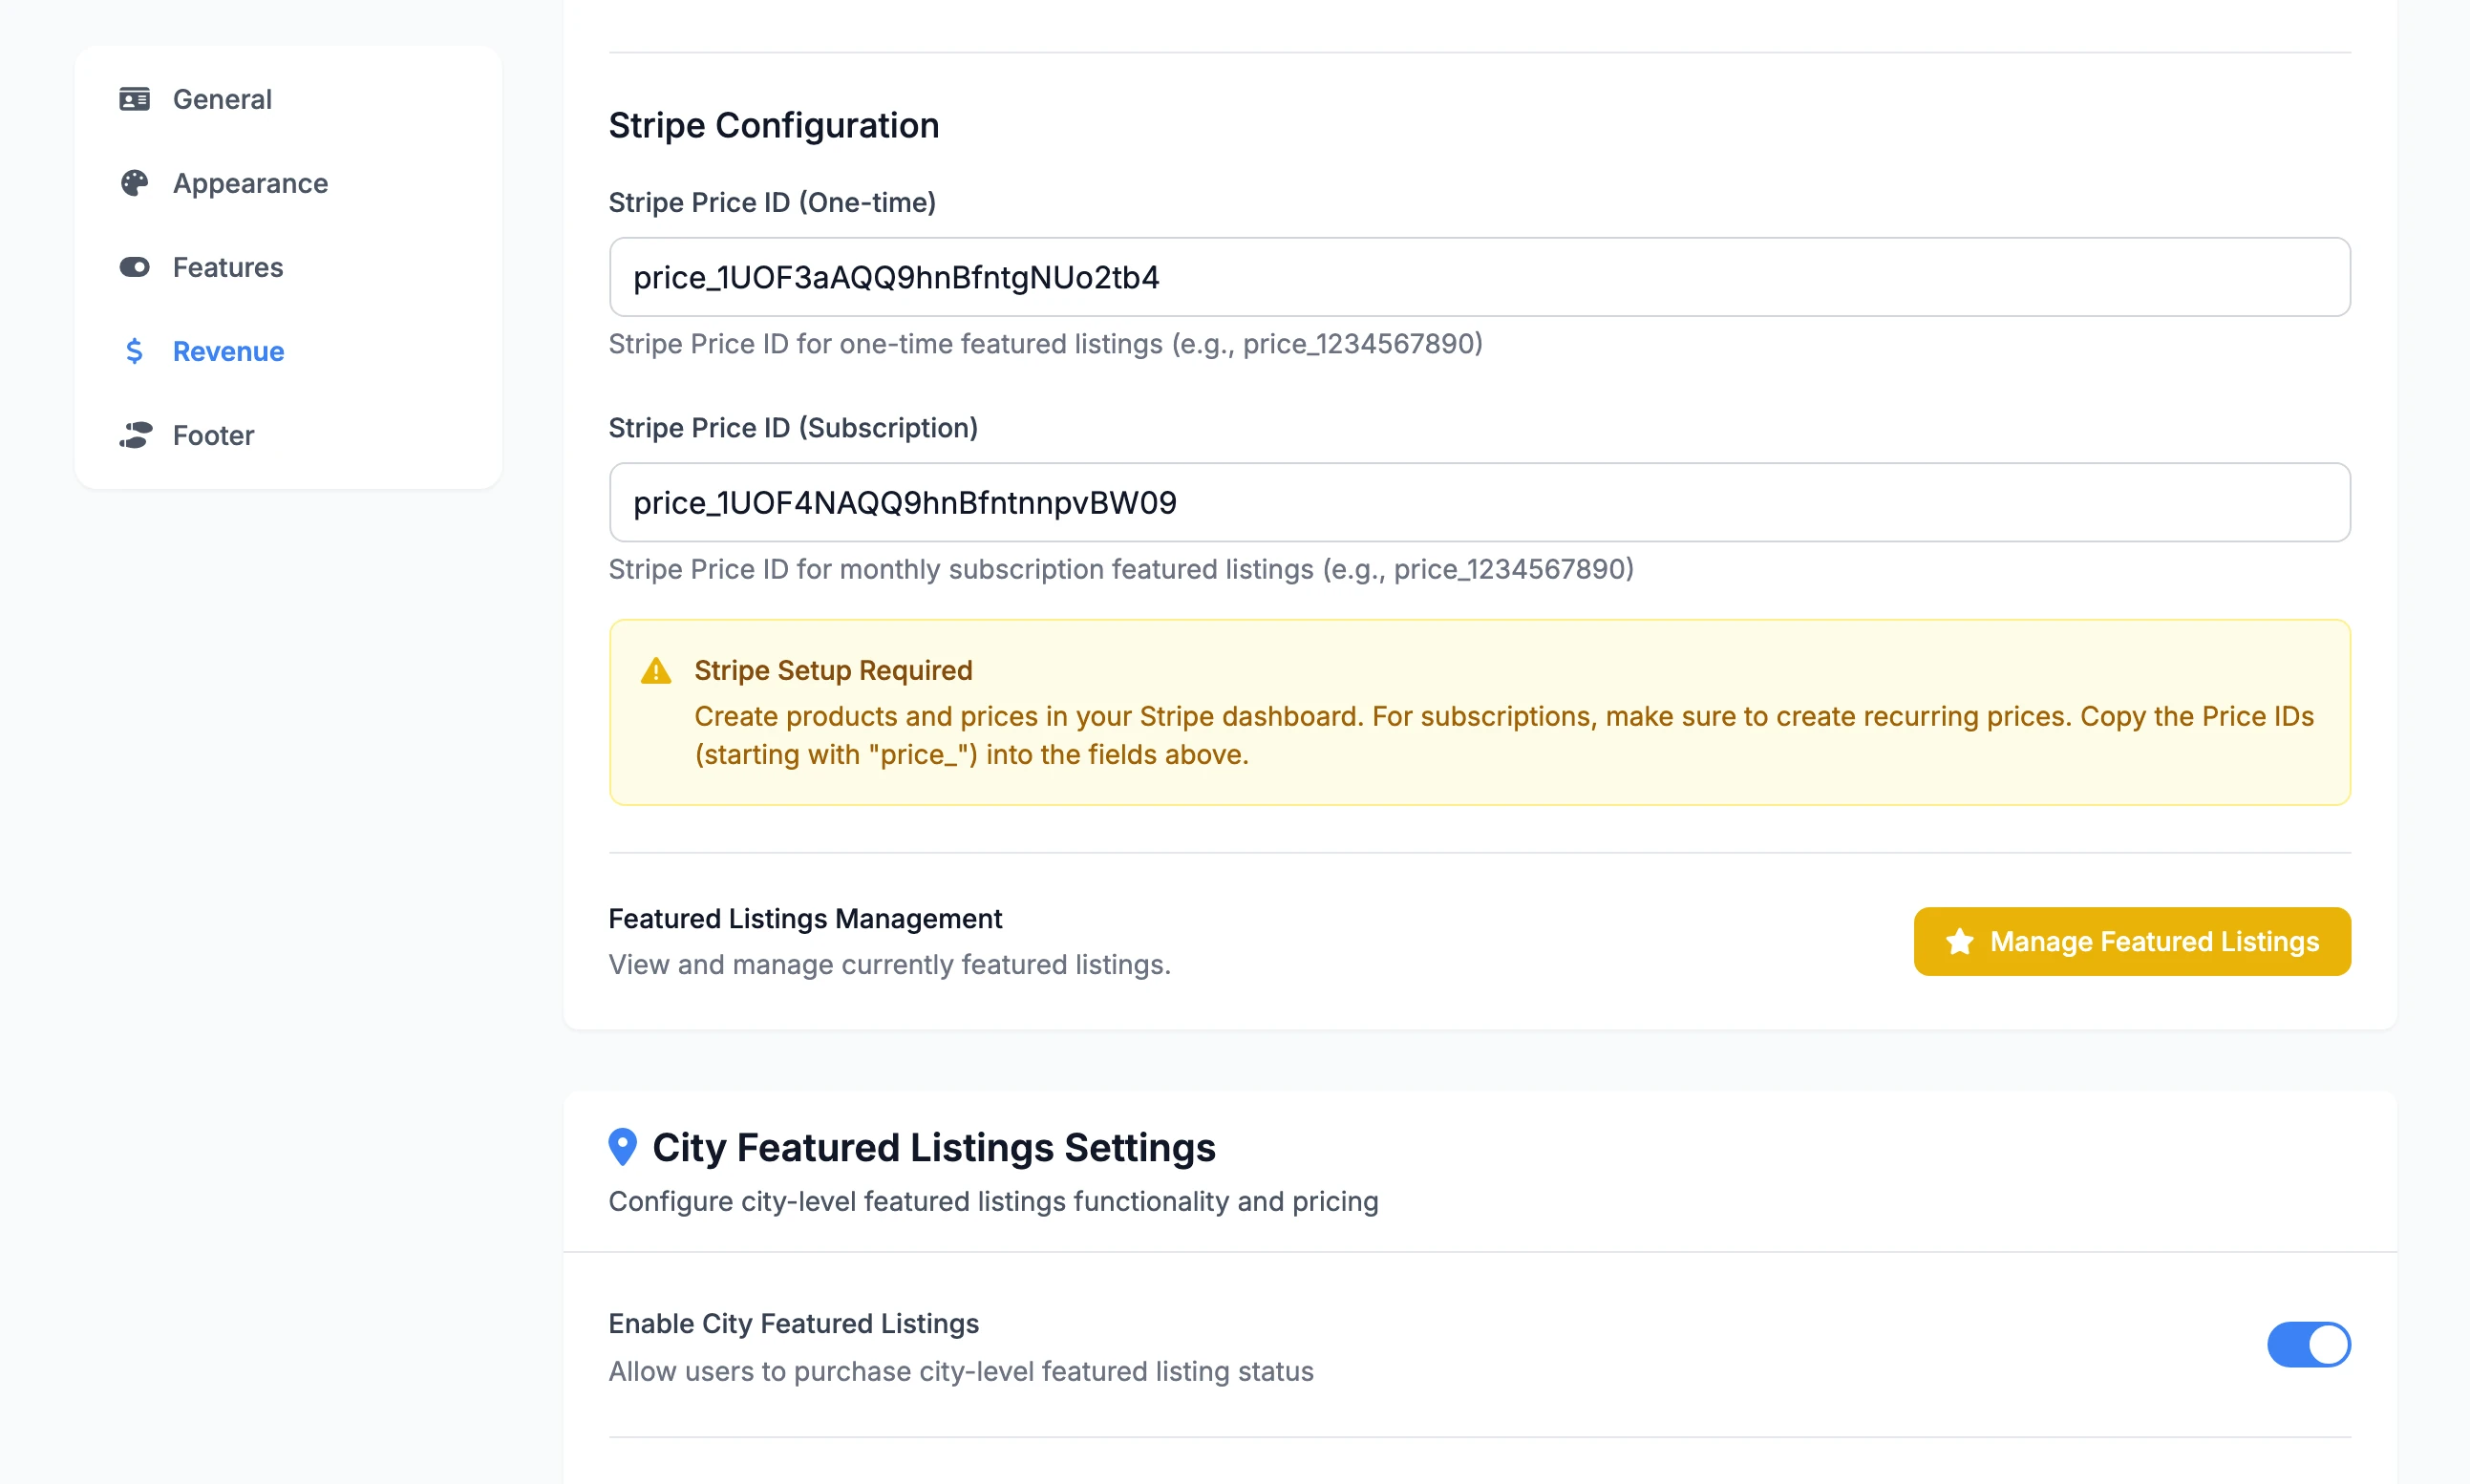
A product can hold more than one price. To sell a placement both ways, open the product, click the plus beside Pricing and add the second price.
Price IDs#
Fill in only the ones you sell.
| Field | Under the heading | Kind of price | Sells |
|---|---|---|---|
| Stripe Price ID (One-time) | Stripe Configuration | One-time | Homepage featured, for a number of days |
| Stripe Price ID (Subscription) | Stripe Configuration | Recurring | Homepage featured, as a subscription |
| City Featured Stripe Price ID | City Featured Stripe Configuration | One-time | City featured, for a number of days |
| City Featured Subscription Price ID | City Featured Stripe Configuration | Recurring | City featured, as a subscription |
| Category Featured Stripe Price ID | Category Featured Stripe Configuration | One-time | Category featured, for a number of days |
| Category Featured Subscription Price ID | Category Featured Stripe Configuration | Recurring | Category featured, as a subscription |
| Leads Stripe Price ID | Leads Stripe Configuration | Recurring | Lead subscriptions, one unit for each city |
The prices you type elsewhere on the tab are only what your site displays. Stripe charges what the price in Stripe says. Sell featured listings and Sell leads cover the rest of each product's settings.
What your buyers see#
A business owner who clicks the button to pay leaves your site for Stripe's payment page and comes back when the payment is made. The page carries the name of your Stripe account, the name of the product in Stripe and the amount of the price in Stripe. A subscription reads "Subscribe to" and the product's name, with the amount per month.
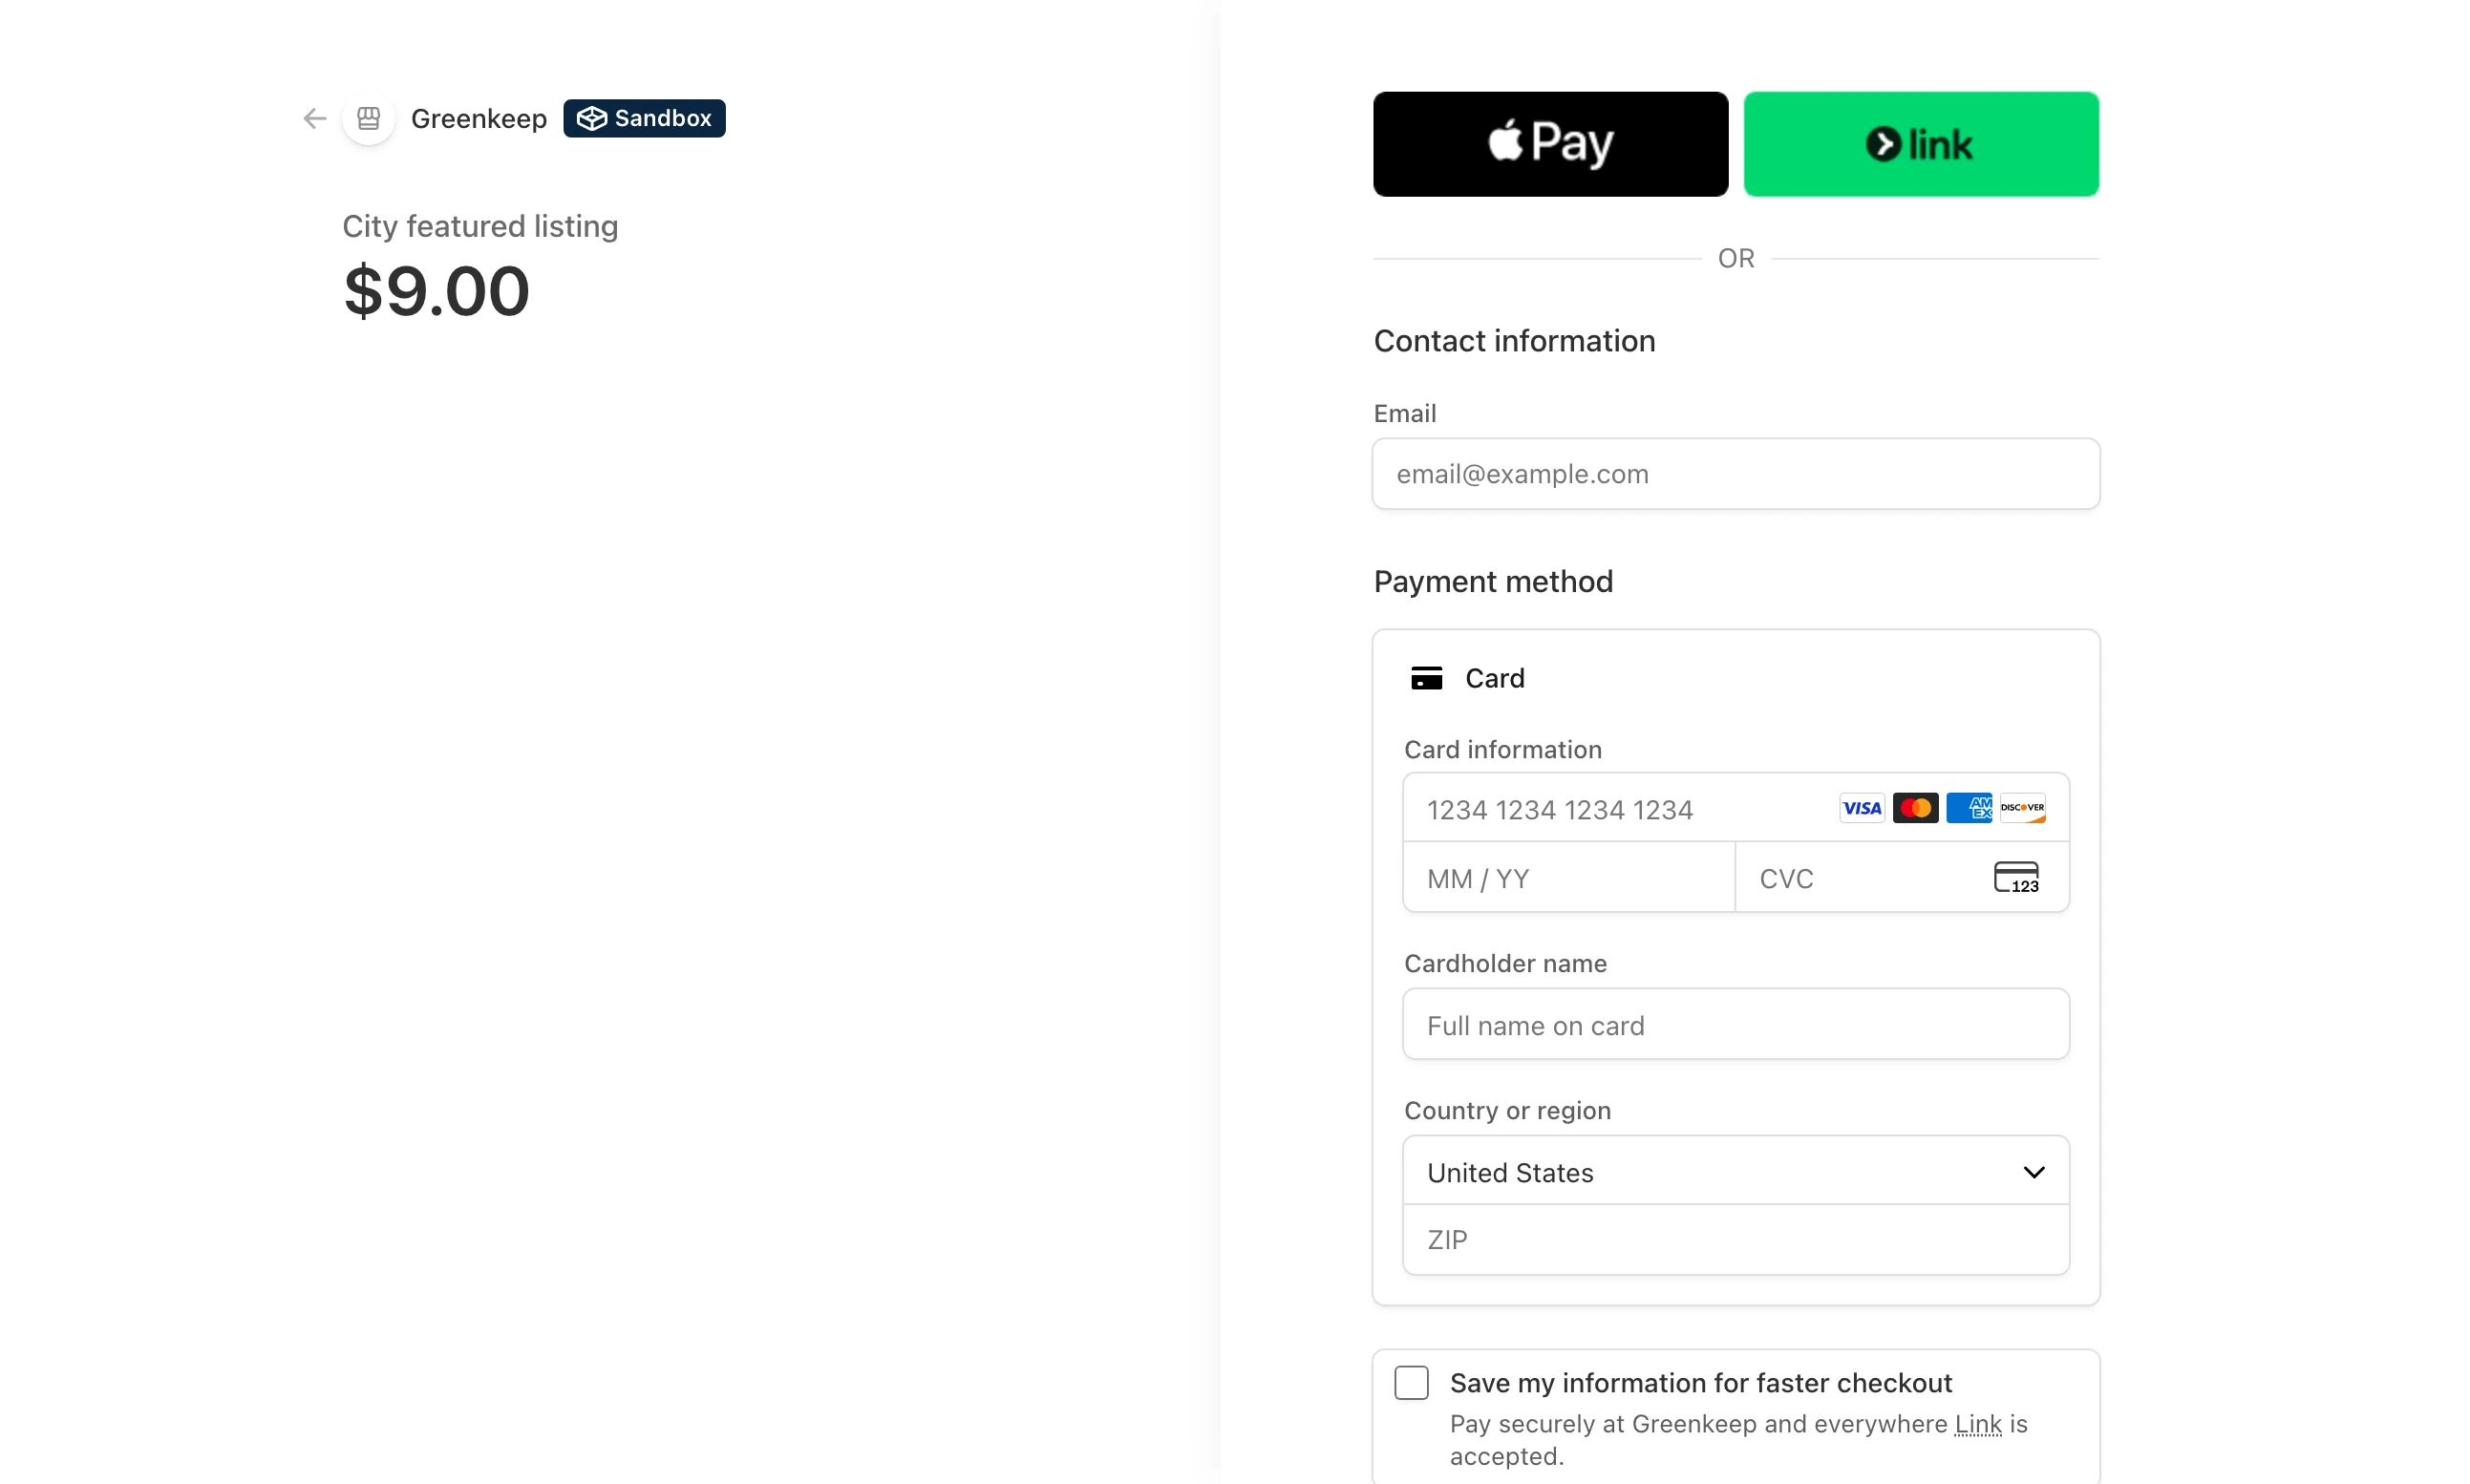
They pay by card. Stripe puts its own quick-pay buttons above the card form: Apple Pay and Link in the picture. The email box starts empty: Local Lab does not pass the owner's address across.
Add the webhook#
A webhook is how Stripe tells your site about things that happen when nobody is on it: a renewal, a cancellation, a refund, a buyer who pays and closes the tab. Stripe cannot reach a site on your own computer, so do this once the site is live on its domain. To try it before then, see Test it on your own computer.
Step 1: Start a new destination in Stripe
Open dashboard.stripe.com/webhooks. Stripe calls this page Event destinations. Click Add destination. The form has three parts: Select events, Choose destination type and Configure your destination.
Step 2: Choose the six events
Leave the scope on Your account and the Payload style on Snapshot. Under Events, find and tick the six events in the table below. Any other event is accepted and ignored.
Step 3: Give it your site's address
Choose a webhook endpoint as the destination type, and give it this address with your own domain:
Endpoint URLhttps://your-domain.com/webhooks/stripeStep 4: Save the signing secret
Stripe gives the endpoint a signing secret that starts with
whsec_. Paste it into Stripe Webhook Secret, type your password under Password Verification and click Save Settings.
What each event does#
| Event | What Local Lab does |
|---|---|
checkout.session.completed | Records the payment and switches on what was bought: the featured placement or the lead subscription. |
invoice.payment_succeeded | Meant to record a subscription renewal as a new payment. In version 1.2.1 it records nothing: see the warning below. |
invoice.payment_failed | Changes nothing. It is noted in the log while Stripe retries the card. |
customer.subscription.updated | Follows the subscription's status. active keeps it on, past_due changes nothing, canceled or unpaid removes the placement or ends the lead subscription. |
customer.subscription.deleted | Ends a lead subscription at once. Sets a featured placement to end 30 days after the day Stripe ended the subscription. |
charge.refunded | Records the refund as a negative payment. It does not take away what was bought. |
The same change means Local Lab cannot read the date a subscription is paid up to. That is why a cancelled featured subscription runs for a flat 30 days after Stripe ends it.
Test it on your own computer#
With sandbox keys saved, sign in to your own copy as a business owner, feature a listing and pay on Stripe's page with Stripe's test card:
| Box | Type |
|---|---|
| Card number | 4242 4242 4242 4242 |
| Expiry | Any date in the future, for example 12 / 34 |
| Security code | Any three digits |
| Name, email and ZIP | Anything |
Stripe's page says Sandbox beside your account's name while you are on a sandbox key. You come back to your site, the listing is featured and the payment is on the Sales Dashboard. That much needs no webhook.
To test the webhook as well, install Stripe's command-line tool, sign it in with stripe login, and leave this running in a second terminal while you make test payments:
stripe listen --events checkout.session.completed,invoice.payment_succeeded,invoice.payment_failed,customer.subscription.updated,customer.subscription.deleted,charge.refunded --forward-to http://127.0.0.1:5000/webhooks/stripeIt prints a signing secret that starts with whsec_. Save that as the Stripe Webhook Secret. Each message Stripe sends is then listed in the terminal with your site's answer, which should be [200]. The secret belongs to the tool: replace it with the real destination's secret when the site goes live.
Test mode and live mode#
Local Lab does not know the two apart. It sends whatever secret key you saved, and Stripe decides. Three things follow:
Keys, price IDs and the webhook secret all belong to one mode. Moving from a sandbox to your live account means replacing every one of them, the seven price IDs included: create the products again in the live account, because a sandbox's prices do not exist there.
A payment made with test keys is recorded on the Sales Dashboard like a real one, and there is no screen to remove it. Do your test purchases on the copy on your own computer, not on the live site.
The check below tells you when a price belongs to the other mode.
Check your setup#
From the Local Lab folder:
python scripts/maintenance/verify_stripe_config.pyOn a server set up with the deploy script, run it inside the site's container, with your site's name in place of mysite:
docker exec directorylab-mysite python scripts/maintenance/verify_stripe_config.pyIt changes nothing. It prints:
where each of the three keys is coming from, the database or
.env, and whether.envholds a different value that is being overriddenwhether the secret and publishable keys are both test or both live, and whether the webhook secret starts with
whsec_whether Stripe accepts the secret key, and the account it belongs to
for each of the seven price IDs: the amount, currency and interval Stripe holds, and a problem if the price is archived, is one-time where a recurring price is needed (or the reverse), or belongs to the other mode
The last line is "RESULT: all checks passed" or a list of problems. Compare the amounts it prints with the prices typed on the Revenue tab. This is what it printed for the directory in the pictures, before its webhook secret was saved:
== Key sources (what the app is actually using) ==
  STRIPE_SECRET_KEY: sk_test_...hLai  <- DATABASE (admin panel)
  STRIPE_PUBLISHABLE_KEY: pk_test_...cz45  <- DATABASE (admin panel)
  STRIPE_WEBHOOK_SECRET: (empty)  <- NOT SET

== Format / mode checks ==
  secret/publishable mode match (both live or both test): OK
  webhook secret: NOT SET - renewals/cancellations will not be processed

== Stripe API validation (read-only) ==
  Secret key VALID - account acct_1UOF0FAQQ9hnBfnt Greenkeep
  Homepage featured (subscription): price_1UOF4NAQQ9hnBfntnnpvBW09 -> 19.99 USD (month) [OK]
  Homepage featured (one-time): price_1UOF3aAQQ9hnBfntgNUo2tb4 -> 29.99 USD (one-off) [OK]
  City featured (subscription): price_1UOF4OAQQ9hnBfntkWEU42ST -> 9.00 USD (month) [OK]
  City featured (one-time): price_1UOF4NAQQ9hnBfntEPslXMkJ -> 9.00 USD (one-off) [OK]
  Category featured (subscription): price_1UOF4PAQQ9hnBfnt4ecbrZfU -> 9.00 USD (month) [OK]
  Category featured (one-time): price_1UOF4OAQQ9hnBfntfyAzUsXK -> 9.00 USD (one-off) [OK]
  Leads access (subscription): price_1UOF4PAQQ9hnBfntx0mXLZHc -> 9.00 USD (month) [OK]

RESULT: 1 problem(s) found:
  - STRIPE_WEBHOOK_SECRET is not set anywhere
The Sales Dashboard#
Open Sales under Quick Actions. Every figure is read from the payments ledger: one row for each payment Stripe took, at the amount and in the currency the buyer was charged. Changing a price later does not rewrite it.
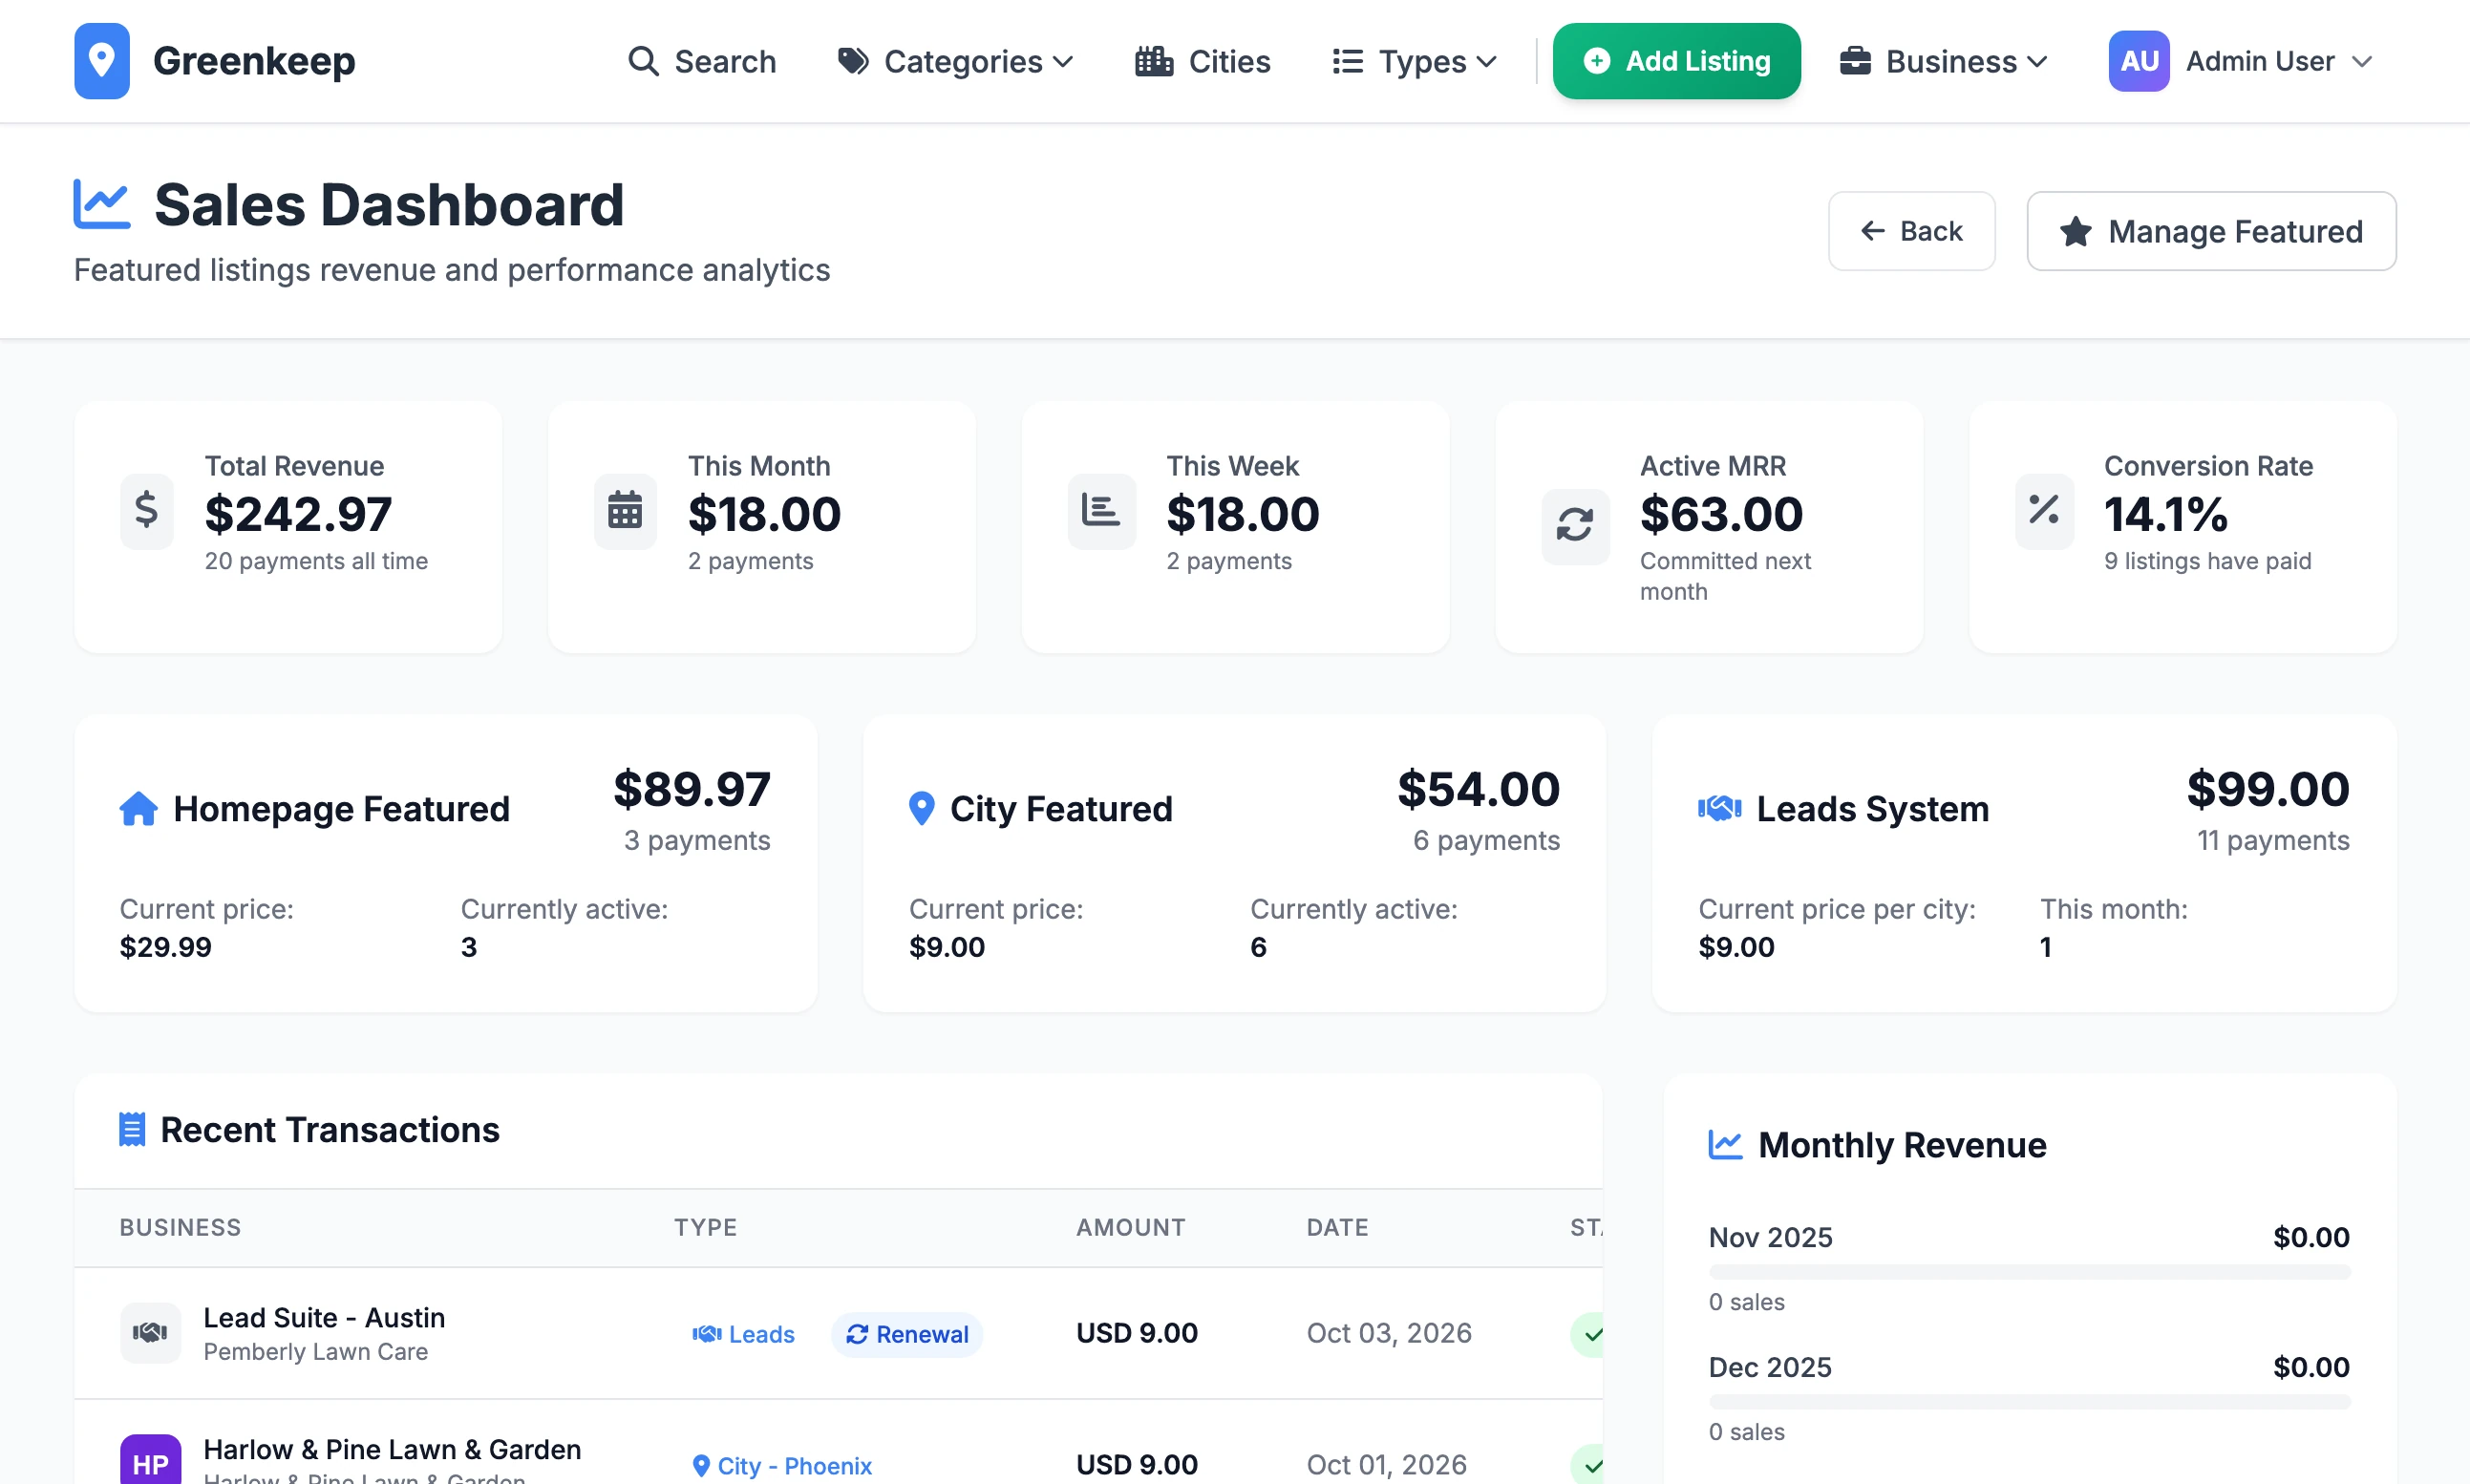
Total Revenue, This Month and This Week: money taken, less refunds, with the number of payments. This Week is the last seven days. If you have taken more than one currency, the headline is the main one and the others are listed beneath.
Active MRR: what your current subscriptions are due to pay next month, worked out from the prices on the Revenue tab.
Conversion Rate: the share of listings that have ever paid.
Homepage Featured, City Featured, Category Featured and Leads System: revenue and payments for each product, with its current price.
Recent Transactions: the last 20 payments, with Business, Type, Amount, Date and Status. A refund shows as a negative amount marked Refunded. A renewal would be marked Renewal, but in version 1.2.1 renewals are not recorded.
Monthly Revenue: the last 12 months.
Top Customers: the ten accounts that have spent most.
One Stripe account for several sites#
You can run several Local Lab sites on one Stripe account. Give each site its own webhook endpoint and its own prices. Stripe sends every event on the account to every endpoint, so each site works out which are its own:
A completed checkout is acted on only if the price charged is one of the seven price IDs saved on that site. Otherwise it is ignored.
A cancellation or status change is acted on only if the subscription is one the site already knows.
A buyer sees "Payment system is not configured. Please contact support."
There is no secret key. Check that the badge beside Stripe Secret Key says Database or Environment.
A buyer sees "Payment processing error"
Stripe refused the request. The secret key is wrong, or the price ID belongs to the other mode or has been archived. Run the check above: it names the one at fault.
Do I need the publishable key?
Not in this version. No page uses it, because payment happens on Stripe's page and not on yours. The check does not count a missing publishable key as a problem.
I copied .env.example and now payments fail
That file carries placeholder Stripe keys such as sk_test_your-secret-key. A placeholder shows as Environment and is sent to Stripe, which refuses it. Delete those lines from .env, or save real keys on the Revenue tab, which override them.
What is STRIPE_API_VERSION?
Local Lab talks to Stripe in one fixed version of Stripe's API, 2025-03-31.basil, so that a change on Stripe's side cannot alter what the site reads. A line STRIPE_API_VERSION= in .env overrides it. Leave it alone unless a Local Lab update tells you to change it.
Stuck on a step? Send a message.