Email, campaigns and bounces
Connect an email account so the site can send, email every unclaimed business an invitation to claim its listing, and know what the bounce tools do and do not do.
Updated 7 Oct 2026 · written for Local Lab 1.2.1
On this page
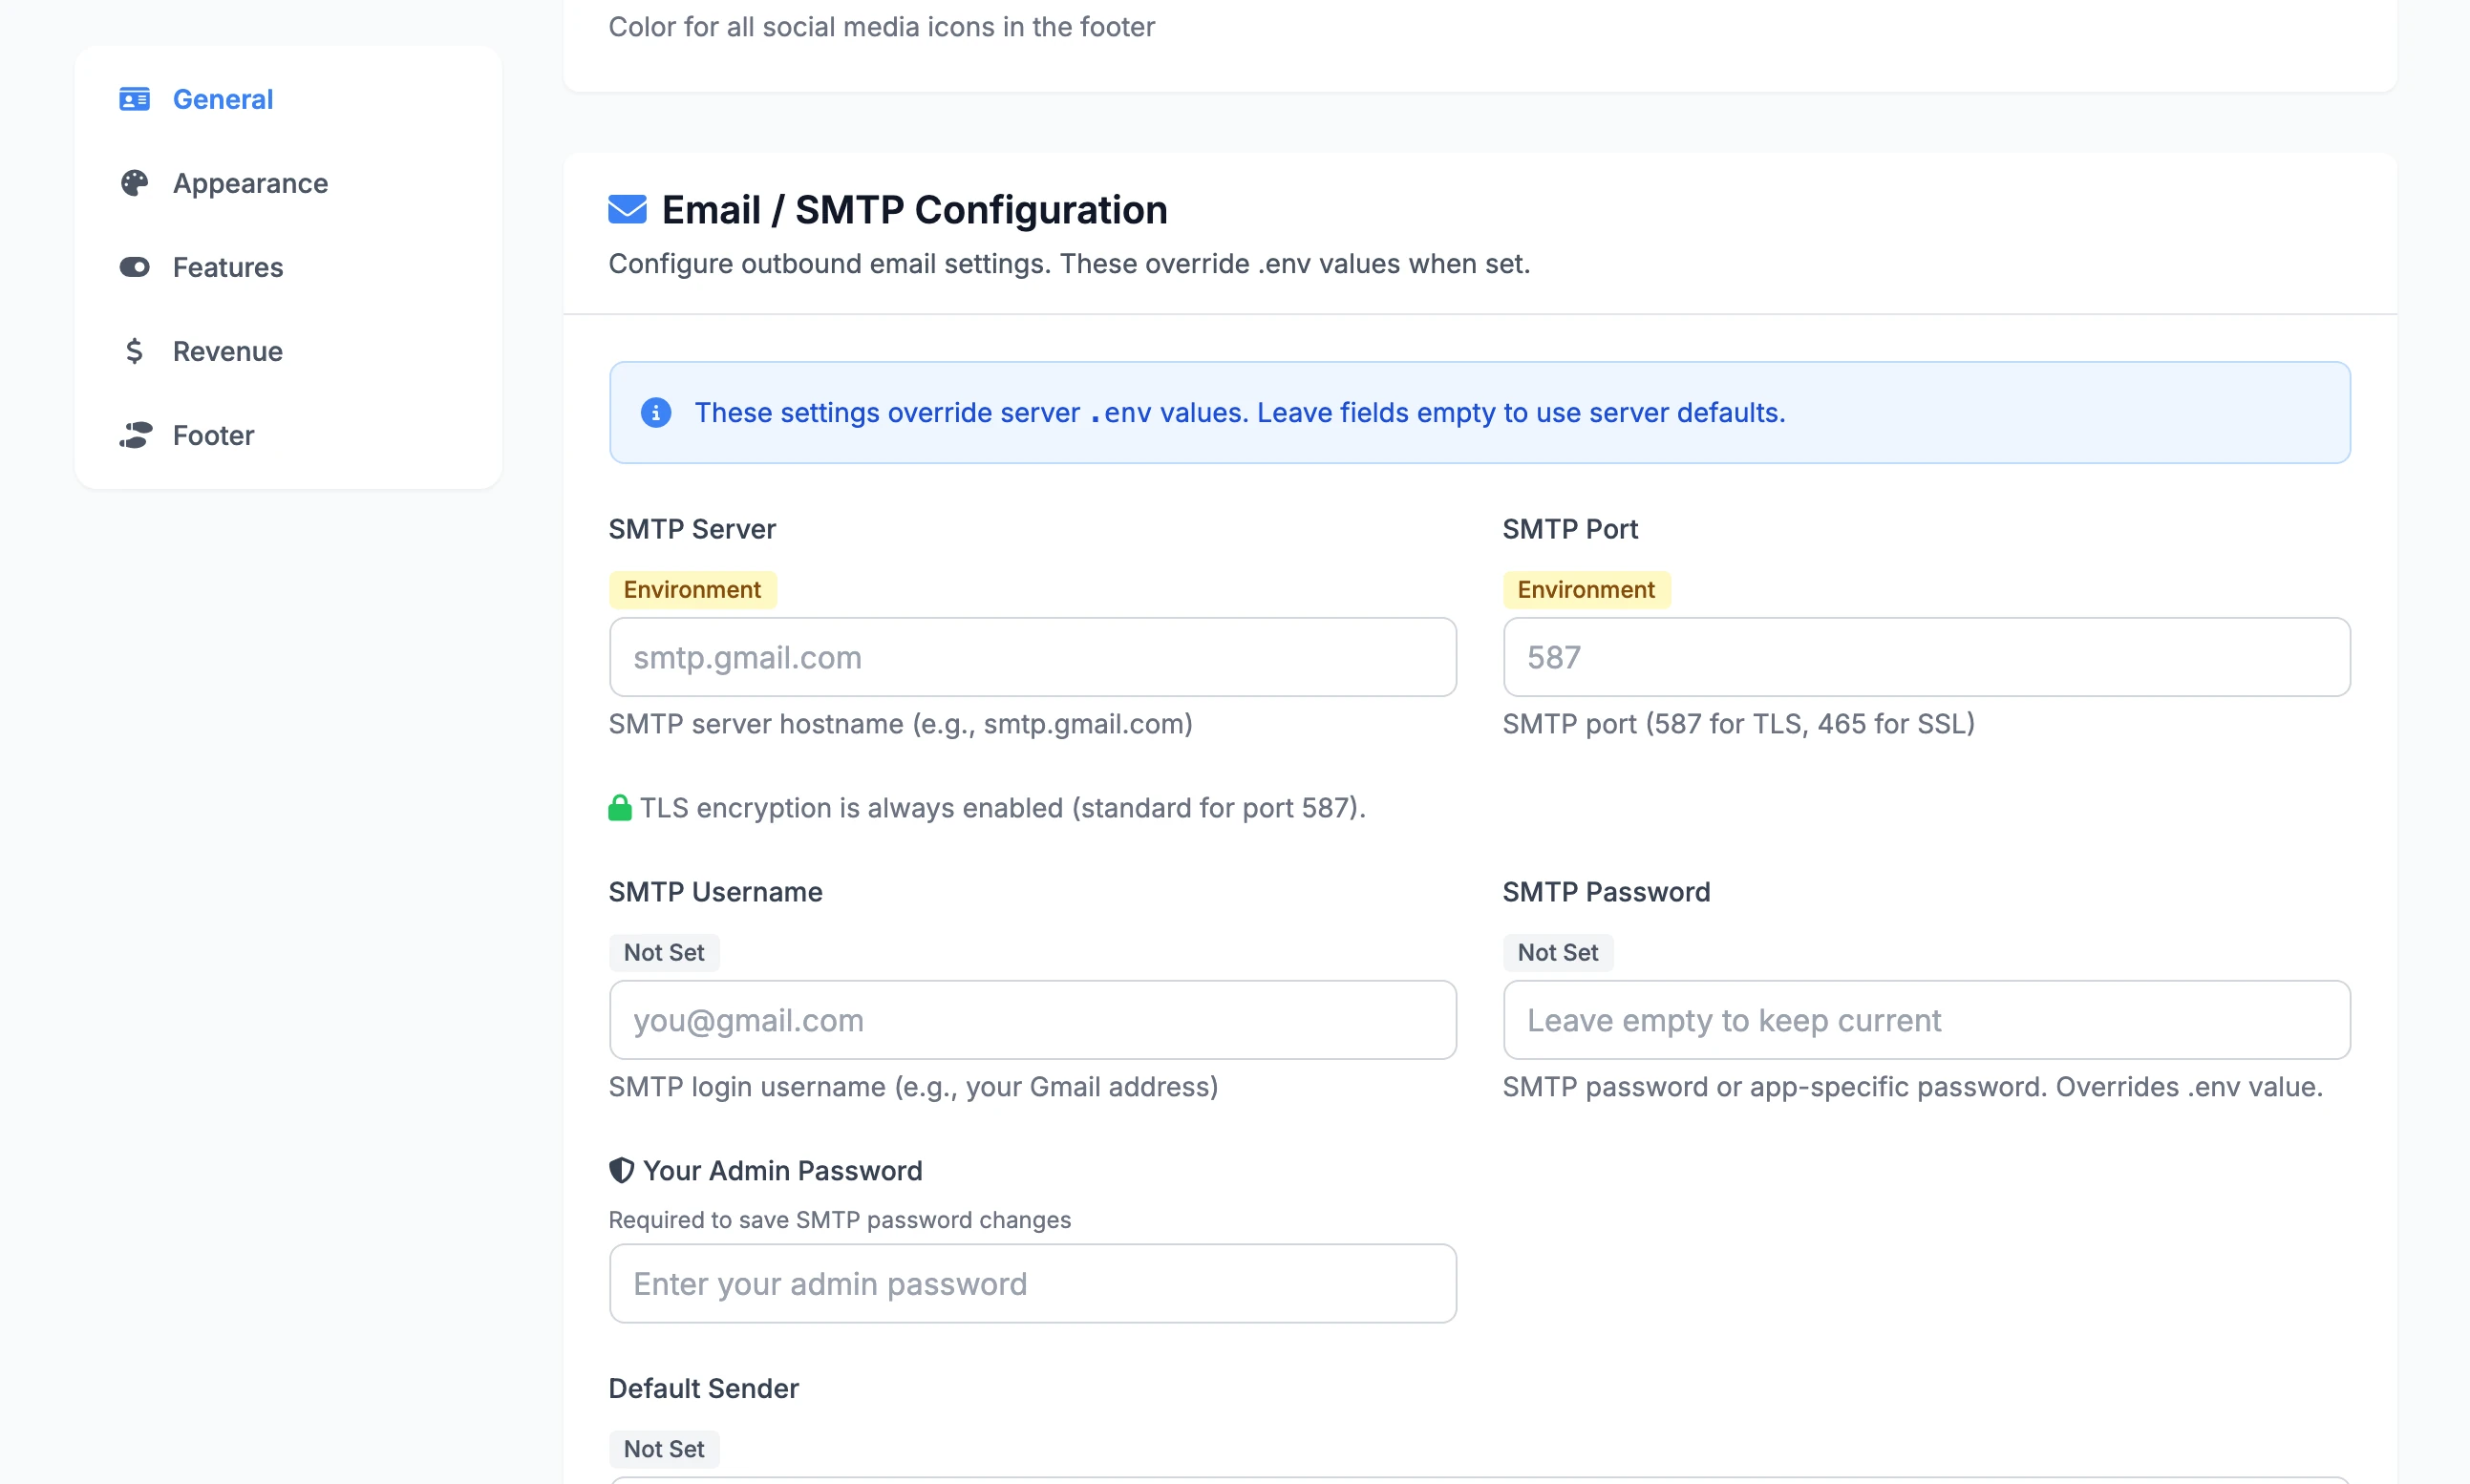
Open Site Settings from the top of the Admin Dashboard, stay on the General tab and scroll down to Email / SMTP Configuration. This is where you give Local Lab an email account to send from. Once it can send, Email under Quick Actions lets you write to every listed business that nobody has claimed yet.
Connect an email account#
Step 1: Fill in the account
SMTP Server: your email provider's server name, for example
smtp.gmail.com.SMTP Port:
587. Port 465 does not work, although the hint under the box mentions it: each time Site Settings is saved, Local Lab switches STARTTLS on and SSL off, whatever.envsays.SMTP Username: the login, usually the full email address. Notices meant for you, such as a new sign-up, review, claim or purchase, are sent to this address.
SMTP Password: the mailbox password, or an app password if your provider issues them, as Gmail does.
Your Admin Password: needed to save an SMTP Password. If it is wrong you see "You must enter your correct admin password to save credential changes" and nothing on the page is saved.
Default Sender: the From line, for example
Jane from Example Co <[email protected]>. Left empty, the SMTP Username is used.
Step 2: Click Save Settings
The password is stored encrypted with your secret key. The page now shows a masked Current value with a Clear link, which removes it.
Step 3: Click Send Test Email
The test uses the saved settings, not what is typed in the boxes, so save first. It goes to the email address of the admin account you are signed in with. The result appears beside the button: "Test email sent to" and the address, or "Error:" and the mail server's reply.
The badge beside each label says where the value in use comes from: Database (saved on this screen, which wins), Environment (the .env file) or Not Set. The .env names are MAIL_SERVER, MAIL_PORT, MAIL_USERNAME, MAIL_PASSWORD and MAIL_DEFAULT_SENDER. Two more, MAIL_USE_TLS and MAIL_USE_SSL, exist only in .env and stop counting the first time Site Settings is saved. SMTP Server and SMTP Port show Environment on a new install even with an empty .env, because Local Lab assumes smtp.gmail.com and 587 until told otherwise.
What happens without email#
The site runs. Each email is skipped and the visitor is not told.
People who register cannot sign in. They are told to check their email, no link arrives, and signing in answers "Please verify your email before logging in". The admin has no button to verify an account by hand. Accounts made with Google sign-in, or made when you approve a claim, are verified already.
Password resets do nothing. The page says a link has been sent. None is.
You get no notices by email of sign-ups, reviews, claims, quote requests or purchases.
With email working, a verification link and a reset link each last one hour.
Send a campaign#
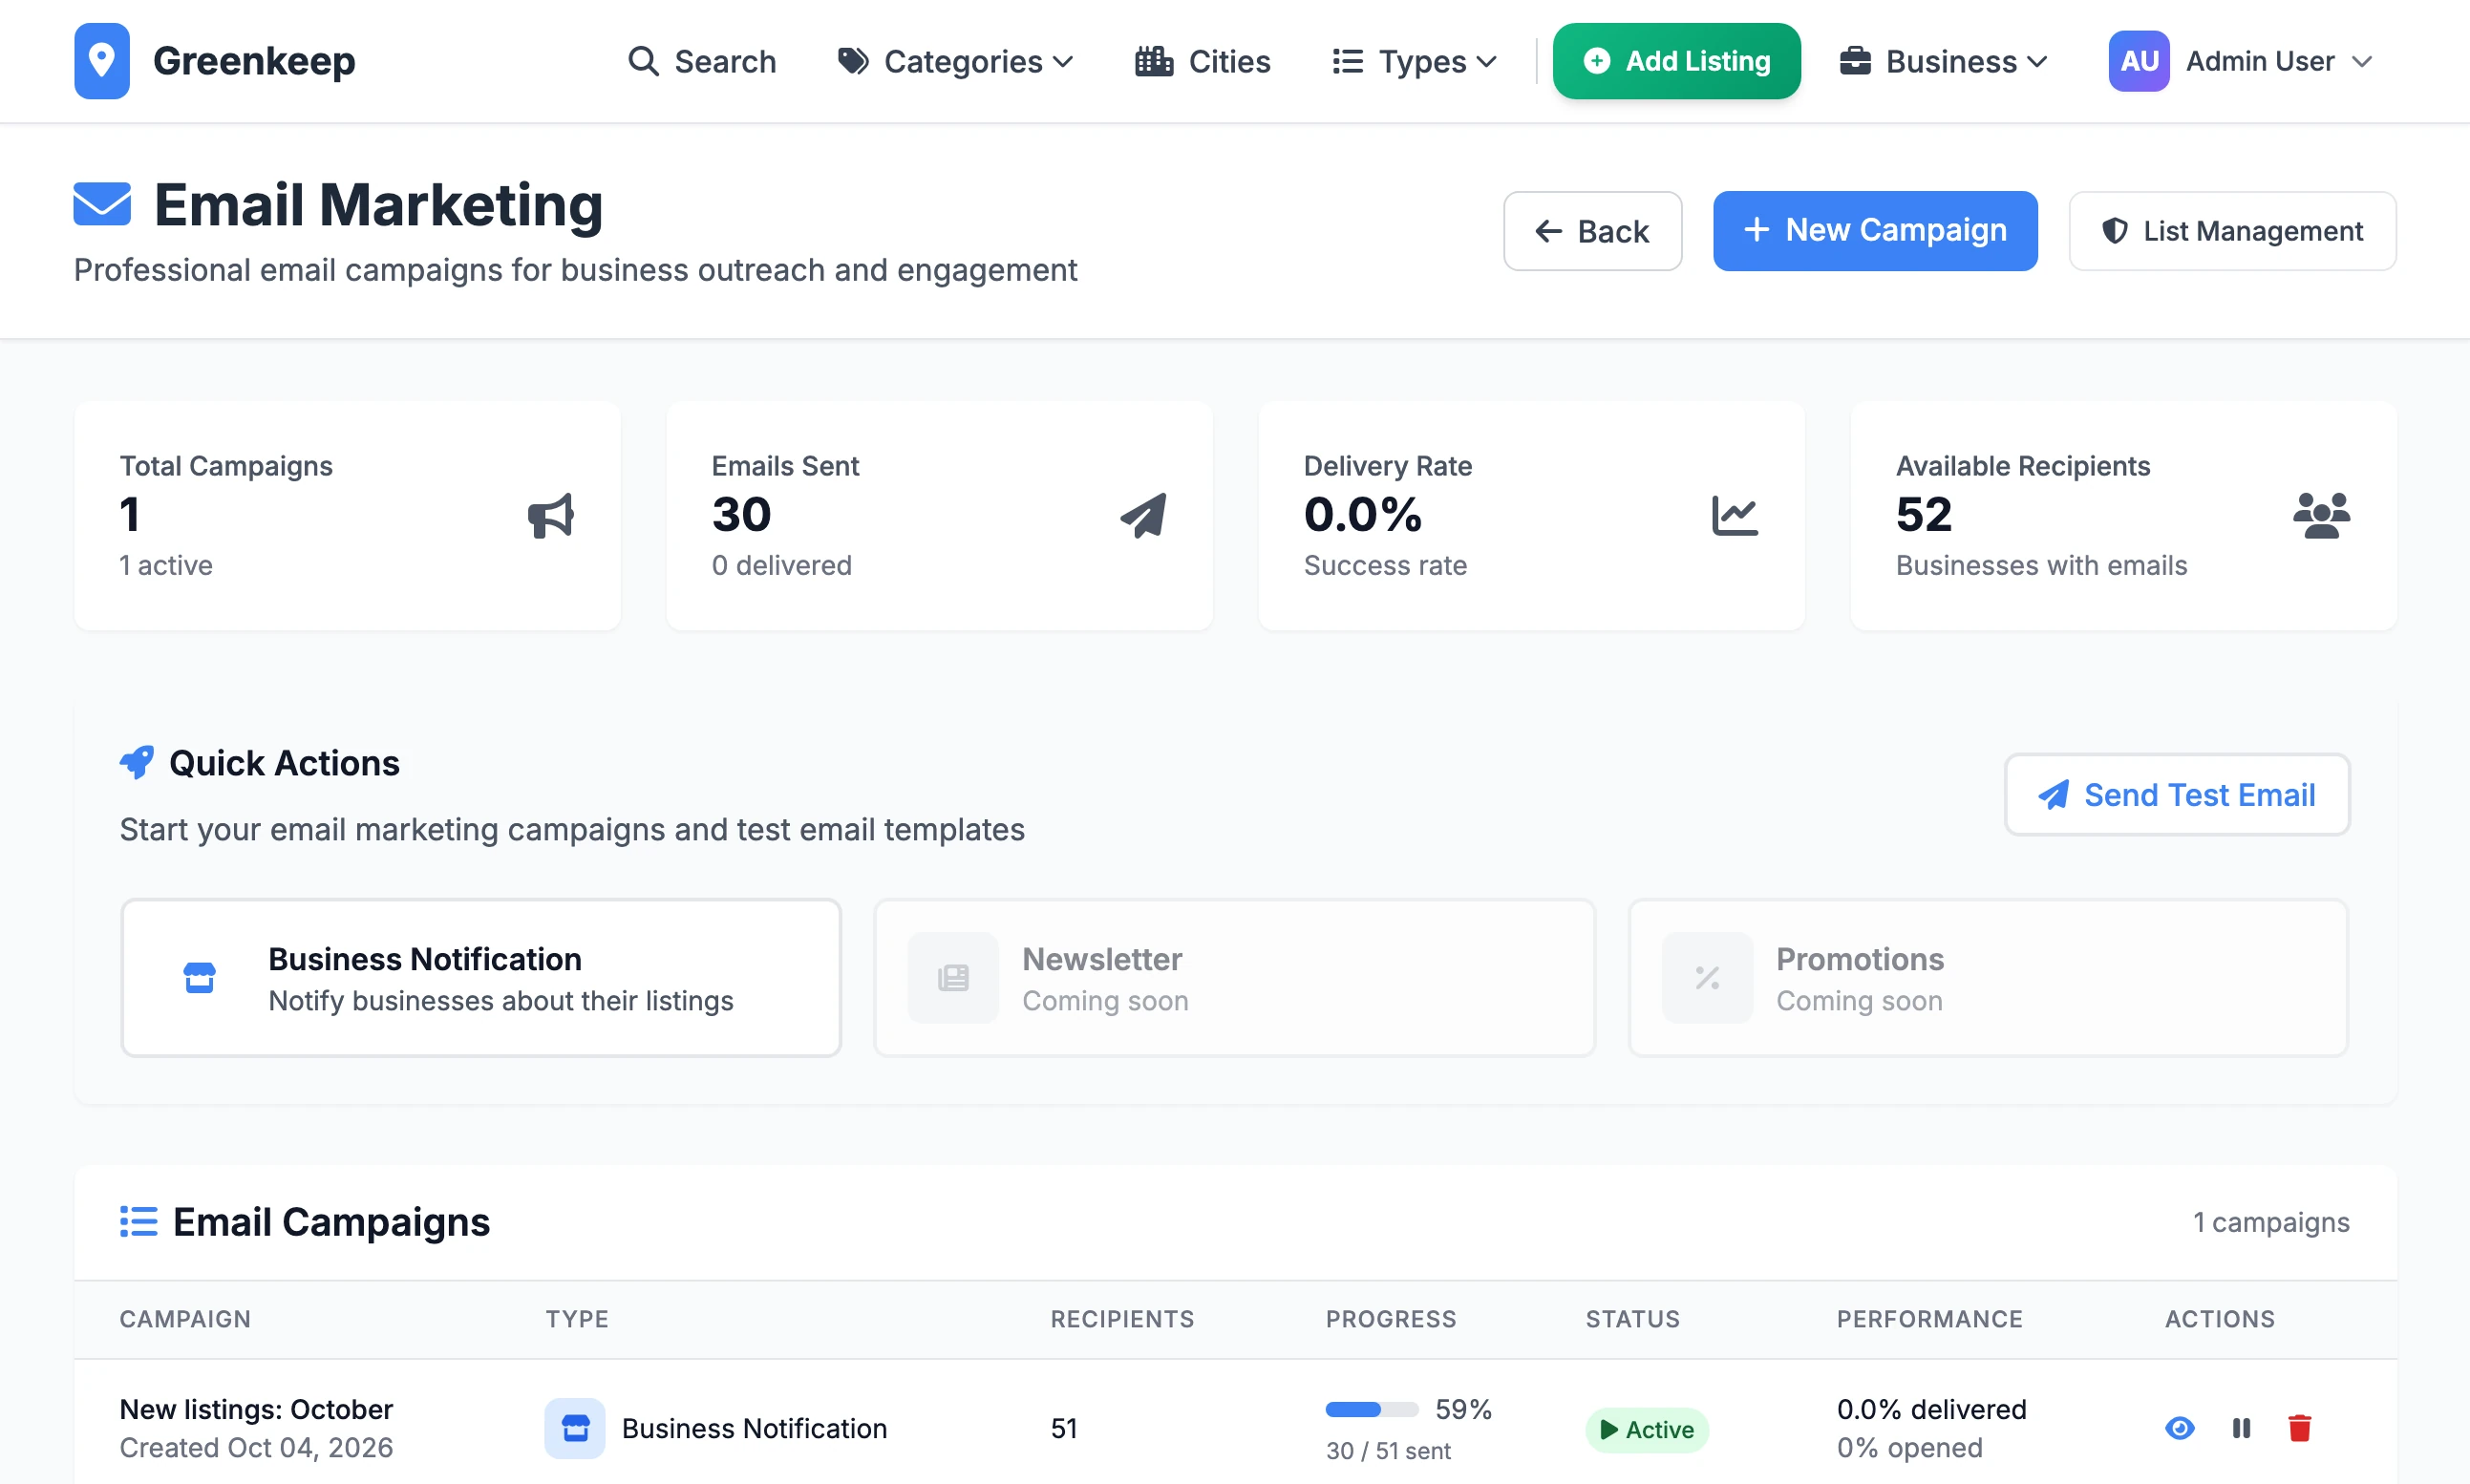
Open Email under Quick Actions. There is one kind of campaign, Business Notification: an email to each unclaimed business saying it is listed on your site and inviting the owner to claim the listing. The Newsletter and Promotions cards say "Coming soon" and do nothing.
Step 1: Set your website address
In Site Settings, on the General tab, fill in Website Address (Base URL) with your full address, such as
https://www.yourdirectory.com. The links in the email are built from it. Left empty, they point athttps://example.com.Step 2: Send yourself a test
Click Send Test Email. Search for a listing under Select Business Listing and type your own address in Test Email Address (Optional). You receive exactly what that business would. Leave the address empty and the test goes to the business itself.
Step 3: Create the campaign
Click New Campaign. Give it a Campaign Name and a Daily Email Limit, from 1 to 1,000. It starts at 100 and cannot be changed afterwards, although the page says it can. Click Create Campaign. The recipient list is made at this moment.
Step 4: Start it
Click Start Campaign. The status changes from Draft to Active. Nothing has been sent yet.
Step 5: Send a batch
Click Send Now to send as many emails as the daily limit. Further down, under Quick Actions, Send 50 Emails sends a smaller batch. The page does not come back until the whole batch has gone, one email after another.
Step 6: Repeat until it says Completed
Send another batch each day. When no emails are left the status becomes Completed.
Who receives it and what it says#
Every active listing that has no owner, or is owned by an admin, and has an email address. The listing's own Email is used. If it has none, the owner's is. The count is the Available Recipients card.
There is one email per listing, so an address on two listings gets two.
Sync Contacts on the campaign page adds listings created since the campaign was made.
The subject is the business name followed by "has been listed on" and your site title. The Subject Line previewed when you create the campaign is not the one sent.
The email opens "Hi there", shows the business name and city, then the Claim Your Listing button and a short list of reasons to claim. Its Category line is always empty.
There is no unsubscribe link.
The daily limit is a batch size#
Nothing sends a campaign on a schedule, and nothing counts emails per day. Press Send Now twice and two batches go out. To send without the buttons, run this from the Local Lab folder:
python process_email_campaigns.pyIt sends one batch for every Active campaign and writes what it did to logs/email_campaigns.log.
| Option | What it does |
|---|---|
--campaign-id 3 | Only that campaign. It must be Active. |
--batch-size 50 | Send this many, not the daily limit. |
--dry-run | Say how many would be sent. Send nothing. |
To have a batch go out every day, schedule that command yourself. The jobs that scripts/setup-crons.sh installs on a server are the nightly backup and the subscription sync only. On a server installed with the kit's deploy script, process_email_campaigns.py is not copied into the container at all, so there the buttons are the only way to send.
Reading the campaign page#
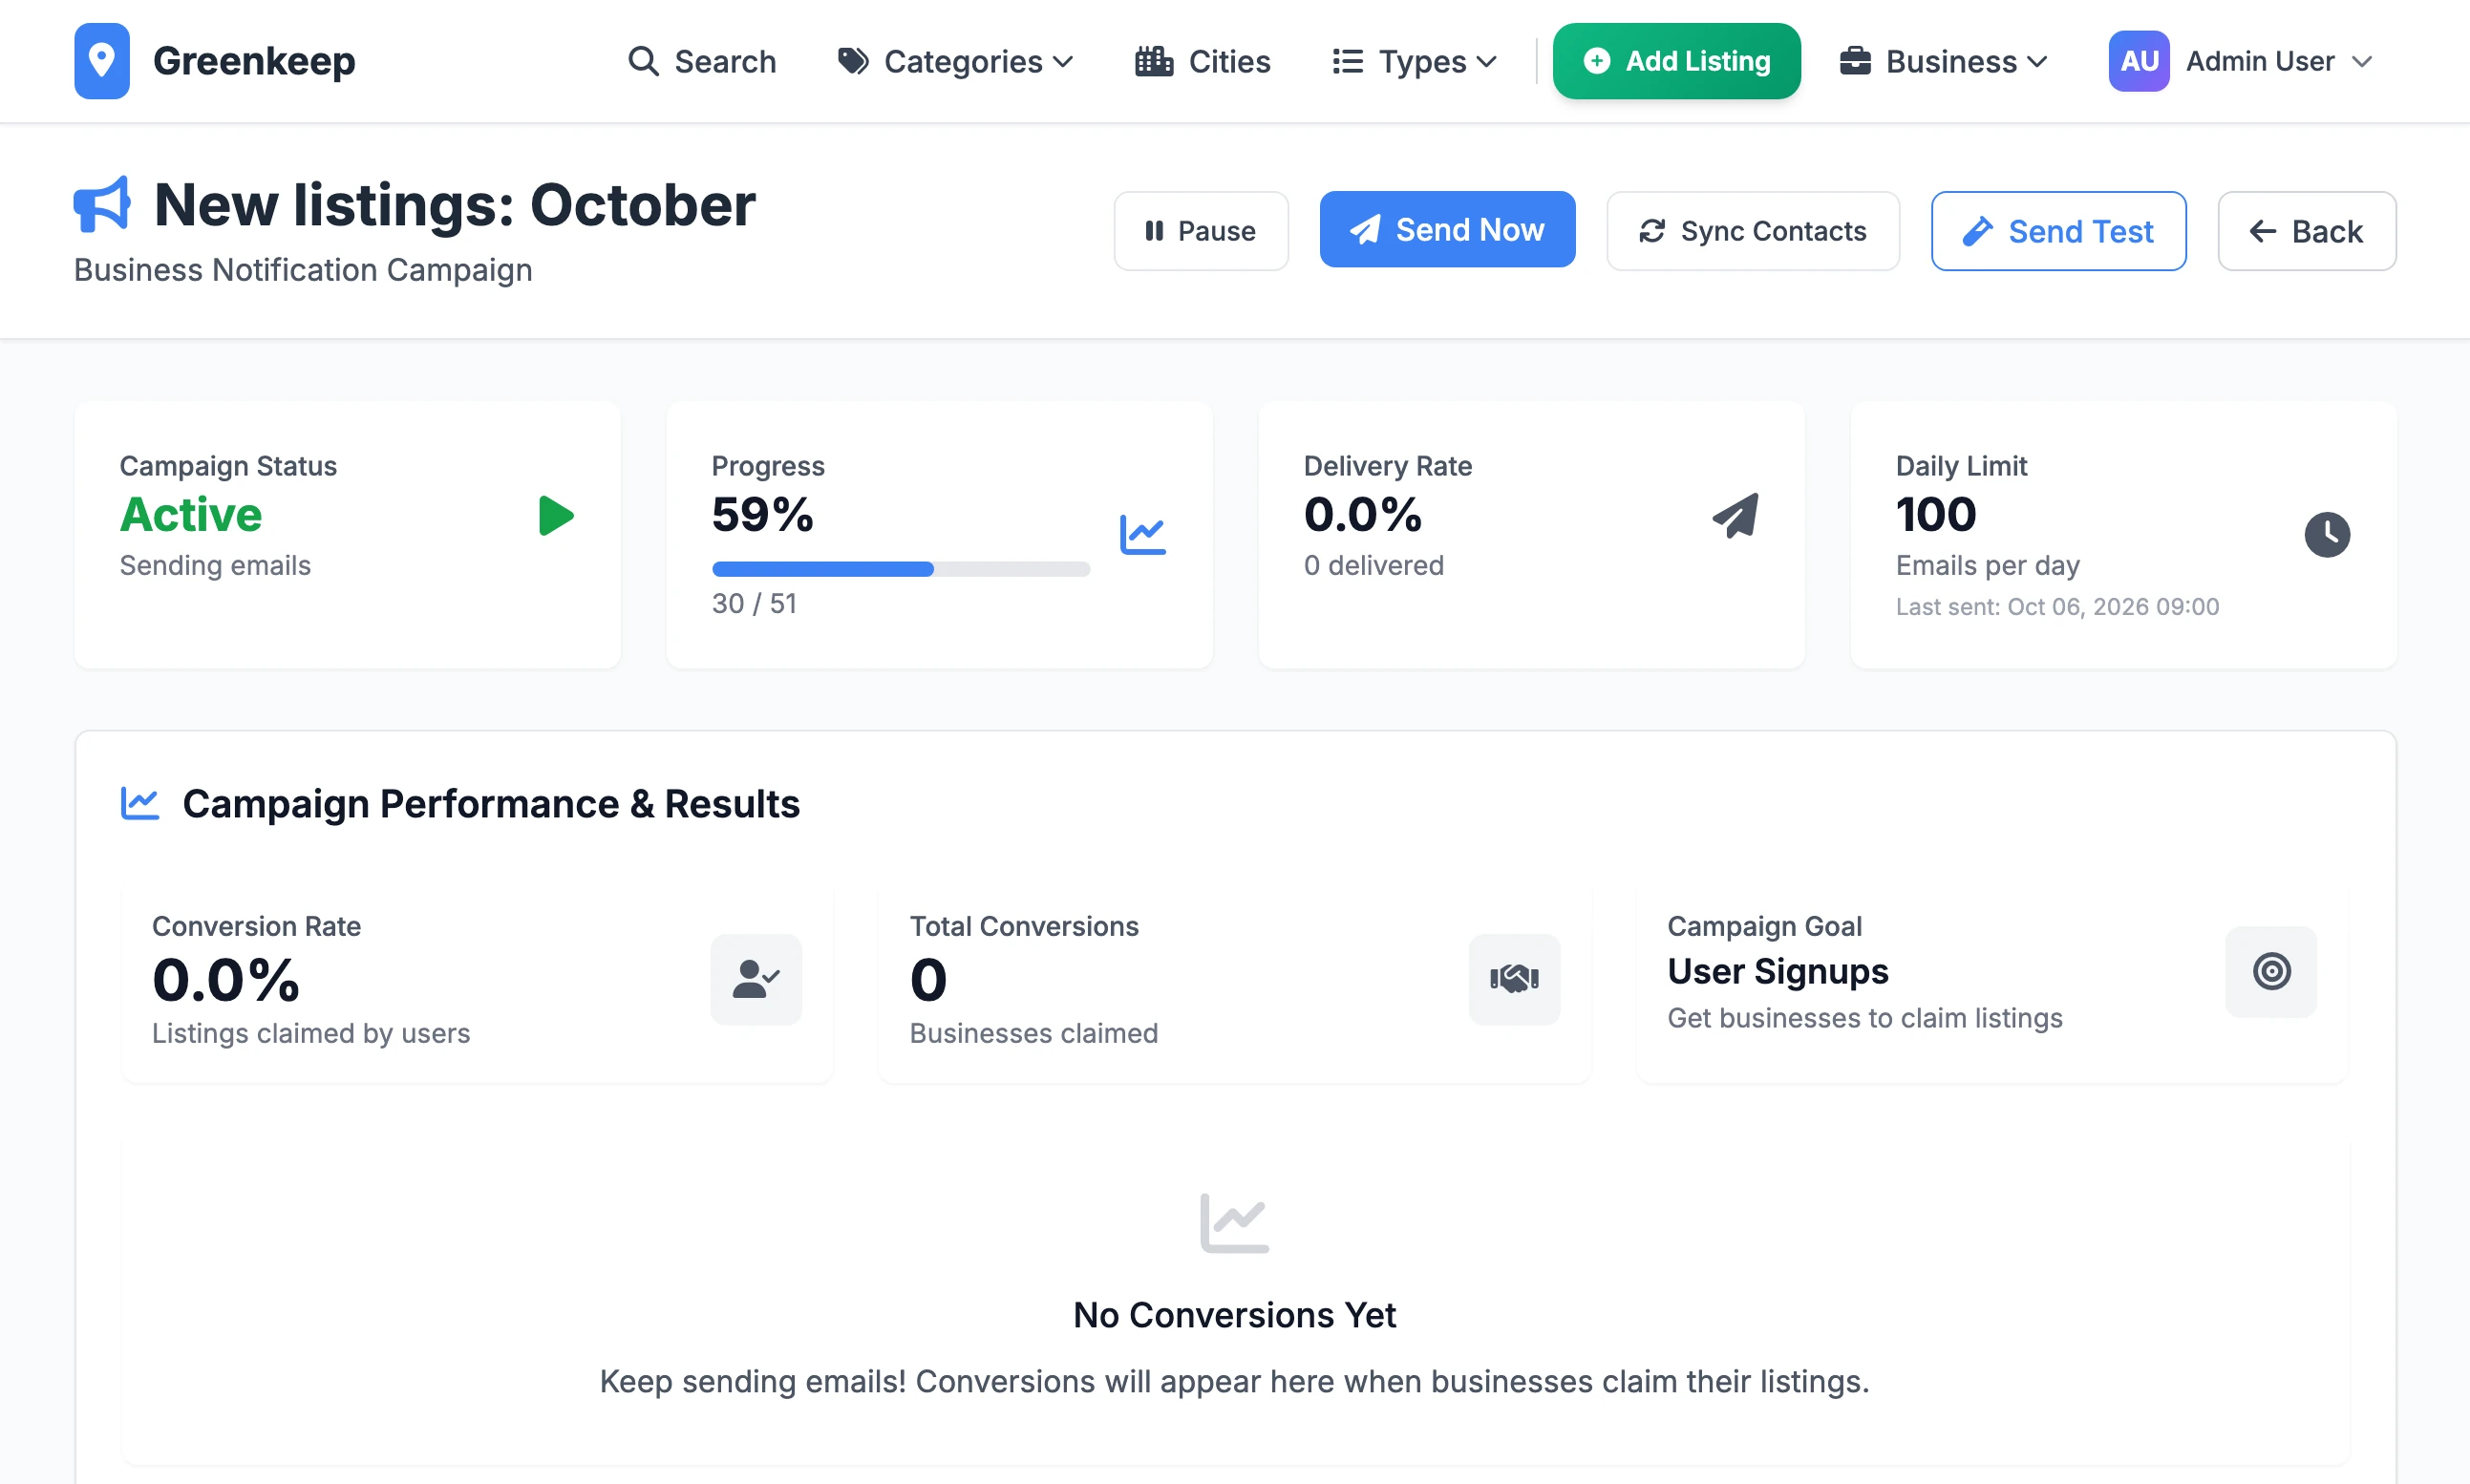
Progress is emails sent out of recipients. This is the figure to trust.
Delivery Rate, "delivered" and "opened" always read 0. Nothing in Local Lab records a delivery or an open.
Failed means the email could not be handed to your mail server, or the listing had no usable address. A failed email is not tried again.
Conversion Rate counts emailed listings that now belong to an owner who is not an admin.
Pause stops a campaign and Resume Campaign restarts it.
List management, unsubscribes and bounces#
List Management, on the Email Marketing page, lists every campaign email, newest first, with a status filter and a search box. The rest of that page promises more than version 1.2.1 does:
Verified counts emails sent and Bounced counts emails that failed to send. Recent Bounces is always 0.
The suppress button on each row writes a line to the log and suppresses nothing.
Process Bounces reads the text you paste, lists the addresses it finds and changes nothing.
Local Lab keeps no unsubscribe list. To stop writing to a business, empty the Email field on its listing. An email still waiting for that listing is then marked Failed and not sent, unless an admin account owns the listing, in which case it goes to that admin.
The script scripts/bounce/bounce_processor.py has four modes. None of them changes anything in your directory.
| Mode | What happens |
|---|---|
imap | Signs in to the MAIL_SERVER name on port 993 with MAIL_USERNAME and MAIL_PASSWORD, reads the last day's bounce messages in the inbox and writes the addresses it finds to logs/bounce_processor.log. |
gmail-api | The same, for Gmail messages you have labelled "Bounced". Needs GOOGLE_CLIENT_ID, GOOGLE_CLIENT_SECRET and a browser sign-in to Google the first time. |
db with --process, --clean, --escalate or --all | Stops with an import error. |
stats | Stops with an import error. |
Run a mode as python scripts/bounce/bounce_processor.py imap. Add --setup to imap or gmail-api to print setup notes.
The
BOUNCE_settings (BOUNCE_IMAP_SERVER,BOUNCE_IMAP_PORT,BOUNCE_EMAIL_USER,BOUNCE_EMAIL_PASS) are not read bybounce_processor.py. Only an older script in the same folder reads them, and it cannot start. Setting them does nothing./admin/email-bounce-webhookrefuses every request as Unauthorized. The token it checks,BOUNCE_WEBHOOK_TOKEN, is never read from.env.
In practice, watch the mailbox you send from. When an email bounces, correct or empty the Email on that listing by hand.
The email templates#
Every email is a file in templates/emails/. There is no editor in the admin: open the file, change the wording and save. Leave anything inside {{ }} or {% %} as it is. On a server the files are built into the site, so an edit takes effect the next time you deploy.
There are 48 files: 24 emails the site sends, each with a name ending _simple.html; base_simple.html, the frame around all of them; and 23 older designs with the same names minus _simple, which nothing uses.
| For | Files, each ending _simple.html |
|---|---|
| Accounts | verify_email, password_reset, welcome, user_signup_notification |
| Listings | listing_submission_notification, listing_pending_confirmation, listing_approval_notification, ownership_transfer_notification, business_listing_notification (the campaign email) |
| Claims | claim_listing_notification, claim_approval_notification, claim_rejection_notification |
| Reviews and the contact form | review_submission_notification, contact_message |
| Featured listings | featured_listing_confirmation, featured_purchase_notification |
| Leads | lead_submission_notification, lead_request_confirmation, lead_request_approved, lead_available_notification, lead_response_notification, lead_subscription_confirmation, lead_subscription_purchase_notification, lead_cold_outreach |
Send Test Email says "Error" and a message about authentication
The mail server refused the login. Check SMTP Username and type the SMTP Password again, with your admin password beside it. With Gmail, the password must be an app password.
Every email in my batch is marked Failed
The site could not send at all, or the script was run from a terminal with no MAIL_ lines in .env. Failed emails are not sent again and cannot be reset from the admin. Fix the email account, send yourself a test, then create a new campaign.
I see "Error processing campaign batch"
This appears when an Active campaign has nothing left to send. The campaign is marked Completed at the same moment.
A test to an address at example.com fails
Addresses at example.com and test.com are always refused as invalid, in a test and in a campaign. Use a real address in Test Email Address (Optional).
Stuck on a step? Send a message.